> For the complete documentation index, see [llms.txt](https://docs.relevant-digital.com/llms.txt). Markdown versions of documentation pages are available by appending `.md` to page URLs; this page is available as [Markdown](https://docs.relevant-digital.com/ad-revenue-insights/data-connections/setting-up-a-new-ssp-connection-through-a-scheduled-daily-csv-file.md).
# Setting Up a New SSP Connection Through a Scheduled Daily CSV File
Set up an SSP mail import with scheduled daily CSV reports when API access is not available.
If the SSP does not provide an API, follow this documentation to set up a mail import SSP through CSV imports in Yield.
**It is always better to utilise the API first, but CSVs can be used as well. Read more about how to set up an API connection:** [Setting Up a New SSP Connection with API](/ad-revenue-insights/data-connections/setting-up-a-new-ssp-connection-with-api.md)
### Setting Up the CSV Report
You need to ask the partner company to generate automatic daily reports in .CSV format. The daily email must contain exactly **one .CSV file**. In some systems, you are allowed to do this yourself as well.
Before you start, make sure the report meets these requirements:
1. The report needs to be in CSV format. Excel files don't work.
2. Only Gmail is supported as the mailbox.
3. The subject line of the report should be unique. This is especially important if you work with multiple email import SSPs coming from the same sender address.
They should send the email reports to: **dev\_\[customer]@relevant-digital.com**. You should have already been given a similar email, but if you're unsure, feel free to reach out to your Technical Account Manager or our support team, and they can provide you with the correct email.
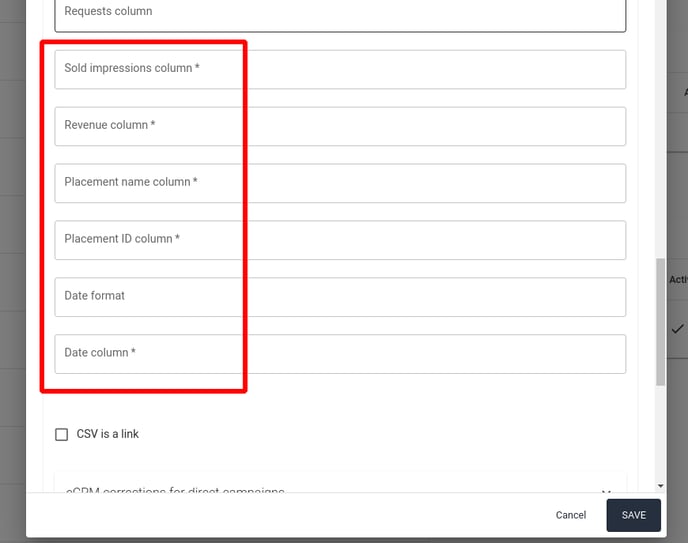
The report should include the following columns. Required fields are marked with `*`.
Required:
* **Date column\***
* **Placement ID column\***
* **Placement name column\***
* **Revenue column\***
* **Sold Impressions column\***
Optional but recommended:
* **Deal**
* **Deal ID**
* **Advertiser**
* **Ad Requests**
In Yield, you will need to set up both access to the mailbox and configure the column names in the report.
{% hint style="warning" %}
To see your Relevant email address (`dev_[customer]@relevant-digital.com`), you need help from Relevant Support because credentials are required. Contact your TAM or our support team to complete this step.
{% endhint %}
### Setting Up the Integration in Yield
{% stepper %}
{% step %}
#### Create the integration
Go to **Configuration** → **Integrations** and add a new SSP integration.
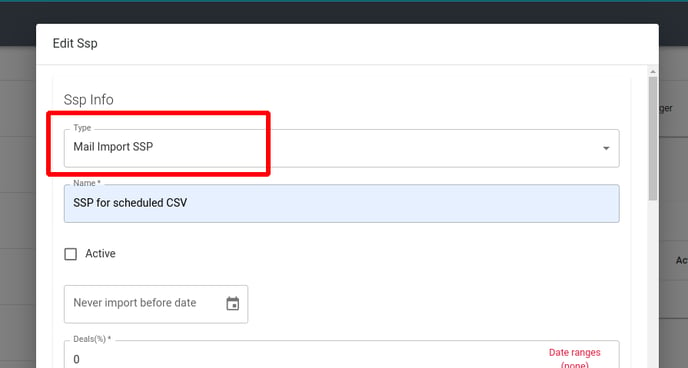
Set the SSP type to **Mail Import SSP** and give the integration a name. This name appears as the SSP name in reporting.
{% endstep %}
{% step %}
#### Map the CSV columns
Fill in the required fields `*` and as many additional fields as possible.
Make sure the column names in Relevant Yield match the column names in the CSV file.
{% endstep %}
{% step %}
#### Configure import settings
Complete any additional settings needed for your report:
* Add how the data should be handled and add [revenue shares](/ad-revenue-insights/finance-and-statements/revshare-handling-for-ssps-and-publisher-accounts.md) if needed.
* If the report currency is not EUR, enable **Use Default Report Currency** and select the value in **Default Report Currency**.
* Fill in the fields based on the column names used in the `.CSV` report file.
* Check the date format in the date column. If it is not a standard JavaScript date format, enter it in **Date Format**.
{% endstep %}
{% step %}
#### Add Gmail credentials
To add the credentials for the Gmail account at the bottom of the page, follow the same procedure as [Google Ad Manager](/ad-revenue-insights/data-connections/setting-up-a-new-ad-server-connection.md).
{% endstep %}
{% endstepper %}
#### Using Scheduled Reports with Rubicon/Magnite
By default, we use [Magnite's preferred partner connection](/ad-revenue-insights/data-connections/setting-up-a-new-ssp-connection-with-api.md). If, for any reason, there's a need to set up a Magnite connection as a mail import SSP, here are the step-by-step instructions.
{% stepper %}
{% step %}
#### Create the saved report
Create a saved report with these settings:
* **Time Period:** Yesterday
* **Columns:**
* Date
* Advertiser
* Zone
* Zone ID
* Ad Requests
* Paid Impressions
* Gross Revenue
* Deal
* Deal ID
* Buyer
* DSP
* Creative Size
{% endstep %}
{% step %}
#### Add the filter
Add this filter: **Paid Impressions >= 1**.
This removes unnecessary rows for advertisers with bid requests but no impressions.
{% endstep %}
{% step %}
#### Check the row count
Run the report manually and check the row count.
Rubicon has a 50,000-row report limit.
{% endstep %}
{% step %}
#### Reduce columns if needed
If the report is close to or above that limit, remove the **Advertiser** column.
This avoids losing data, but advertiser reporting in Yield for Rubicon will not be available.
{% endstep %}
{% step %}
#### Schedule the report
Schedule the report to send daily to **dev\_\[customer]@relevant-digital.com**.
{% endstep %}
{% endstepper %}
---
# Agent Instructions
This documentation is published with GitBook. GitBook is the documentation platform designed so that both humans and AI agents can read, navigate, and reason over technical content effectively. Learn more at gitbook.com.
## Querying This Documentation
If you need additional information that is not directly available in this page, you can query the documentation dynamically by asking a question.
Perform an HTTP GET request on the current page URL with the `ask` query parameter, and the optional `goal` query parameter:
```
GET https://docs.relevant-digital.com/ad-revenue-insights/data-connections/setting-up-a-new-ssp-connection-through-a-scheduled-daily-csv-file.md?ask=&goal=
```
`ask` is the immediate question: it should be specific, self-contained, and written in natural language.
`goal` is optional and describes the broader end goal you are ultimately trying to accomplish on behalf of the user. GitBook uses it to tailor the answer towards what is most useful for that goal.
The response will contain a direct answer to the question and relevant excerpts and sources from the documentation.
Use this mechanism when the answer is not explicitly present in the current page, you need clarification or additional context, or you want to retrieve related documentation sections.