> For the complete documentation index, see [llms.txt](https://docs.relevant-digital.com/llms.txt). Markdown versions of documentation pages are available by appending `.md` to page URLs; this page is available as [Markdown](https://docs.relevant-digital.com/general-platform/reports-and-dashboards/how-to-create-and-maintain-your-reporting-and-dashboard-templates.md).
# How to Create and Maintain Your Reporting and Dashboard Templates
This article will help you create and manage reporting and dashboard templates, both for yourself and your colleagues!
## How to Add a New Template and Choose Where It Should Appear
In **Relevant Yield**, you already have a selection of ready-to-use templates.
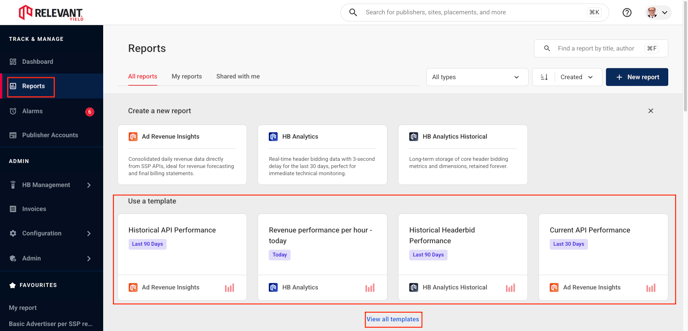
Hover over **Reports**, then click the **“+”** icon that appears. Choose a template from the preview, or click **View all templates** to see all available options.
If you wish, you can create your own templates. There are two ways to do this:
* Create a new template from scratch
* Use an existing report or dashboard reporting module and save it as a template
### Choose Pre-existing Template
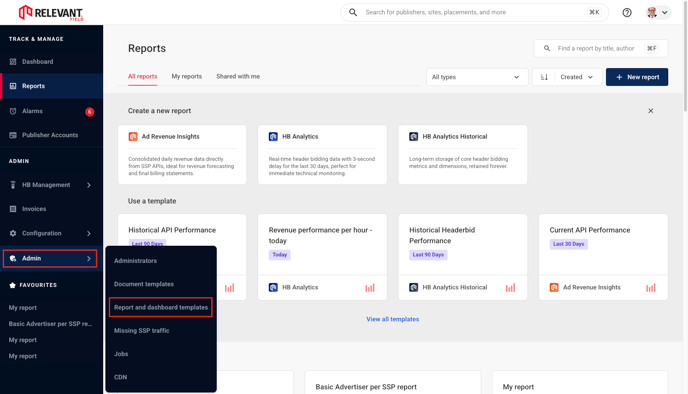
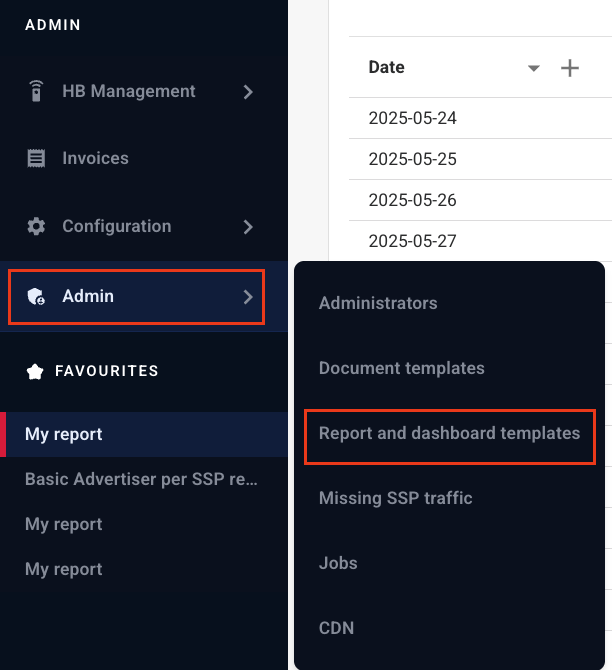
You can find the **Template Editor** in the left-hand menu, under the **Admin** drop-down. It is called **Report and Dashboard Templates**.
In this view, you also have the option to add a new template for the type of report you would like to build into a template:
* **Ad Revenue Insights** – Historical API data
* **HB Analytics** – Real-time auction data
* **HB Analytics Historical** – Long-term historical auction data
* **API Adserver Forecast** – Forecasting data collected from your ad server
### Create a New Template from Scratch
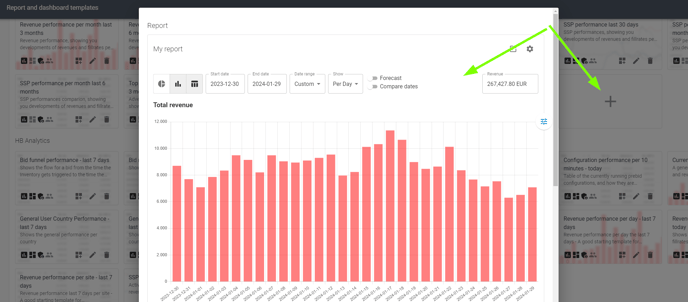
Once in **Report and Dashboard Templates**, click the large **“+”** icon next to one of the report types to open the **Add/Edit** screen. You’ll see a basic version of the report, which you can start customising by clicking the **cogwheel** icon.
When you’re happy with your report setup, give it a name and click the **OK** button. This will take you back to the edit screen.
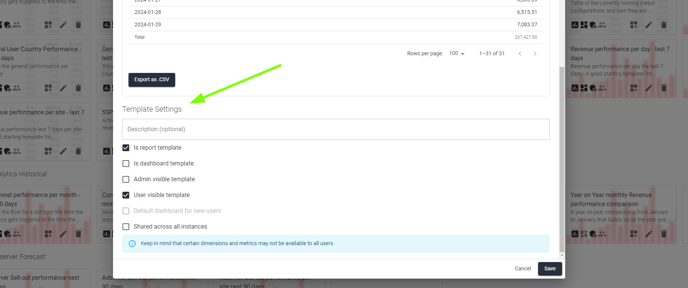
At the bottom of the page, you’ll find the **Template Settings** section:
* **Description:** This text will be shown to other users when they hover over the template in the template lists or when selecting a template.
* **Is report template:** Select this if you want the template to appear in the **Reports** menu on the left. We recommend keeping data-heavy reports as “report templates” rather than “dashboard templates” to avoid slowing down dashboard load times upon login.
* **Admin visible template:** Choose this option if the template should be visible to Admin users.
* **User visible template:** Select this if the template should be available to non-admin users, such as [Sales users](/general-platform/user-management/sales-users-and-sales-portfolios.md) or [Publisher users](/general-platform/user-management/publisher-users.md). Please ensure that all metrics and dimensions included in the report are accessible to these users; otherwise, the template will appear crossed out in their list (you can always edit this later).
* **Default Dashboard for new users:** If selected, a version of this template will be automatically created on the dashboard for new users, providing an easy introduction to the system.
You can revisit and adjust these settings as needed until you are satisfied. Once finished, click the **Save** button. The template will then appear in either the **Dashboard template** list or your **Report** selection list, depending on your choices.
### Use an Existing Report and Save It as a Template
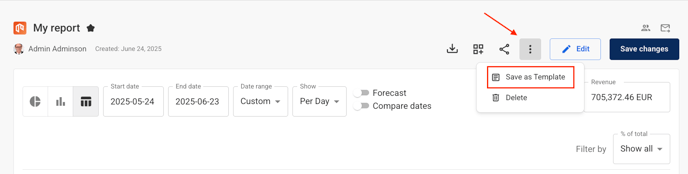
If you already have a report you’d like to turn into a template, it’s as simple as pressing a button! You can find this button under the hamburger menu in your reports.
## Edit or Remove an Existing Template
To edit an existing template, navigate to the **Report and dashboard templates** found under the **Admin** menu on the left-hand side.
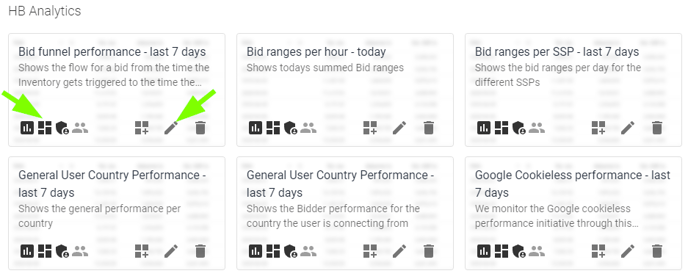
The icons on each template provide an overview of its current template settings.
The **pencil** icon takes you to the edit page (see instructions above on how to edit), and the **trashcan** icon deletes the template.
**Please note that deleting a template will not affect any existing reports you have created.** It simply removes the template from the selection lists, so you cannot create new reports based on it. Previously created reports or dashboard modules will remain intact.
---
# Agent Instructions
This documentation is published with GitBook. GitBook is the documentation platform designed so that both humans and AI agents can read, navigate, and reason over technical content effectively. Learn more at gitbook.com.
## Querying This Documentation
If you need additional information that is not directly available in this page, you can query the documentation dynamically by asking a question.
Perform an HTTP GET request on the current page URL with the `ask` query parameter, and the optional `goal` query parameter:
```
GET https://docs.relevant-digital.com/general-platform/reports-and-dashboards/how-to-create-and-maintain-your-reporting-and-dashboard-templates.md?ask=&goal=
```
`ask` is the immediate question: it should be specific, self-contained, and written in natural language.
`goal` is optional and describes the broader end goal you are ultimately trying to accomplish on behalf of the user. GitBook uses it to tailor the answer towards what is most useful for that goal.
The response will contain a direct answer to the question and relevant excerpts and sources from the documentation.
Use this mechanism when the answer is not explicitly present in the current page, you need clarification or additional context, or you want to retrieve related documentation sections.