# Welcome to Relevant Yield

Relevant Yield is the most comprehensive solution on the market for ad ops and digital sales teams to maximise ad revenue.

Relevant Yield consists of three main product sections: HB Manager, HB Analytics and API Insights. All of the product sections are accessed through a common UI, which makes it easier to navigate between them.

### Explore Relevant Digital Modules

<table data-column-title-hidden data-view="cards"><thead><tr><th></th><th></th><th data-type="content-ref"></th><th data-hidden data-card-cover data-type="image">Cover image</th></tr></thead><tbody><tr><td><h3>HB Manager</h3></td><td><em>Manage your headerbidding setup</em></td><td><a href="/pages/4SNGnS69kd9pIVoqhr4s">/pages/4SNGnS69kd9pIVoqhr4s</a></td><td><a href="/files/Pm17ekYEdnFRE0vFsgKo">/files/Pm17ekYEdnFRE0vFsgKo</a></td></tr><tr><td><h3>HB Analytics</h3></td><td><em>Analyze header bidding performance</em></td><td><a href="/pages/yKhGQiLCq7SmKLQpcnxK">/pages/yKhGQiLCq7SmKLQpcnxK</a></td><td><a href="/files/UEthG35Le0lN5tiLDlDj">/files/UEthG35Le0lN5tiLDlDj</a></td></tr><tr><td><h3>Ad Revenue Insights</h3></td><td><em>Report and reconcile revenue data</em></td><td><a href="/pages/9MMMQMRWJP2HLXAeuBZO">/pages/9MMMQMRWJP2HLXAeuBZO</a></td><td><a href="/files/JyWflbyL1kFqlpImxZOP">/files/JyWflbyL1kFqlpImxZOP</a></td></tr></tbody></table>

Depending on which product section(s) you are paying for, the setup process varies slightly.

If you’d like to learn more about the differences between the three product sections and their features, we recommend that you read the following articles:

[What is the Difference Between HB Analytics and Ad Revenue Insights?](/getting-started/what-is-the-difference-between-hb-analytics-and-ad-revenue-insights)


# What is HB Manager?

## The HB Manager is a way for the User to control a prebid based Header Bidder through the Relevant Yield Interface

Handling a prebid setup is usually done by a publisher's development team or through a 3rd party wrapper. HB Manager differentiates from these basic options in a few ways:

{% stepper %}
{% step %}
When using the HB Manager the settings and code changes that would normally require developer involvement are handled through the Relevant Yield interface.

Anything related to the Headerbidder is handled through relevant Yield after the initial deployment is made to a website.

This gives the AdOps/Yield optimisers a lot more control and optimising or experimentation possibilities as they are not dependent on the development team as soon as they need to do a change.

Tasks, such as Prebid updates, Floor-price changes, Bidder/SSP addition & removal, dimension changes etc. all become possible to do without developers - placing the control where it should be.
{% endstep %}

{% step %}
You do get some of the same benefits by using a 3rd party wrapper as you would with HB Manager except for certain big differences:

We strive to make EVERY setting available to your AdOps/Yield team with the HB Manager. Most 3rd party wrappers give the user very little control over the settings. So as an AdOps/Yield user you are basically just switching your dependencies from your own development team to the 3rd party wrapper's support team. This is not our goal with HB Manager. We want to give all that power straight to the AdOps/Yield optimisers. Enabling them to experiment and build advanced setups without interruptions.

You also get real-time feedback on any changes you make as we usually add the HB Manager with the HB Analytics. This enables you to build advanced alarms to monitor any changes you make.
{% endstep %}
{% endstepper %}

Thus HB Manager is an extremely powerful tool and since it requires no coding skills the users only need to have a basic understanding of the header bidder concept.


# What is HB Analytics?

HB Analytics drives value for publishers and sales houses by monitoring Header Bidding setups, making sure they run efficiently and tracking new ways of optimisation. It monitors your Header Bidding setups and makes sure you get advanced comparable data. Our solution is built to measure and analyse Prebid based setups, but can also be customised for other solutions.

See also: [What is the Difference Between HB Analytics and Ad Revenue Insights?](/getting-started/what-is-the-difference-between-hb-analytics-and-ad-revenue-insights)


# What is Ad Revenue Insights?

Relevant Yield's Ad Revenue Insights module enables multiple SSPs and Adservers’ monitoring and reporting in one interface. The system provides a detailed, easily customisable view to all sales channels. It makes follow-up, reporting and revenue optimisation much easier and saves publishers time for more productive work.

See also: [What is the Difference Between HB Analytics and Ad Revenue Insights?](/getting-started/what-is-the-difference-between-hb-analytics-and-ad-revenue-insights)

### Related articles

* [Ad Revenue Insights - Dimensions and Metrics](https://help.relevant-digital.com/e3t/Ctc/OO+50013/cyHXp04/Jll2-6qcW7Y8-PT6lZ3lDN2xN6Y783_10N3wxh0rxqcJ3W2RNstg3z8Hr0W8L6H_-3LPLpmW6yH8YY5Lvf1TW6Hvdlt5Qy38BW7VwWZ_4hLC37N41y3n3kkcWpW4lN8Bf5LdC5dW66VvFM7HWtykW5kjl5_7PFmVkW4Z3k-h82L4RxVjSF5Y7WjwTcW28gZ5c5NrXqzVjMCgL5_VyZXW3TgHrz21z8sCW6gZN_q3V4T0MW5hQKML6-X0rYW4-7MZp5ly8ZvV3Qnth7dgmK4W3fjhGd5634pnW41kkFF3L6nzZW4TccHR2JLlcrN78NPRvz_6btW6PSP5M1dhnTBW5T8BW019fXy7f8yBDG204)
* [Mapping Ad Server and SSP Placement IDs to Relevant Yield Ad Revenue Insights Placements](https://help.relevant-digital.com/e3t/Ctc/OO+50013/cyHXp04/JlY2-6qcW95jsWP6lZ3myN3PHkmj9JP4YW79yjZ65pVnfVW2yFYZk1kZ7xlVdWTkC3-rCg3W3PgcTK99pQbNW58VXCy7Rh6tQW3glTQM2fCgj6W5wzVBk5byJrXW4d6xWH5g_SlTW8RJx_g68JqQ-W2Lj-vk5GCXt9W7n6ZCt57WqCLN2rQTPpCdg6hN1N97ypptn_5W1-gyjn1GlPpWW93SSDf1VfNl3W5H0hJ54l3Q68W6x9QJk8dM9f3W8YPB286tzXR0W5Z87zv5rrDpZW18HH8g9jFdcFW35Kl9t5ZnL-xW3N7Yyq80CgNcW75JlzJ1J7B5GW645j6w28n0zfW2X6dyp44ZfF9W4cVb3n7gVgjzW8ncN3m1xQWhGW7rJBqb8BS4F8W6HRypZ4VG0mGf7RmLYj04)
* [Setting Up a New Ad Server Connection](https://help.relevant-digital.com/e3t/Ctc/OO+50013/cyHXp04/Jll2-6qcW7Y8-PT6lZ3pnW7pPK9y6xmywGW6wCGsD9bS_XsW3SWxWb4h0LgVVbP4J95ClD8rN5CwYrB9LxdyW3vCJ3k1td5SCW4b26pZ59zJ72W1md0n81SJsHtW8dPWDk1ypYn_N7lg-f5vbq-wVsbST83sB2gRN4GtXV6_F4s6W59np5Q1jpG6FVTDS6s2JGy2wW1TYXR31t8SfJW4YNZXt4P8Hz1W9l3wvx6mJHzbW3L2pq13kMSL1W1nmfHb7QLpM0W2HzTxJ1Q7MyMW1KS_kz9bgzfHW2qmZtM9hGWM2W3cY3DW5Zbbd6W7kh4Jv53HLrnW7WRRwC3lY49RN2tM6YQ8B8CRf5KGZB204)
* [Setting Up Your Ad Revenue Insights Alarms](https://help.relevant-digital.com/e3t/Ctc/OO+50013/cyHXp04/JlF2-6qcW8wLKSR6lZ3nNW6jcCCl7rCJLdV2rSZ36JJqg9W76J1pj2H-fC2W2907Pj4TRzG2W7gtTc64qNGZsW5PH0BK56Wsv_W1HNZr5272STBW3-lkHC8nbzx2W4-dXMC70gCjWW66RlQm8xZW5lW5s7wry6XDXK1W2P8NJ92Ck9qCW3bmrty2gTdblW5lTz-T90jzS6W6qbw_w56sbWYW8g69d98lzPs1W6fN8MC3wCPw_W8by1kc2b5q2wW8cZR6j2llwjBVB2J2m632vgHW8DL6Nc9ksY7MW4rkhvh7zPygtW1myRt483MJk6Vhb1Gn2WXbHyW4fyTn92FDZG-W8mgsDk3c_LKtVbm8kW3bPb0ZW68sBpm8n20yZf76Lhv004)
* [How to Export Reporting Data through Ad Revenue Insights' Pull API](https://help.relevant-digital.com/e3t/Ctc/OO+50013/cyHXp04/JlY2-6qcW95jsWP6lZ3nFW24ZlWB8f9K7gW7x61ll27y-GGW5tN3Gs5zc_hBVpkrxV4dM501W2rmSF63GwNMvW2rQVhv4t_HmsW3_g8fL3ShNMgVynTwQ1rRlKQW4Vh1K91txHmYW8dq9fv355HjlW5j9Ylp76yMDHW3llWN84QqFJyN4F7wVMBNfh1W7J-h-Q10jjyqW1Qzc4S1mjtWFW1qJ3dS7XBbj_N8GJ_zjgpB_0VQG8g7271_nmW1qwpQ86PGXm-W3ndhD64qGlXWW4BPgGp7FysjyW1l63L34_h1hBW3TLmM42Wm0B_V_CykV86tvQyN96JVryyJKj0W39L-6f68GJPzW30-9lB5R12CsV590Jd6FypR0W8LxYxY5d232jW1BJkbf6P998qf2CSsdC04)


# What is the Difference Between HB Analytics and Ad Revenue Insights?

Compare real-time header bidding diagnostics with daily reconciled revenue reporting.

**HB Analytics (HBA)** shows you what happened in your header bidding auction, in near real time — the calls your site made and what came back. **Ad Revenue Insights (ARI)** shows you what your SSPs and ad server confirmed as valid, reconciled revenue, once a day. Use HBA to catch and debug problems as they happen; use ARI to trust the numbers for reporting and forecasting.

### Quick comparison

|                      | HB Analytics                                               | Ad Revenue Insights                                           |
| -------------------- | ---------------------------------------------------------- | ------------------------------------------------------------- |
| **Data source**      | Your site's own header bidding calls                       | SSP and ad server APIs                                        |
| **Update frequency** | Near real-time (\~3 second delay)                          | Once daily                                                    |
| **What it measures** | Raw calls, bid responses, response/render times            | Reconciled, validated revenue                                 |
| **Granularity**      | Site, placement, bidder — call-level                       | Advertiser, buyer, campaign — platform-level                  |
| **Best for**         | Technical monitoring, alerting, validating a config change | Revenue forecasting, financial reporting, commercial analysis |
| **Works with**       | HB Manager, or any other header bidding wrapper            | The Relevant Yield platform                                   |

### Why the two won't always agree — and that's useful

HBA logs every bid your site's calls actually returned. ARI reports what the SSP and ad server later confirmed as valid revenue, after their own reconciliation. Some of what HBA logged gets filtered out along the way — so the two datasets are expected to diverge, not just measurement noise.

That gap is itself useful: comparing HBA's call-level numbers against ARI's reconciled ones is how you spot rejected traffic and potential revenue leakage — if HBA shows meaningfully more bid activity than ARI ends up crediting, that difference is worth investigating.

### Which one do I actually open?

| Question                                                              | Go to                                                     |
| --------------------------------------------------------------------- | --------------------------------------------------------- |
| Did a bidder's activity just drop?                                    | **HBA**                                                   |
| I changed a timeout/config — did it help?                             | **HBA**                                                   |
| What did we actually earn from this bidder last month?                | **ARI**                                                   |
| My SSP's own dashboard shows different revenue than I expected — why? | **Both** — the gap is the rejected/filtered traffic above |
| I need numbers for a forecast or a finance report                     | **ARI**                                                   |

<br>


# Relevant AI

Relevant AI is your dedicated AdTech assistant, seamlessly integrated with the Relevant Yield platform to enhance your programmatic advertising workflow.

{% hint style="info" %}
Relevant AI is currently in the testing phase and will undergo ongoing updates and enhancements. If you notice any unusual behavior or have feedback to share, please don't hesitate to [get in touch](/support-and-troubleshooting/contact-us)!
{% endhint %}

## Getting to Know Relevant AI

Relevant AI is a built-in support feature within the Relevant Yield platform, designed to assist with tasks related to programmatic advertising. It combines knowledge of the platform with practical AdTech expertise to help streamline daily operations.

You can use Relevant AI to support activities such as **analysing campaign performance**, **troubleshooting** header bidding configurations, or **identifying opportunities** to improve revenue. It is intended to provide quick, useful guidance within your existing workflow.

Please note that the Relevant AI Assistant is available to **Admin users only**.

<div data-with-frame="true"><img src="/files/7281375ed7d8ed4d83c7571522b6f97a58b04eca" alt=""></div>

## Core Capabilities

### Data Analysis and Reporting

Relevant AI helps you interpret your advertising data more effectively. It can generate complex reports, analyse performance metrics, and highlight key trends. For example, you might ask, “Show me the top-performing placements from last month” or “Compare revenue between Q1 and Q2.”

### Real-time Problem Solving

If you run into technical issues or have questions about specific features, Relevant AI can offer immediate support. It draws from detailed documentation covering both the Relevant Yield platform and Prebid.js, and can assist with tasks such as configuring ads.txt or setting up header bidding.

### Performance Optimization

Relevant AI can analyse your setup and performance data to suggest practical improvements. It may help identify underperforming placements, detect unusual revenue patterns, and support informed, data-driven decisions.

### Multilingual Support

Relevant AI supports multiple languages and can respond in your preferred language. It maintains accuracy in AdTech terminology, ensuring clear and effective communication across language preferences.

## Practical Applications

**Quick Insights**

Ask for immediate data highlights such as:

* "What's our best-performing ad size?"
* "Which devices are generating the most revenue?"
* "Show me the top 5 placements by revenue"

**Report Generation**

Generate customised reports to track performance over time:

* "Compare today's revenue with our weekly average"
* "Show me the revenue breakdown by SSP for the last quarter"
* "What's our average eCPM trend over the past month?"

**Technical Guidance**

Get step-by-step assistance with configuration tasks:

* "Guide me through setting up a new Prebid adapter"
* "Help me configure floor prices"
* "How do I implement lazy loading?"

**Performance Analysis**

Investigate recent changes or issues in performance:

* "Why did we see a drop in revenue yesterday?"
* "Which placements should we optimize first?"
* "Why is our fill rate dropping?"
* "Check if we have any timeout issues in our header bidding setup"

**Optimization Opportunities**

Identify areas for improvement to maximise results:

* "Identify placements with declining performance"
* "Find SSPs with high timeout rates"
* "Show me opportunities to increase fill rate"

## Getting Started

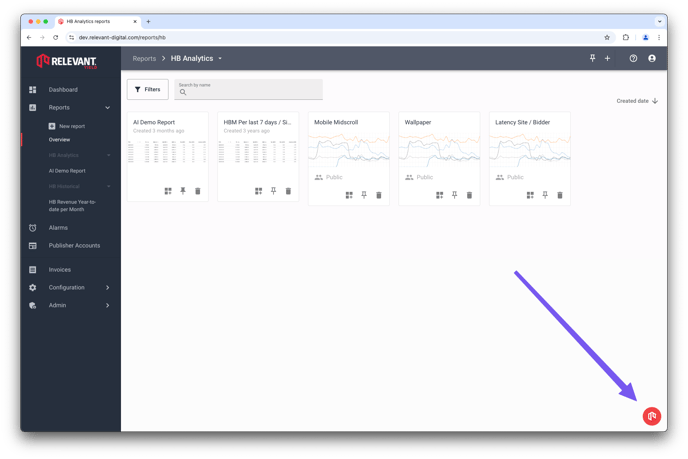
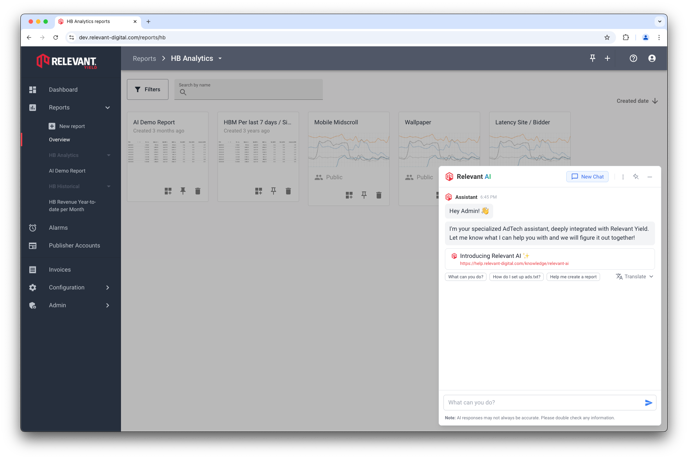
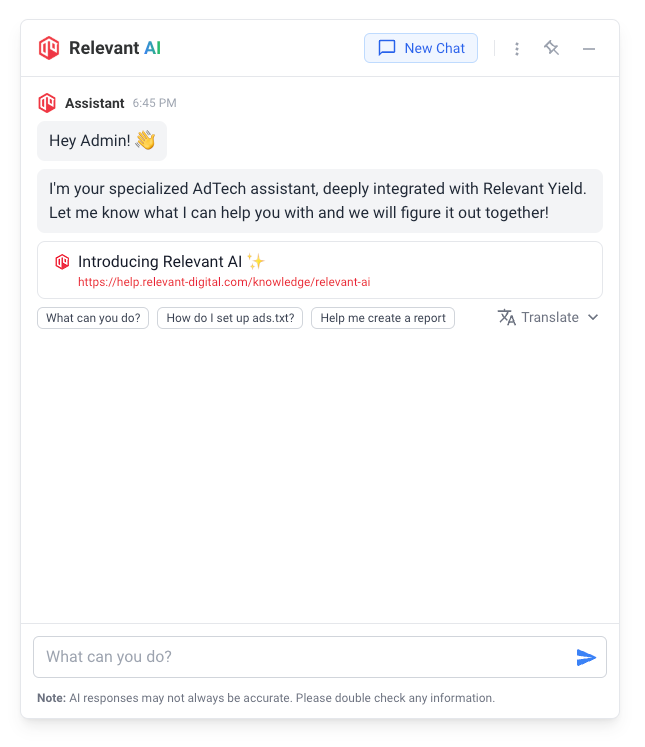
To open and start using Relevant AI, click the button located in the bottom-right corner of the Relevant Yield platform. It is accessible from any page within the platform.

<div data-with-frame="true"><img src="/files/40f31d18d700d8e8192ef1272d44b4fa605ca612" alt=""></div>

<div data-with-frame="true"><img src="/files/d74f5a22c5577a5c2abb10c4119bb15868999619" alt=""></div>

Simply type your question and press **Send**. Relevant AI will respond promptly and may offer suggestions to help you follow up or refine your request.

If you wish to start a new topic, you can clear the current conversation by clicking the **New Chat** button at the top. This is helpful when you want to begin a completely new query without carrying over the context from previous messages.

### Pinning

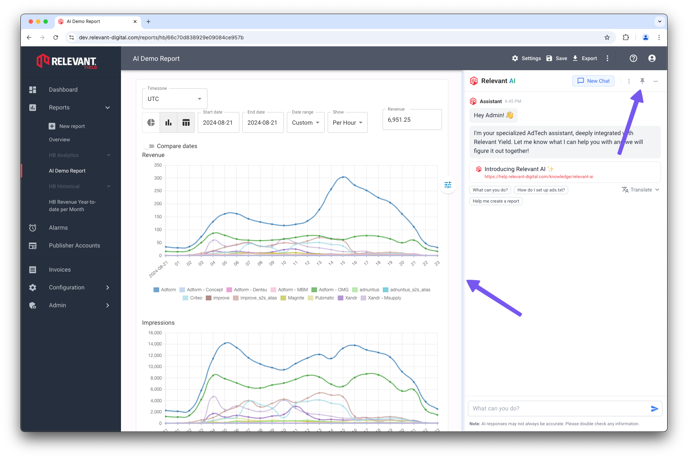
When viewing a report, you may find it useful to pin the AI window to the side of the screen. To do this, click the **Pin** button in the top-right corner of the AI window. Once pinned, you can freely resize the window by dragging its edge to suit your workspace.

<div data-with-frame="true"><img src="/files/8ddbf8e430edc957c7dd4f5575134afaf72bde67" alt=""></div>

<div data-with-frame="true"><img src="/files/21cae7b2c20b2c98f25034351a0c264d3a724f8a" alt=""></div>

## Best Practices

1. **Double-check responses**, as they may not always be accurate
2. **Be specific with timeframes** when requesting data analysis
3. **Provide context** when asking technical questions
4. **Ask follow-up questions** to dive deeper into any topic
5. **Use the suggested queries** as inspiration for your own questions

## Related articles

* [Sharing Reports in Yield](/general-platform/reports-and-dashboards/sharing-reports-in-yield)
* [How to Activate Relevant AI](/getting-started/relevant-ai/how-to-activate-relevant-ai)
* [Publisher Users](/general-platform/user-management/publisher-users)
* [Logging in to Relevant Yield](/general-platform/user-management/logging-in-to-relevant-yield)
* [Adding a New Publisher Account](/general-platform/inventory-management/adding-a-new-publisher-account)

## Breadcrumbs

1. [Help Center](broken://spaces/thyujPhgXh1WtJZy8bjr/pages/9a8d83aa36eaf141957b99237b8124839d337e0e)
2. [Relevant Yield - General Features](/general-platform/relevant-yield-general-features)
3. [Relevant AI](broken://spaces/thyujPhgXh1WtJZy8bjr/pages/F48NIqgElrDr4aPMK7QH)


# How to Activate Relevant AI

To activate Relevant AI, you will need to review and approve an additional AI disclaimer. This outlines the data processing terms required to enable the feature. While there are no additional costs, acceptance of the disclaimer is necessary before activation.

To request the disclaimer, please contact your Technical Account Manager. Once you have reviewed it, confirmation of acceptance via email will be sufficient to proceed with activation.


# Relevant Yield - General Features

Set up common platform features and manage access, inventory, and reporting.

### Browse by category

* [User management](/general-platform/user-management) — Manage logins, roles, notifications, and user history.
* [Inventory management](/general-platform/inventory-management) — Manage publisher accounts, websites, and placements.
* [Reports and dashboards](/general-platform/reports-and-dashboards) — Share reports and maintain dashboard templates.

### Other platform guides

* [Relevant AI](broken://spaces/thyujPhgXh1WtJZy8bjr/pages/F48NIqgElrDr4aPMK7QH)
* [How to Activate Relevant AI](/getting-started/relevant-ai/how-to-activate-relevant-ai)
* [Using the Relevant Yield Slack Integration](/general-platform/using-the-relevant-yield-slack-integration)


# Reports and dashboards

Share reports and manage dashboard templates.

Share reports and manage dashboard templates.

Use reports and dashboards to distribute insights and standardise reporting.

Share reports with eligible Yield users, or export and schedule CSV delivery. Create templates to give users consistent reports and dashboards.

### Reporting guides

* [Sharing Reports in Yield](/general-platform/reports-and-dashboards/sharing-reports-in-yield) — Share reports, export CSV files, and manage subscriptions.
* [How to Create and Maintain Your Reporting and Dashboard Templates](/general-platform/reports-and-dashboards/how-to-create-and-maintain-your-reporting-and-dashboard-templates) — Create, configure, and maintain report and dashboard templates.


# How to Use Dashboards and Reports

Compare dashboards and reports, choose the right format for your use case, and customise views for analysis.

Reports and dashboards use the same calculation module. They differ primarily in how they present data.

This functionality is available in Ad Revenue Insights (ARI), Header Bidding Management (HBM), and Header Bidding Analytics (HBA).

## When should I use reports or dashboards?

### Key Differences

| Dashboards                                                                                                     | Reports                                                                                                                         |
| -------------------------------------------------------------------------------------------------------------- | ------------------------------------------------------------------------------------------------------------------------------- |
| Personal, drag-and-drop overviews on your start view. They are dynamic and best for real-time visual insights. | Reports can be public, for sharing, or personal, for your use only. They handle larger data sets and support in-depth analysis. |

<div data-with-frame="true"><img src="/files/acaea7df3d6b833380f37cc89d9d706c3a177a2f" alt=""></div>

### Dashboards and reports

* **Dashboards**: Use dashboards for easy-to-read overviews with charts and graphs. They prioritise visual, quick insights. Reports usually suit large tables with thousands of rows.
* **Reports**: Use reports for large data sets and detailed analysis. You can export them as CSV files. The export option appears at the bottom of each report.

Both dashboards and reports support different visual outputs, including line charts, bar charts, and pie charts. HBA reports also support geographical maps. The best option depends on the complexity of the data. For single- or dual-dimensional data, charts are effective. For more complex information, tables provide greater clarity.

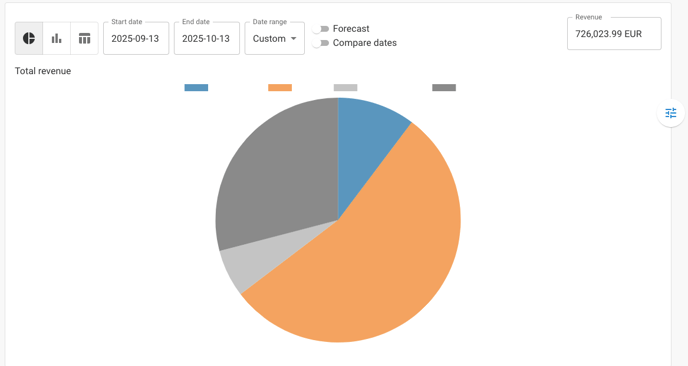
#### Example: pie chart

A pie chart works well for displaying a single dimension (for example, revenue distribution across websites).

<div data-with-frame="true"><img src="/files/e19b2241b9d8470e5135309bbaef2f31ee0a46d4" alt=""></div>

#### Example: geographical map

In HBA, use geographical maps to visualise performance by country. Maps use the **Country** dimension. Combine it with other dimensions to analyse the data from different perspectives.

Use comparisons to track whether metrics increase or decrease in a country over time. You can zoom into an area and save the graph. This preserves the visual focus that matters to you.

For example, compare bidder performance by country. You can also compare demand types across countries.

<div data-with-frame="true"><figure><img src="/files/05mWYVBULgT2XeEzIjWI" alt=""><figcaption></figcaption></figure></div>

### Dashboards

Dashboards provide real-time overviews of activity. You can create multiple dashboards for different needs. They often use graphs, but can also include tables.

Dashboards are dynamic. You can make changes without saving them. This makes them useful for quick adjustments.

There is no single correct setup. Start with these examples:

* **Revenue graph:** Displays revenue per day for the last month.
* **SSP revenue graph:** Breaks down daily revenue by SSP for the last month.
* **Site revenue table:** Shows revenue levels per site for the current month.
  * AdOps users might go deeper, breaking this down by placement and focusing on the last few days to catch short-term drops.
* **Advertiser trend table:** Tracks top advertiser performance and trends.

These are just examples. You can customise your dashboard setup to suit your needs.

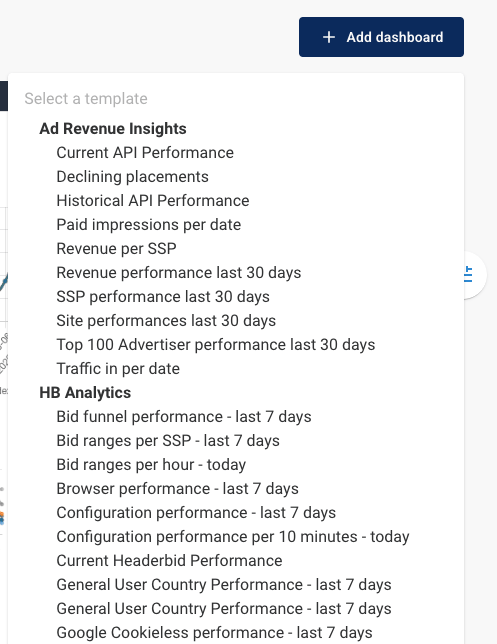
Ready-made templates can help you get started. Go to the **Dashboard** tab, select **+ Add dashboard** in the top-right corner, then choose a template.

<div data-with-frame="true"><img src="/files/253d06147050a47a6152452f191e5a8e78471574" alt=""></div>

### Reports

Reports support in-depth analysis, larger data sets, and data sharing. Like dashboards, the ideal setup depends on your tasks. Consider these examples:

* **End-of-month report:** Shows revenue per publisher or website, broken down by revenue type. If you are a programmatic network, this can be exported and shared with finance for invoicing. You can reuse the report by updating the dates each month.
* **Start-to-end report:** Tracks revenue per publisher from the start of your relationship. It provides a long-term performance view. A fixed start date and dynamic end date keep the report up to date.
* **Large advertiser reports:** Tables suit complex reports with detailed advertiser data. Split the information across report pages to keep it manageable.

For day-to-day investigations or optimisation, you might not need to save reports. These investigations often require detailed drill-downs. Try different table and graph combinations to find the right setup.

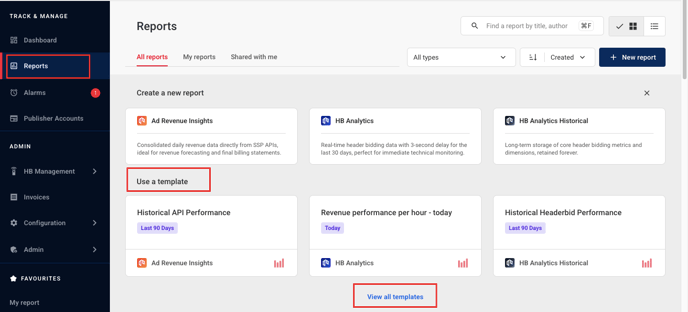
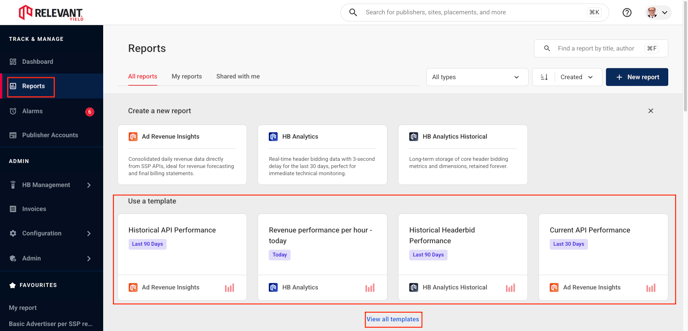
Ready-made report templates are also available. Go to the **Reports** tab and find **Use a template**. This section previews three templates. Select **View all templates** to see every template.

<div data-with-frame="true"><img src="/files/81aeadbc56df5705a5feef06551b6152f7a2540f" alt=""></div>

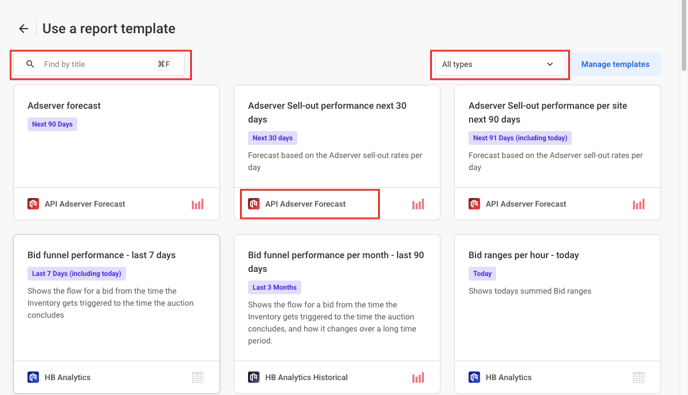
In **View all templates**, filter templates by module or search by name.

<div data-with-frame="true"><img src="/files/574a641da21cdd7c00564839dee0a84902d0e952" alt=""></div>

### Customising the graph view

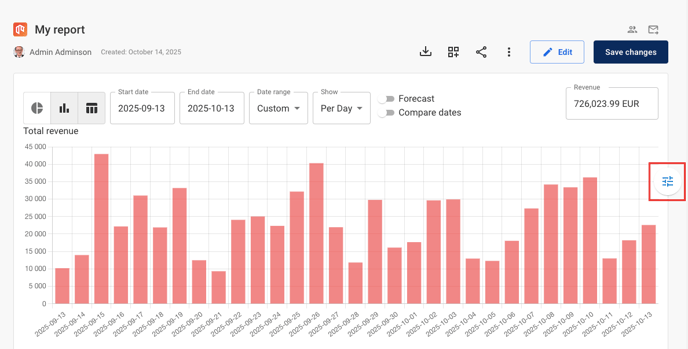
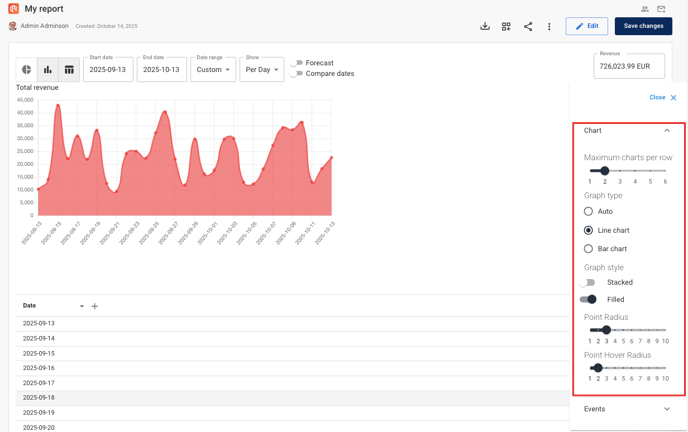
Dashboard and report views can display multiple graphs side by side. This makes data comparison easier. Use the settings next to each report or dashboard to customise the view.

<div data-with-frame="true"><img src="/files/12f9fd7899bad6a578edc60b8c02aa05c698f037" alt=""></div>

You can display up to six graphs per row. Adjust the graph style to lines or bars. You can also change graph orientation.

<div data-with-frame="true"><img src="/files/f679882939643e61368a0161ac8d94ffb71de60b" alt=""></div>

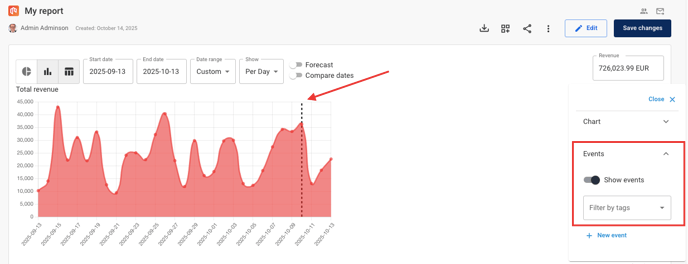
You can also display [events](/ad-revenue-insights/alarms-and-notifications/date-based-event-notifications-in-ad-revenue-insights) on the graph for easier tracking. A dotted line marks where each event was recorded.

<div data-with-frame="true"><img src="/files/6ab78b5d4619c2c94146d1d3de70fb09c19d39fc" alt=""></div>


# Sharing Reports in Yield

You can share reports within Yield or externally. This article covers link sharing, report sharing and report subscriptions.

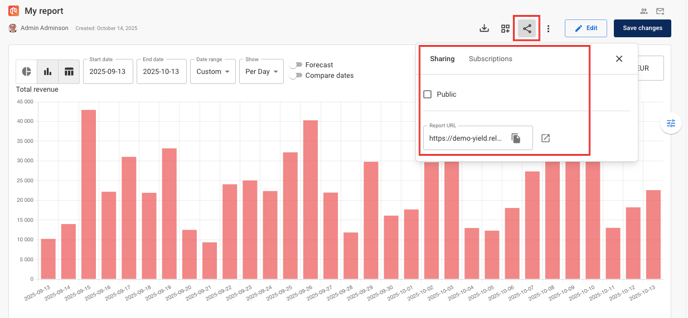
Use the sharing options in the upper-right corner, above the graphs and tables.

#### Share directly with Yield users

**Share a public report**

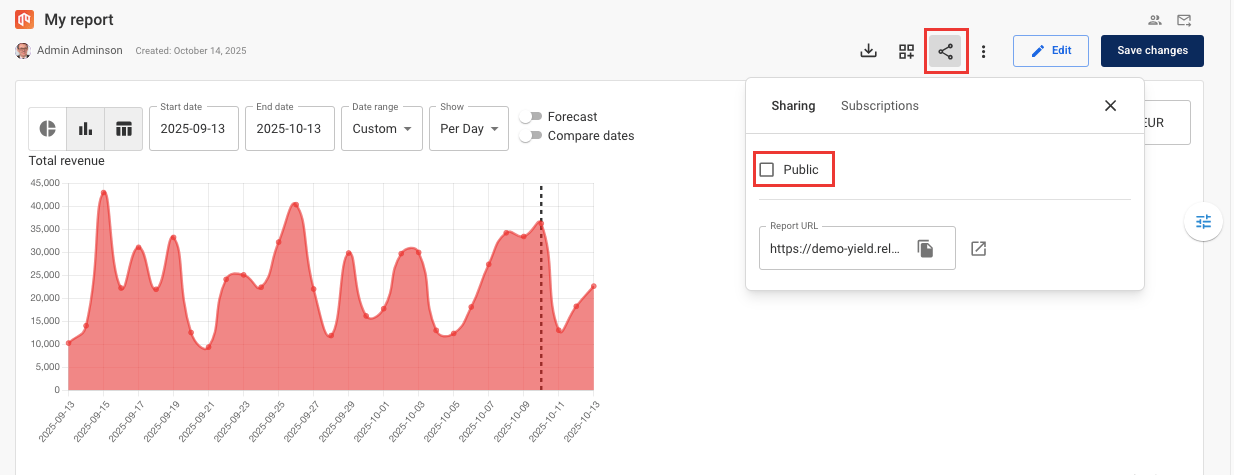
Select **Public** to make the report visible in the saved reports list. Other users with equivalent permissions can then view it.

<div data-with-frame="true"><img src="/files/f6cf6fffc17b9aa22aec5456401d37842ba8606b" alt=""></div>

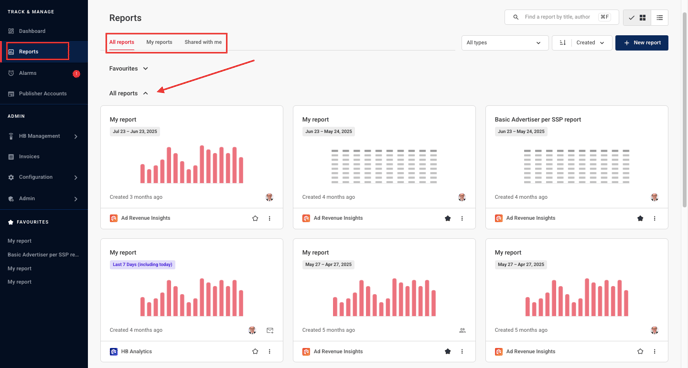
View saved reports in **Reports → All reports** or **Shared with me**.

<div data-with-frame="true"><img src="/files/098ac4ae4c6ac37901da2c83e1ea5551d6fb303d" alt=""></div>

**Share a report link**

You can also copy the report URL from the sharing options. When another user opens the link, Yield creates a report with the same settings.

Each user's report is independent. Changes to one report do not affect the other.

<div data-with-frame="true"><figure><img src="/files/WWRJ69hsB6uBLiIiSTe6" alt=""><figcaption></figcaption></figure></div>

**Make a copy**

Yield users can create a copy of an existing report. Click **Make a copy** in the report toolbar.

This is useful for similar reports with different filters. For example, create separate reports for different advertisers or SSPs.

<div data-with-frame="true"><figure><img src="/files/vnsghhq8xy2PeQZh5qex" alt=""><figcaption></figcaption></figure></div>

#### Share a CSV file

To share a report outside your organisation, export a CSV file or subscribe recipients to periodic reports. You can also use subscriptions for Yield users.

Each subscription sends a CSV file with the raw data. It also sends a PDF containing the report graphs.

External users can receive subscribed CSV and PDF reports. They cannot access the report in the Yield interface.

{% stepper %}
{% step %}

## Subscribe to a report

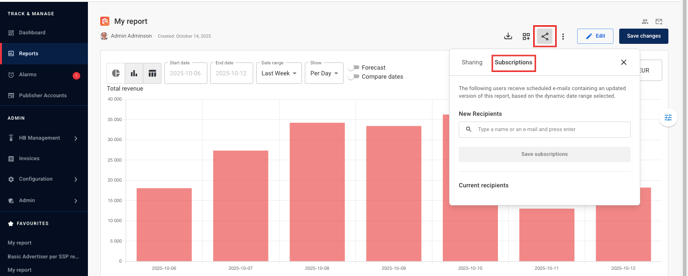
Click **Sharing** in the upper-right corner above the report. Then select the **Subscriptions** tab.

<div data-with-frame="true"><img src="/files/e5d5a55e71238923a72fcfac9bfcd2ae43b82523" alt=""></div>
{% endstep %}

{% step %}

## Add recipients

Enter the email address or name of the Yield user to subscribe. You can add multiple recipients at once.
{% endstep %}

{% step %}

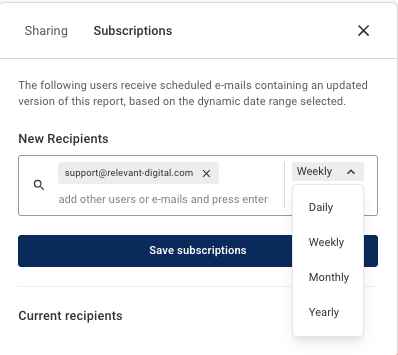
## Choose the delivery frequency

Choose how often to send the report: daily, weekly, monthly or yearly.
{% endstep %}

{% step %}

## Save the subscription

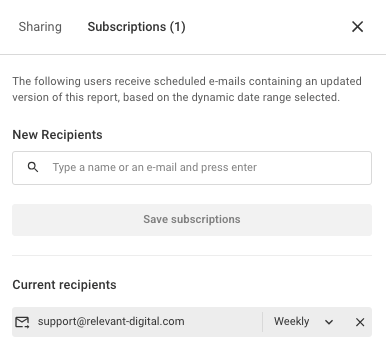
Save the subscription. Recipients then appear in the **Current recipients** list.

<div data-with-frame="true"><img src="/files/11553e48e3233eff79f2061f029a12d768609c75" alt=""></div>
{% endstep %}
{% endstepper %}

To manage report subscriptions, return to the **Subscriptions** tab. You can change the delivery frequency or unsubscribe a user.

<div data-with-frame="true"><img src="/files/1bef088bbfb43dece493c90105c1540415bc4a3d" alt=""></div>

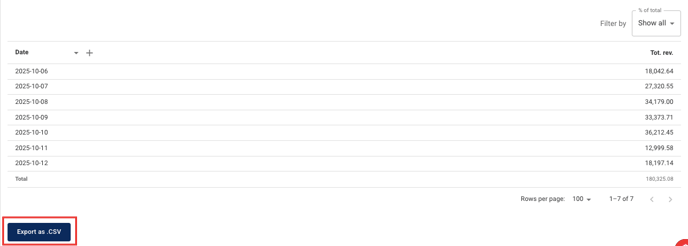
You can also export a report as a CSV file. Click **Export as .CSV** after the tables and graphs. The CSV contains data only, not graphs.

<div data-with-frame="true"><img src="/files/ac271883a63e2967931a98f1467871fb023abcd9" alt=""></div>

### Sharing reports between different user roles

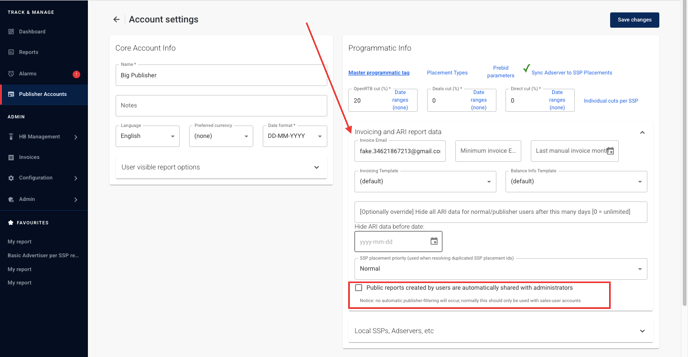
By default, a public report saved by a [publisher user](/general-platform/user-management/publisher-users) is visible only to publisher users with equivalent access rights.

An [admin user](/general-platform/user-management/administrator-admin-users) can access these reports. Open the user's connected [publisher account](/general-platform/inventory-management/what-are-publisher-accounts). In **Invoicing and ARI report data**, select **Public reports created by users are automatically shared with administrators**.

Public admin reports remain available only to other admins.

<div data-with-frame="true"><img src="/files/4927dc230b6e516fe6265c3e0999e794467dc1b1" alt=""></div>

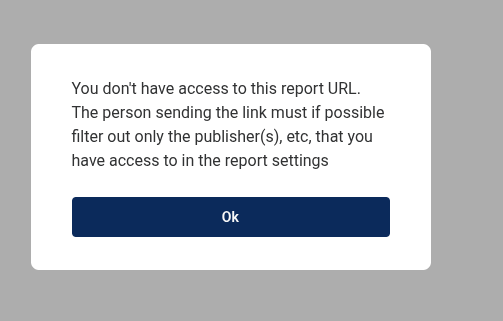
An admin can share a report with a publisher user. The report must contain only data the user can access. Otherwise, the following pop-up appears.

<div data-with-frame="true"><img src="/files/a4be3e1c8eb2a932d19d564dc23357906e39d6ca" alt=""></div>


# How to Create and Maintain Your Reporting and Dashboard Templates

This article will help you create and manage reporting and dashboard templates, both for yourself and your colleagues!

## How to Add a New Template and Choose Where It Should Appear

In **Relevant Yield**, you already have a selection of ready-to-use templates.

Hover over **Reports**, then click the **“+”** icon that appears. Choose a template from the preview, or click **View all templates** to see all available options.

<div data-with-frame="true"><img src="/files/40c664016fb5d18e70a9ff129402c78ae13033c9" alt=""></div>

If you wish, you can create your own templates. There are two ways to do this:

* Create a new template from scratch
* Use an existing report or dashboard reporting module and save it as a template

### Choose Pre-existing Template

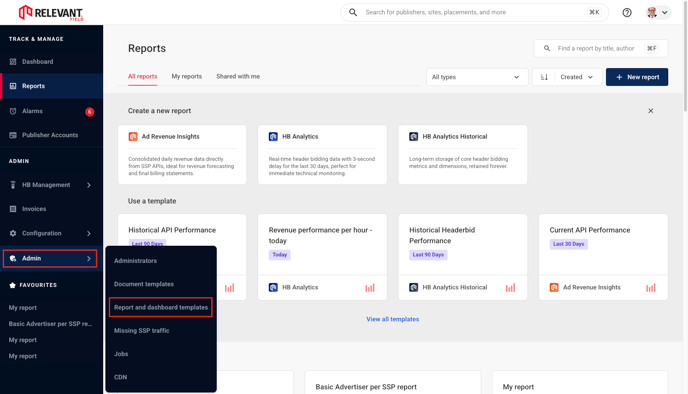
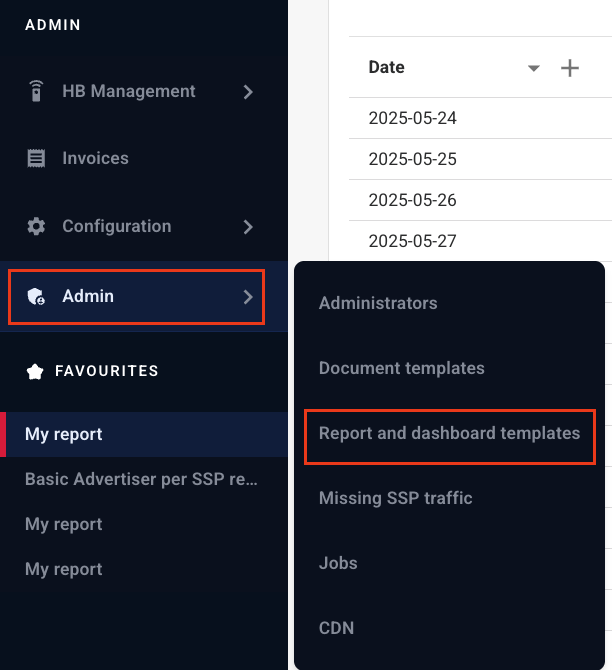
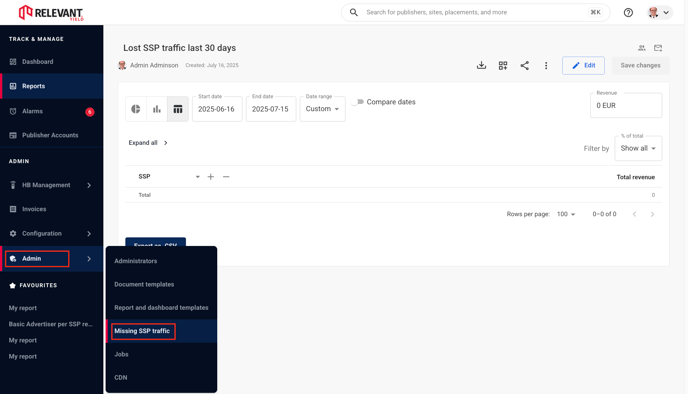
You can find the **Template Editor** in the left-hand menu, under the **Admin** drop-down. It is called **Report and Dashboard Templates**.

<div data-with-frame="true"><img src="/files/978eeea650d4182e152588c002cf7a456bccaba4" alt=""></div>

In this view, you also have the option to add a new template for the type of report you would like to build into a template:

* **Ad Revenue Insights** – Historical API data
* **HB Analytics** – Real-time auction data
* **HB Analytics Historical** – Long-term historical auction data
* **API Adserver Forecast** – Forecasting data collected from your ad server

### Create a New Template from Scratch

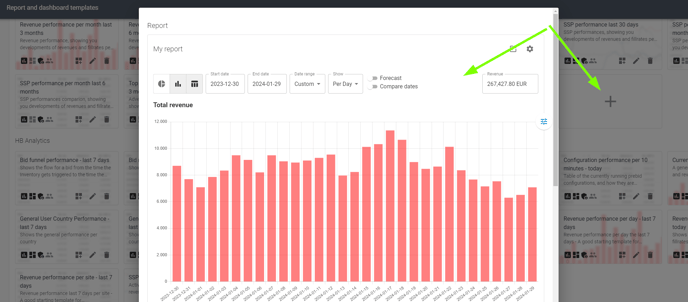
Once in **Report and Dashboard Templates**, click the large **“+”** icon next to one of the report types to open the **Add/Edit** screen. You’ll see a basic version of the report, which you can start customising by clicking the **cogwheel** icon.

<div data-with-frame="true"><img src="/files/84dea8d1603676b9d5b2e97586eec723788b5f78" alt=""></div>

When you’re happy with your report setup, give it a name and click the **OK** button. This will take you back to the edit screen.

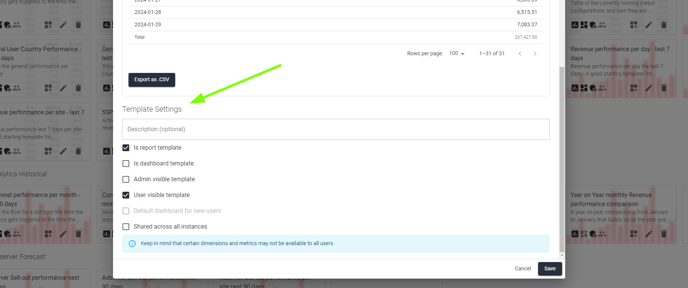
At the bottom of the page, you’ll find the **Template Settings** section:

<div data-with-frame="true"><img src="/files/a1ffbc38856292372ffa1dc38d20fe73920946b2" alt=""></div>

* **Description:** This text will be shown to other users when they hover over the template in the template lists or when selecting a template.
* **Is report template:** Select this if you want the template to appear in the **Reports** menu on the left. We recommend keeping data-heavy reports as “report templates” rather than “dashboard templates” to avoid slowing down dashboard load times upon login.
* **Admin visible template:** Choose this option if the template should be visible to Admin users.
* **User visible template:** Select this if the template should be available to non-admin users, such as [Sales users](/general-platform/user-management/sales-users-and-sales-portfolios) or [Publisher users](/general-platform/user-management/publisher-users). Please ensure that all metrics and dimensions included in the report are accessible to these users; otherwise, the template will appear crossed out in their list (you can always edit this later).
* **Default Dashboard for new users:** If selected, a version of this template will be automatically created on the dashboard for new users, providing an easy introduction to the system.

You can revisit and adjust these settings as needed until you are satisfied. Once finished, click the **Save** button. The template will then appear in either the **Dashboard template** list or your **Report** selection list, depending on your choices.

### Use an Existing Report and Save It as a Template

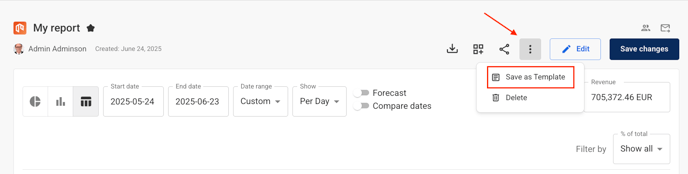
If you already have a report you’d like to turn into a template, it’s as simple as pressing a button! You can find this button under the hamburger menu in your reports.

<div data-with-frame="true"><img src="/files/39343703eff4ac4d4dd87da55c2fcd83d1c5b8fb" alt=""></div>

## Edit or Remove an Existing Template

To edit an existing template, navigate to the **Report and dashboard templates** found under the **Admin** menu on the left-hand side.

<div data-with-frame="true"><img src="/files/1d979b57cced9203c93d8a45b117f12e75d4cad8" alt=""></div>

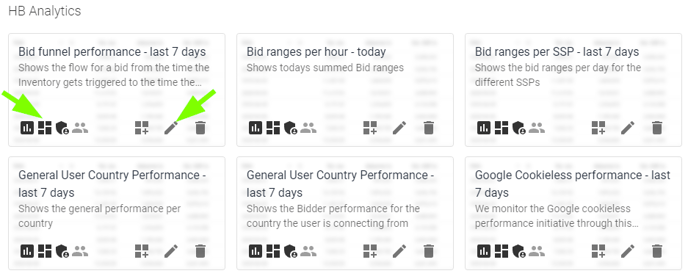
The icons on each template provide an overview of its current template settings.

<div data-with-frame="true"><img src="/files/f76ed9afce1d8b1a99271d85f264b960c9095377" alt=""></div>

The **pencil** icon takes you to the edit page (see instructions above on how to edit), and the **trashcan** icon deletes the template.

**Please note that deleting a template will not affect any existing reports you have created.** It simply removes the template from the selection lists, so you cannot create new reports based on it. Previously created reports or dashboard modules will remain intact.


# Inventory management

Manage publisher accounts, websites, and placements.

Manage publisher accounts, websites, and placements.

Inventory follows a three-level hierarchy:

1. **Publisher accounts** define the reporting and access boundary.
2. **Websites** group inventory under each publisher.
3. **Placements** connect ad server and SSP identifiers to your inventory.

Create these in order to keep reporting and access settings consistent.

### Inventory guides

* [What Are Publisher Accounts?](/general-platform/inventory-management/what-are-publisher-accounts) — Understand the inventory hierarchy and publisher-level settings.
* [Adding a New Publisher Account](/general-platform/inventory-management/adding-a-new-publisher-account) — Create a publisher account.
* [Adding a New Website](/general-platform/inventory-management/adding-a-new-website) — Add a website under a publisher account.
* [Adding a New Placement](/general-platform/inventory-management/adding-a-new-placement) — Add a placement and connect its ad server and SSP IDs.


# What Are Publisher Accounts?

The Publisher Accounts section tracks all the publishers, websites, and placements you are working with. It also shows how your ad server and supply-side platforms (SSPs) are connected to these.

Publisher accounts operate on three levels:

1. **Publisher Accounts**
2. **Websites**
3. **Placements**

## The Publisher Account Level

The Publisher Account level is the highest reporting level within the system. It can also have external users associated with it.

### External Users on Publisher Accounts

If you have an external publisher or stakeholder who should only have access to specific websites under a particular publisher, you can create an “external user” for that stakeholder. This user essentially acts as a publisher user, ensuring they only have access to the relevant websites associated with that Publisher Account.

By clicking the user icon within the desired Publisher Account, you can add specific “external users” and restrict their access to only the websites under that Publisher Account.

![Näyttökuva 2025-07-15 kello 8.40.52-1](/files/f211f27b495b86ded06e2d1005ea2500c9f4c5e4)

You can send login credentials directly from the user interface (UI). Within user settings, you can restrict a user’s access to specific SSPs, choose which publishers they can view, and determine the revenue types visible in their reports. Additionally, you can specify whether they have permission to edit other users.

Using the **Default Dashboards** field, you can select the pre-made dashboard template that will be shown to them in their Dashboards.

![Näyttökuva 2025-07-15 kello 8.47.20](/files/ae8c72977790246c4567acbfde9a49f909c14d61)

At the account level, you can restrict which reporting dimensions and metrics external users are allowed to access. Be sure to tick **Override default values** to enable changes to the permitted dimensions and metrics.

![Näyttökuva 2025-07-15 kello 8.52.09](/files/a6eee02174ec2888a07dde331ec62204d26b68d3)

### Default Publisher Account

If you do not have any external stakeholders outside of your own publishing organization, you may only need to add one Publisher Account—your own organization.

Please note that all financial statements are generated at the Publisher account level. If you want to utilize the monthly statement generation tool, it is essential to add publishers that correspond to the publisher you intend to send the statement to.

## The Website Level

Websites can be created under a Publisher Account. To add a website, simply click the “+” icon in the **Websites** section.

![Näyttökuva 2025-07-15 kello 8.56.12](/files/e58fbe0eca3ac9adecf2823c6ba22da340f845c4)

After clicking the “+” icon, the **Website** section will open, allowing you to enter the relevant information. The **Domain**\* field should contain the website name you want to appear later in reports under the **Site** dimension.

![Näyttökuva 2025-07-15 kello 9.00.47](/files/dbaf21e60027a6e3fa43fbf2d5ccb3ea830206e2)

## Placement Level

You can add a placement by pressing the “+” sign under the **Placements** section, which will allow you to edit your **New Placement**.

![Näyttökuva 2025-07-15 kello 9.03.33](/files/c89ab43ff05296d4841bb7b83caf4e534488cc06)

### Information to Include for Your Placements

When adding a placement, you should include the following information:

* **Name:** Choose a name that clearly defines the placement
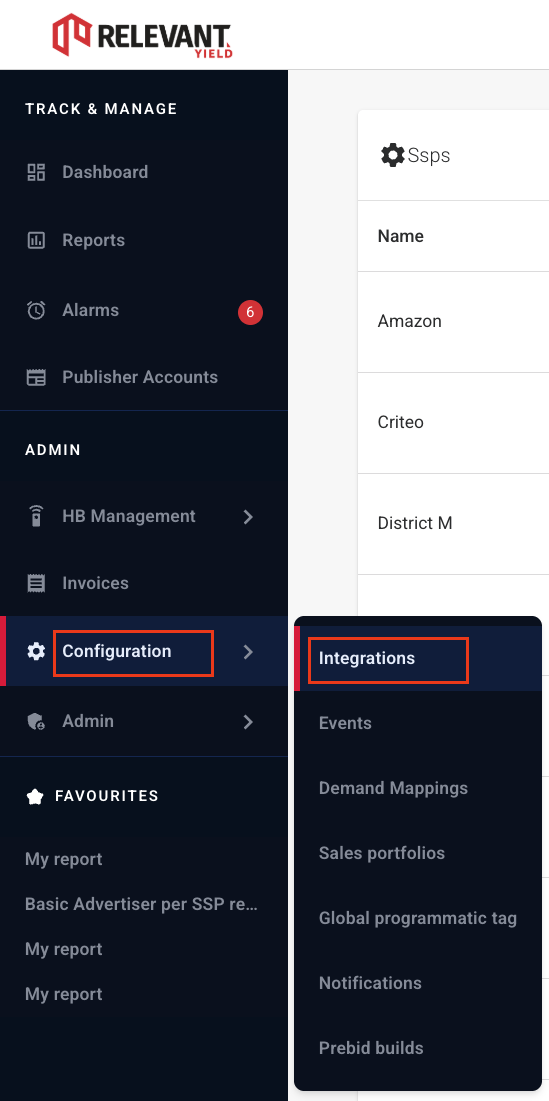
* **Ad server:** Specify the ad server being used, along with the placement or ad unit code. You can group multiple placements together if your ad server’s granularity is broader than what’s used in the SSPs. The ad server list is based on those you’ve added under **Integrations** in the **Configuration** section. [Here](/ad-revenue-insights/data-connections/setting-up-a-new-ad-server-connection) you can find more information about setting up an ad server.
* **SSPs:** Select the SSPs you want to use and enter their respective IDs. Keep in mind that different SSPs use different ID formats. You can add the same SSP more than once if you’re using multiple SSP accounts. The SSP list is also drawn from those configured in **Integrations** under **Configuration**. [Here](/ad-revenue-insights/data-connections/setting-up-a-new-ssp-connection-with-api) you can find more information about setting up an SSP.

![](/files/1d25c3a240eebe8026951207169ed3c634046cf8)

Read [here](/hb-manager/auction-behavior-and-optimization/ad-refresh-in-hb-manager) about **reloading** your ads on the placement level.

Read [here](/hb-manager/auction-behavior-and-optimization/lazy-loading-ads-in-hb-manager) about **lazy loading** on the placement level.

Read [here](/hb-manager/auction-behavior-and-optimization/how-to-use-the-prebid-floor-price-module-and-automatically-set-floor-prices-in-your-ad-server) how to use **floor price module** on the placement level.


# Adding a New Publisher Account

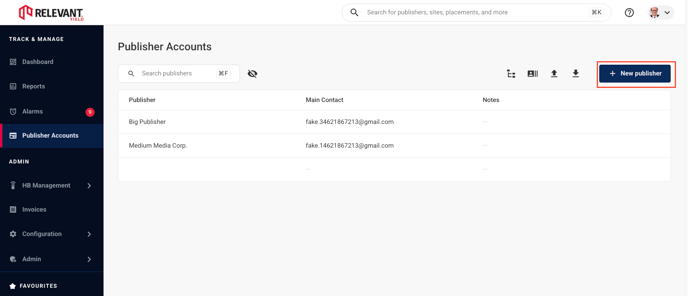
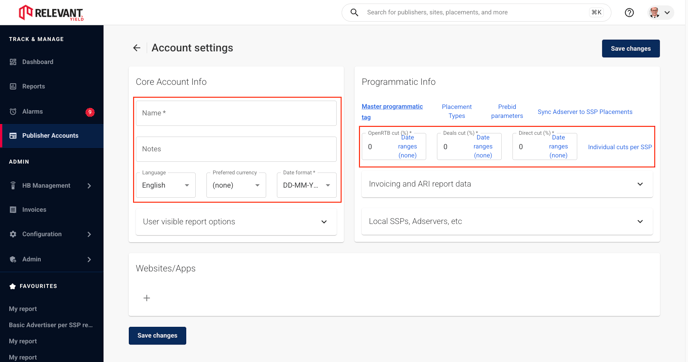
Click **Publisher Accounts** → **Create a new account**, and fill in the core information. Then click **Save**.

<div data-with-frame="true"><img src="/files/8fdef71092a67734b3e050e66d0b0a666aaa09e3" alt=""></div>

If the publisher does not have any revenue share splits with your organisation, you can leave the **Rev share cuts** fields blank. However, if you do have a rev share agreement with this publisher, fill in the relevant details accordingly.

<div data-with-frame="true"><img src="/files/c2f787f7ed3e9fce7f50e4e77a09b52ed699516a" alt=""></div>

Note that this step can also be completed later. If you’re using the [**Programmatic Bulk Import**](/hb-manager/setup/bulk-import-automated-mapping-of-your-hb-structure-with-.csv), some of these steps may be handled automatically.

If you're using the **Ad Revenue Insights** module, take a look at [Rev share handling for SSPs and Publisher accounts](/ad-revenue-insights/finance-and-statements/revshare-handling-for-ssps-and-publisher-accounts)


# Adding a New Website

## How to Add a Website Under a Publisher Account

{% stepper %}
{% step %}

## Select a Publisher Account to Add a Website To

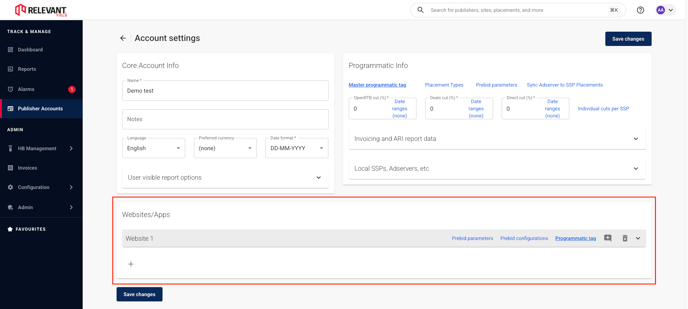
To add a website, you’ll need to edit an existing Publisher Account. Navigate to **Publisher Accounts** and select the one where you want to add the new website. In the account settings, you’ll find the **Websites** section at the bottom of the page.

<div data-with-frame="true"><img src="/files/9b4e6fba1e708667b069c137efb7afda2b302e7a" alt=""></div>
{% endstep %}

{% step %}

## Add a New Website by Clicking the “+” Icon

{% endstep %}

{% step %}

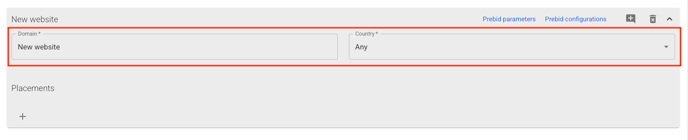
## Edit the Domain of the New Website

You can also change the **Country** setting, though it is purely informational and not used in reporting. If your country is missing from the list, please contact **Relevant Support** and we’ll add it.

<div data-with-frame="true"><img src="/files/353d472696dec17c155e77638a9d2457b995d7c5" alt=""></div>
{% endstep %}

{% step %}

## Click Save

{% endstep %}
{% endstepper %}


# Adding a New Placement

In **Relevant Yield**, placements are created under [**Websites**](/general-platform/inventory-management/adding-a-new-website).

1. **Navigate to a Website**

   Go to the website where you’d like to create a new placement.

   ![Näyttökuva 2025-07-15 kello 11.29.12](/files/a6bfc9022a89955170bea7fc2529de3cd6348b14)
2. **Click the “+” Icon**
3. **Open Placement Settings**

   Click the downward arrow on the right to expand and view the placement settings.

   ![Näyttökuva 2025-07-15 kello 11.31.39](/files/dcaefff0d0fd34a99a722d1aa9ae3e9c18f7ff86)
4. **Edit Name and Other Settings**
   * **Name** - Name of your placement, which will be visible in reports.
   * **Adserver** - select the [ad server](/ad-revenue-insights/data-connections/setting-up-a-new-ad-server-connection) you created in the **Configuration → Integrations**.
   * **SSP** - select an SSP you created in the **Configuration → Integrations**. This is where you will [map the SSP](/ad-revenue-insights/mapping/mapping-ad-server-and-ssp-placement-ids-to-relevant-yield-ad-revenue-insights-placements) placement IDs.
   * **Placement label**- A placement label helps you organise and group your various placements for **Ad Revenue Insights** reporting. Read more about Placement labels in the Ad Revenue Insights section: [Adding your own placement labels](/ad-revenue-insights/mapping/adding-your-own-placement-labels)
   * **Placement type** - This feature in the **HB Manager** module allows you to manage which ad sizes should run on this placement. Placement types can be global, website or placement specific. Read more [here](/hb-manager/setup/setting-up-placement-types).
   * **Prebid parameters** - HB Manager module setting for managing how Prebid is working on the placement. Read more [here](/hb-manager/auction-behavior-and-optimization/manage-prebid-settings-with-prebid-parameters).
   * **Built-in settings** - This section contains placement settings for the **HB Manager** module. Here, you can set the [floor price](/hb-manager/auction-behavior-and-optimization/how-to-use-the-prebid-floor-price-module-and-automatically-set-floor-prices-in-your-ad-server), disable all header bidding on the placement, and adjust the [ad refresh](/hb-manager/auction-behavior-and-optimization/ad-refresh-in-hb-manager) and [lazy loading](/hb-manager/auction-behavior-and-optimization/lazy-loading-ads-in-hb-manager) settings.
   * **Custom parameters** - Custom parameters can be set at the placement level for various purposes, and they can also be configured globally.
5. **Click Save**


# User management

Manage access to Relevant Yield and control what each user can view.

Choose the user type that matches the required scope:

* **Administrators** have access to all features, websites, advertisers, and reports.
* **Publisher users** can access one assigned publisher.
* **Sales users** can access assigned advertisers and sales portfolios.

### User management guides

* [User Management in Relevant Yield](/general-platform/user-management/user-management-in-relevant-yield) — Compare user types and their access.
* [Logging in to Relevant Yield](/general-platform/user-management/logging-in-to-relevant-yield) — Sign in with credentials, Google, or SAML.
* [Administrator (Admin) Users](/general-platform/user-management/administrator-admin-users) — Create and manage administrator accounts.
* [Publisher Users](/general-platform/user-management/publisher-users) — Create users with publisher-level access.
* [Sales Users and Sales Portfolios](/general-platform/user-management/sales-users-and-sales-portfolios) — Configure advertiser-level sales access.
* [See Non-Admin Users’ Login History](/general-platform/user-management/see-non-admin-users-login-history) — Review recent sign-in activity.
* [Notifications](/general-platform/user-management/notifications) — Manage account notifications.


# User Management in Relevant Yield

There are three types of users in Relevant Yield:

### 1. Administrator

An Administrator is a core user with access to all features, websites, advertisers, and reports. [Learn how to create and manage administrators.](/general-platform/user-management/administrator-admin-users)

![Näyttökuva 2025-06-19 kello 10.56.38](/files/4c6c5c6904c77dd13a52742f7f56515da65499d4)

### 2. Publisher User

A Publisher user is an external user with access restricted to the specific Publisher for whom the account is created.

[Learn how to create and manage publisher users](/general-platform/user-management/publisher-users).

![Näyttökuva 2025-06-19 kello 10.59.09](/files/f06b9cdf4460c6e48e86ab48d3ea9f0a3f3ad257)

### 3. Sales User

A Sales user has access restricted to specific advertisers only.

[Learn how to create and manage sales users](/general-platform/user-management/sales-users-and-sales-portfolios).

![Näyttökuva 2025-06-19 kello 11.01.36](/files/2f8bb20173dfcfb82ef2f09479eed2bcf3af5b0f)


# Logging in to Relevant Yield

Relevant Yield supports login through username/password, Google or SAML.

Each client has a customer-specific login page, so there is no shared or generic login address. You will receive your unique login link during the onboarding process.

### SSO/SAML integration

Relevant Yield supports Single Sign-On (SSO) through SAML-compatible providers such as Google Workspace, Microsoft Entra, and Okta.

To set up integration with your organisation’s login provider, please [contact us](/support-and-troubleshooting/contact-us).

### Related articles

* [See Non-Admin Users’ Login History](/general-platform/user-management/see-non-admin-users-login-history)
* [Adding a New Publisher Account](/general-platform/inventory-management/adding-a-new-publisher-account)
* [Publisher Users](/general-platform/user-management/publisher-users)
* [Sharing Reports in Yield](/general-platform/reports-and-dashboards/sharing-reports-in-yield)
* [Sales Users and Sales Portfolios](/general-platform/user-management/sales-users-and-sales-portfolios)


# Administrator (Admin) Users

Admin users are created through the **Administrators** section and serve as the core users of the system. An Admin user has full access to set up and generate reports on all functions within the platform.

To create a new Admin user:

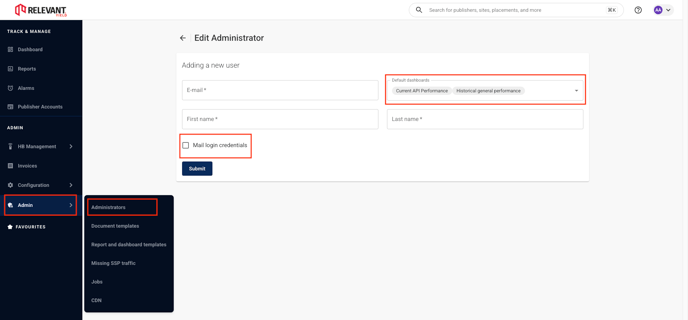
Go to **Admin** > **Administrators** and click **New administrator**.

<div data-with-frame="true"><img src="/files/65e918f49afcac83eb0a3599e60a46e8d07812c8" alt=""></div>

You can email the login credentials to new Admin users and also set a **default view on their dashboard** during the creation process.


# Publisher Users

## An overview of the Publisher user role, outlining how to create external users, manage their access, and customise their reporting capabilities.

### Publisher User Role

The Publisher role is designed for creating external users. These users are associated with a particular "Publisher" and, by default, have access only to that "Publisher." However, one or more users can also be granted additional access beyond the "Publisher" for which they were created.

The primary purpose of the external user role is to provide access to a specific set of websites, allowing users to monitor website performance. **External users are limited to non-setup-related tasks, but they can create their own dashboards and pull reports.**

Please note that external publisher role users have access to fewer dimensions and metrics for reporting, in order to keep things as simple as possible. Admin users can regulate access to dimensions and metrics by editing the publisher users.

{% stepper %}
{% step %}

## Assigning Publisher Role

Once you have created a Publisher in the Publisher Accounts section, simply click the User Icon to begin creating and editing users for those publisher accounts.

![](/files/fed857678f2808c331d42edc270d8913d5ccb453)
{% endstep %}

{% step %}

## Send Publisher User Credentials

Users and passwords can be managed through the system, and new passwords can be generated if a user loses theirs.

![](/files/9ecbc0b7ff2f4a88caba84eb3327757ce2e4a0da)
{% endstep %}

{% step %}

## Limit Publisher User Dimensions and Metrics in Reports

You can decide what publisher users can report on by selecting the 'Override Default Values' option and choosing your preferred values.

![](/files/c13696333b7faadb5b7955cb994afc19c787b527)
{% endstep %}
{% endstepper %}


# Sales Users and Sales Portfolios

This article explains how to set up sales users in Relevant Yield and assign them specific sales portfolios. It covers how to create the user, manage portfolios and edit access rights.

### Sales User Role

A **Sales user** is an external user role, similar to a [**Publisher user**](/general-platform/user-management/publisher-users). Sales users can filter advertisers assigned to them, allowing them to track how well those advertisers are performing within their area of responsibility.

This can be particularly useful for reporting on revenue channels such as deals, OpenRTB, or direct campaigns, broken down by website, for example. Sales users can also combine advertiser reporting with trend reporting to analyse advertiser performance and identify potential new leads based on OpenRTB spend across different websites.

### Setting Up Sales Users Across Multiple Publisher Accounts

A **Sales user** is a special type of external user with access to one or more Publisher accounts.

{% stepper %}
{% step %}

## Create a Publisher account

Create a [**Publisher account**](/general-platform/inventory-management/adding-a-new-publisher-account) called Sales, which includes users but no websites.
{% endstep %}

{% step %}

## Add Sales users

Once created, add Sales users in the same way as [Publisher users](/general-platform/user-management/publisher-users). When setting up the user, you can choose to grant them access to all the relevant Publisher accounts.

![Näyttökuva 2025-07-16 kello 12.54.39](/files/abd7e8e4b8dd312d75bf6b772bb41105b60de5a0)
{% endstep %}

{% step %}

## Define accessible dimensions and metrics

Remember to define under the Sales Publisher account which dimensions and metrics the Sales users should be able to access in their reports.

![Näyttökuva 2025-07-16 kello 12.58.25](/files/d76975d33487f67d3382fc1b82837c1ba638b915)
{% endstep %}
{% endstepper %}

### Build Sales Users' Portfolios

Once a Sales user has been created, you can build their portfolio by going to **Global Settings → Users and Portfolios**.

![Näyttökuva 2025-07-16 kello 12.07.15](/files/302804259c64e608d23f8c49fcd5011bc18b58d4)

To add advertisers for Sales users, click the pencil icon next to the user. A new window will open. In the left-hand side, you can search for advertisers by name. Click **Add** to include them in the list on the right-hand side.

When adding an advertiser to the portfolio, you can choose whether the advertiser should be assigned to the Sales user for a specific time period or remain permanently linked. On the right-hand side, you can view the Sales user’s previous, current, and future advertisers, and you also have the option to move or remove advertisers from their portfolio.

![Näyttökuva 2025-07-16 kello 12.40.28](/files/62b25635a6c4841fa0a7a3333e7f97893f97199e)

### Reporting on a Sales Portfolio

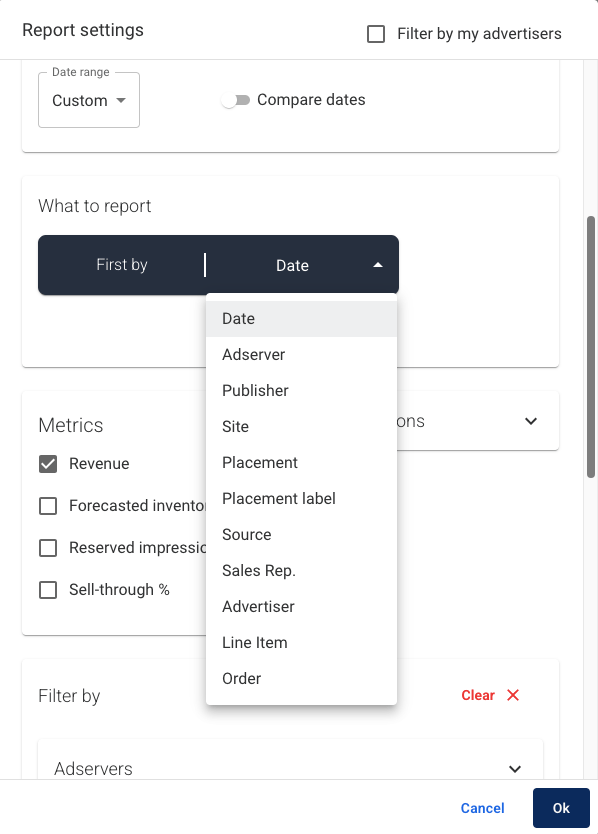
To see how a specific Sales user is performing, you can add the **Sales rep.** dimension to your report. By ticking the box **Filter by my advertisers** at the top of the report settings, you can filter the data based on your own sales portfolio.

![Näyttökuva 2025-07-16 kello 12.46.52](/files/c6d24a0014703ff127ab85bd137bd8d754f46539)


# See Non-Admin Users’ Login History

If you, as an administrator, want to see when non-admin users have logged in, you can find this in the **Publisher Account** view. Simply click the **Access history** button at the top to view their login history.

<div data-with-frame="true"><img src="/files/3f151970154e22575991505c7abedda7dc54e0e3" alt=""></div>


# Notifications

Administrators can use the notifications to post key information or announcements directly on user dashboards. The message stays visible until users close it, making it an effective way to ensure visibility.

### Message of the Day (MOTD)

You have the ability to set a Message of the Day (MOTD) that will be displayed prominently on the dashboards of all users within the system. This feature allows you to communicate important updates, announcements, or reminders directly to users as they log in. Once a new message is created, it will automatically appear on their dashboard, ensuring it captures their attention immediately.

The message will remain visible until users choose to close it. Currently, only a single message is supported, but this will be expanded in the future.

![](/files/34d85f6b6d4e0ef8363715eb3bfa971d58b9d8bd)

To set a message, go to **Configuration → Notifications** and complete the available fields.

![](/files/d202cacc9ca27f2d91a88bc04161e473d4f02d2e)

Please keep the **Closable** option selected out of consideration for users, unless you have a specific reason to display the message permanently.


# Using the Relevant Yield Slack Integration

Using our Slack integration, you can receive notifications of your alarms in your Slack workspace and acknowledge them.

## Setting up the Slack integration

Before it can be used, a Relevant Yield **Admin user** with sufficient Slack permissions needs to create a Slack app and input its details to the Relevant Yield platform.

To create it, head to **Configuration > Integrations**, and under **Automation systems** edit the Slack Integration.

![automation\_systems](/files/98d943adf027c6c355d7d1573fe24a8a132f4c09)

In the pop-up, you need to press the *"Install Slack app to your workspace"* button, which will use a template provided by us and information specific to your Relevant Yield instance to create a new Slack app.

![slack-integration-edit](/files/98efa8cb07ab9ea4ced9505e0d7d8e503872f2cc)

This button will take you to a Slack page to create your app. If you are logged into multiple Slack workspaces, you may first need to choose a workspace for your app to live in.

![slack-create-select-workspace](/files/6d44102a7fd5bac73abea27ef4ead89a207db83f)

In this app creation page, you can also review the permissions of the app, which are used to browse the users and channels in a workspace, send messages from the Relevant Yield platform and send information back, for example to acknowledge alarms. The Redirect URL will be different for your installation. When ready, click the *"Create"* button.

![slack-create-app](/files/e265b1a9c6ff739e978cbbd781e7ca3640519be6)

Once the app is created on Slack, there are three additional steps we need to take within the Slack app page.

First, under **Basic Information**, copy the Client ID along with the Client and Signing secrets to the integration settings on the Relevant Yield platform, below the *"Install Slack app to your workspace"* button. If you desire, in the same Slack page, you can also change the appearance of the app in your workspace under **Display Information**.

![slack-app-credentials](/files/e142ea84829f3368b538f23dabf6fa04ed9d5356)

Second, install the created app to your workspace by navigating to **Install App** and pressing the *"Install to \[workspace]"* button.

![slack-install-app](/files/faf1925a542c30ea74b3ea64f5dc44a43a9c37da)

### Public distribution

Lastly, as an optional step, you can enable the sharing of your app with other workspaces, which will let your users use your Slack app in their own workspaces. Doing so will not submit your app to the Slack marketplace and every user will need to go through your Relevant Yield platform to install it independent of their workspace. To enable the sharing, navigate to **Manage Distribution > Share Your App with Other Workspaces**. Confirm the " *Remove Hard Coded Information"* section and press the *"Activate Public Distribution"* button.

![slack-public-distribution](/files/ab1bbc16e53bbc5b0cd0f9509aa6170708c827d9)

With these steps completed, your Slack app is ready for use!

## Updating the Slack integration

Since the Slack app lives in your workspace, updating the app to enable the newest features requires following a short procedure. If an update is available, the Slack integration pop-up will have an additional button to download the updated Slack app manifest.

![slack-integration-update](/files/09016252f82c788bc120db60205fbe902232ff02)

With the manifest downloaded, head to your Slack app's settings and navigate to the **App Manifest** section. On this page, you can paste the updated manifest and save changes, your app will then be ready to use the latest features.

## Receiving notifications in Slack

Currently, the Slack integration allows you to receive alarm notifications and acknowledge them from Slack. For more information about the alarms feature in general, take a look at the alarms pages for [Ad Revenue Insights](/ad-revenue-insights/alarms-and-notifications/setting-up-your-ad-revenue-insights-alarms) and [HB Analytics](/hb-analytics/alarms-and-notifications/setting-up-your-hb-analytic-alarms).

If you have any feature requests to expand this integration, please don't hesitate to [get in touch](/support-and-troubleshooting/contact-us)!

If the Slack integration is enabled, users will have an additional button when editing alarm recipients. Users can press the *"Connect to a Slack workspace"* button to establish a connection between their user and Slack workspace. Note that unless [public distribution](#public-distribution) was enabled during setup, users will need to be logged-in to the workspace of the Slack app.

![alarm-recipients](/files/641b345e5d6dfc150d9cd0f6e26987da7977aac9)

Allowing access in the opened page (after choosing the right workspace if necessary), will change the edit recipient pop-up to allow selecting Slack channels or users. Users can also use the trash icon to clear their selection.

![slack-integration-connected](/files/5c780bf8c1d51aa20d3fa487b35a9b50952d8b7f)

With a recipient selected, you are ready to receive your alarm notifications on Slack.

![alarm-notification](/files/cd6912210f9247fad4aba51cd4ba3612cc9e96cd)

To receive alarms in channels instead of direct messages, you will need to add the bot user to the channel. Try sending "@Relevant Yield Bot" (or the correct name if you changed it) within the channel and Slack will ask you if you'd like to add the bot to the channel.

Global alarm recipients

Global alarm recipients is a single setting that can be edited by all admin users, this includes its Slack integration. It requires a separate Slack connection, which will then be visible to all admin users.


# Setup

Build the HB Manager foundation for your inventory and Prebid setup.

<div align="left"><figure><img src="/files/4wF5vuU6EfucOh4l5wVg" alt=""><figcaption></figcaption></figure></div>

Build the HB Manager foundation before configuring bidders and auction behavior. Define your inventory, connect your ad server, map placements, and create the configuration that loads your header bidding setup.

### Start here

* [Overview of setting up HB Manager](/hb-manager/setup/overview-of-setting-up-hb-manager) — Follow the recommended onboarding sequence from inventory mapping to launch.
* [Setting up an ad server](/hb-manager/setup/setting-up-an-ad-server) — Add and configure your ad server integration.
* [Mapping Adserver and SSP placement IDs to Relevant Yield Placements](/hb-manager/setup/mapping-adserver-and-ssp-placement-ids-to-relevant-yield-placements) — Map demand and ad server placement IDs to your inventory.

### Configure HB Manager

* [Setting up placement types](/hb-manager/setup/setting-up-placement-types) — Define the ad sizes available for each placement.
* [Setting up your HB Manager configuration](/hb-manager/setup/setting-up-your-hb-manager-configuration) — Create the core configuration for your setup.
* [Create or Edit Prebid configuration](/hb-manager/setup/create-or-edit-prebid-configuration) — Control which placements and bidders load together.

### Advanced setup

* [Manage Prebid settings with Prebid Parameters](/hb-manager/auction-behavior-and-optimization/manage-prebid-settings-with-prebid-parameters) — Apply shared Prebid settings across configurations.
* [Adding Placement Tag Fields - Advanced](/hb-manager/setup/adding-placement-tag-fields-advanced) — Control where and how placements load.
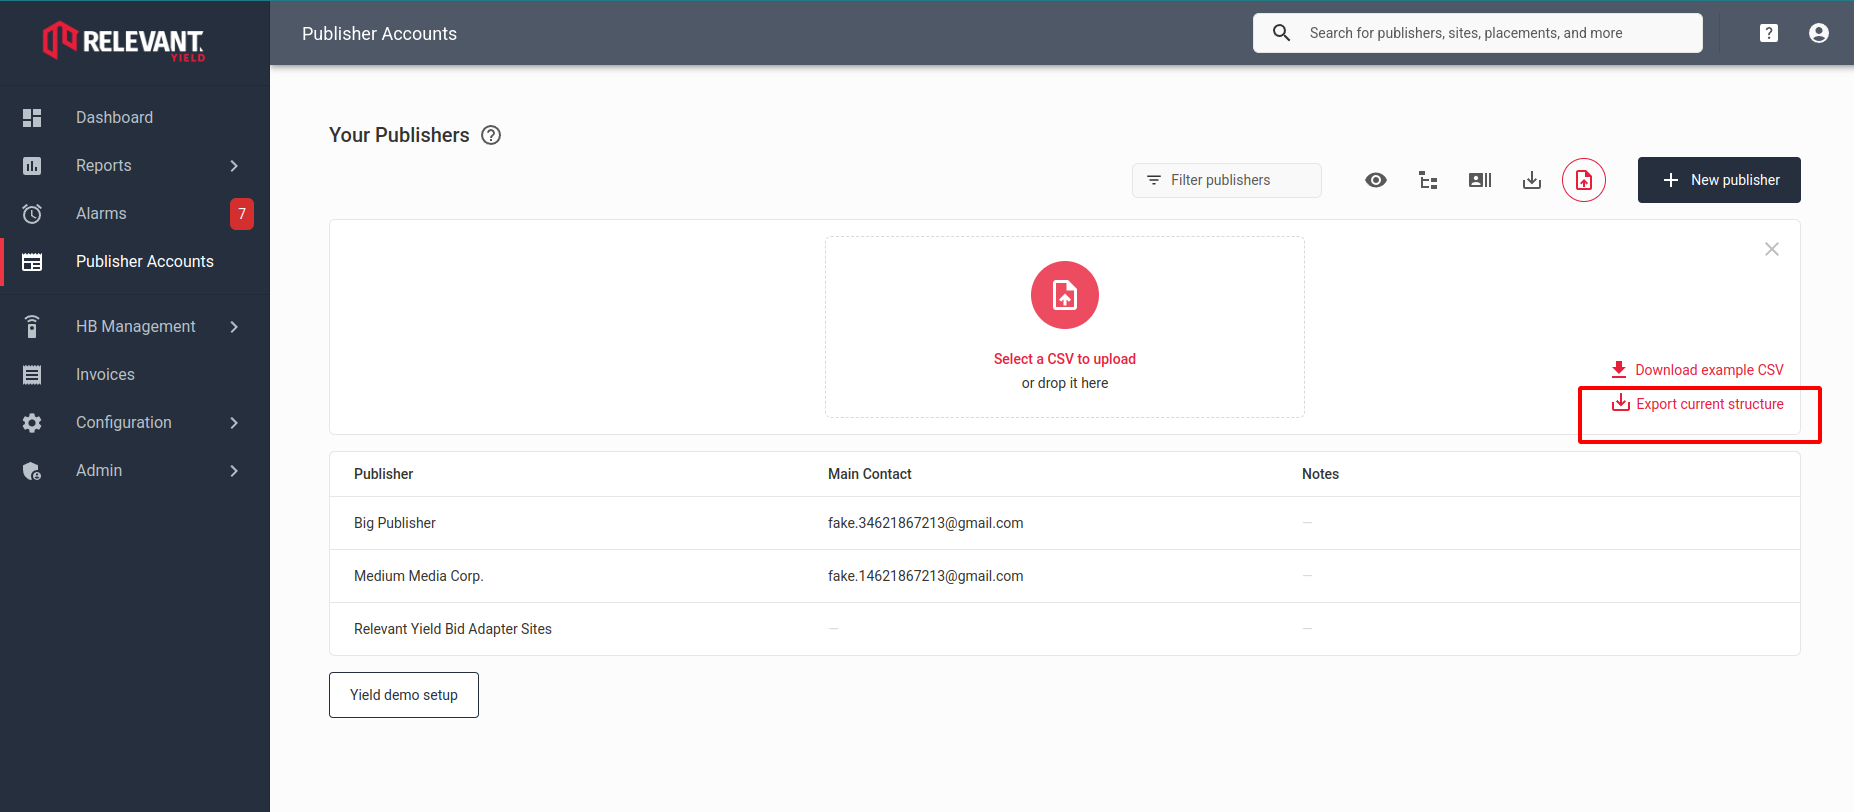
* [Bulk import (automated mapping) of your HB structure with .csv](/hb-manager/setup/bulk-import-automated-mapping-of-your-hb-structure-with-.csv) — Import placement mappings at scale.


# Overview of setting up HB Manager

Setting up HB Manager in Relevant Yield is quick and easy.

These are the main steps to take during the onboarding of Relevant Yield HB Manager:

{% stepper %}
{% step %}

## Create a map of your SSP placements

Your Relevant Digital Technical account manager will provide you with a document sheet where you can list all your adserver placements and corresponding SSP placement IDs. This will be useful later on when mapping the SSP placements to corresponding Relevant Yield placements.
{% endstep %}

{% step %}

## Login and give access to your colleagues

You will receive an email with credentials and a login url to your Relevant Yield account.

You can read more about user roles and how to create users in [User Management in Relevant Yield](/general-platform/user-management/user-management-in-relevant-yield)
{% endstep %}

{% step %}

## Define your Publisher / Website / Placement structure

Whether you are a publisher or a network user, this article will teach you how to create your own placement structure: [What Are Publisher Accounts?](/general-platform/inventory-management/what-are-publisher-accounts)
{% endstep %}

{% step %}

## Add integration to your adserver

Together with your Technical account manager, create line items to your own adserver. Also add an adserver in Integrations view of Relevant Yield. Learn more about adserver settings in [Setting up an adserver](/hb-manager/setup/setting-up-an-ad-server)
{% endstep %}

{% step %}

## Add SSPs

Add your SSPs/Bidders the same way you added your adserver. [Here](/hb-manager/integrations-and-connections/setting-up-a-new-ssp-connection-with-hbm-hba) are detailed instructions.
{% endstep %}

{% step %}

## Create Placement types

Placement types hold information of which ad sizes you wish to load on a certain placement. Create placement types that make sense to your setup. Placement types can be created on a Global, Publisher or Website level. Learn more about how to create placement types in [Setting up Placement types](/hb-manager/setup/setting-up-placement-types)
{% endstep %}

{% step %}

## Map Adserver and SSP ids to corresponding Relevant Yield placements

Read more about [Mapping Adserver and SSP placement IDs to Relevant Yield Placements](/hb-manager/setup/mapping-adserver-and-ssp-placement-ids-to-relevant-yield-placements)
{% endstep %}

{% step %}

## Configure Header bidding with Prebid Parameters

Read more about how to [Manage Prebid settings with Prebid Parameters](/hb-manager/auction-behavior-and-optimization/manage-prebid-settings-with-prebid-parameters)
{% endstep %}

{% step %}

## Configure Header bidding with Prebid configuration

Read more about how to manage which placements / SSPs are being loaded: [Editing Prebid configurations](/hb-manager/setup/create-or-edit-prebid-configuration)
{% endstep %}

{% step %}

## Finetune where and how your placements are being loaded with Placement Tag Fields

In addition to Prebid configurations, you can use Placement Tag Fields to determine where and how your placements are being loaded. Read more: [Adding Placement Tag Fields - Advanced](/hb-manager/setup/adding-placement-tag-fields-advanced)
{% endstep %}

{% step %}

## Test your Header Bidding setup on a test page

Your Relevant Digital Technical Account Manager will help you set up a test page.
{% endstep %}

{% step %}

## Go live with Relevant HB Manager!

{% endstep %}
{% endstepper %}

## Optional Steps

### Serverside header bidding

Read how to setup Prebid server: [Adding the Prebid Server to your calls](/hb-manager/integrations-and-connections/adding-the-prebid-server-to-your-calls-old)

### Mobile apps

Read more about [Setting up Prebid Mobile in HB Manager](broken://spaces/thyujPhgXh1WtJZy8bjr/pages/d5d794ae390ba1d87a738368811c45e4a32511c1)

### Using Amazon UAM/TAM

Read more about [Adding Amazon UAM/TAM to your Prebid setup](/hb-manager/integrations-and-connections/adding-amazon-uam-tam-to-your-prebid-setup)

### AMP

Read more about [Setting up Prebid AMP in HB Manager](broken://spaces/thyujPhgXh1WtJZy8bjr/pages/7d35eda030f64caeba891d13c6ee852f92e0dc52)


# Setting up an ad server

## How to setup a new ad server in Relevant Yield HB Manager

Some of the settings are related to Relevant Yield Ad Revenue Insights when editing an ad server in Relevant Yield. For example, having an active connection to your ad server (working credentials) is not required If you are using Relevant Yield HB Manager.

### How to add a new ad server:

{% stepper %}
{% step %}

## Configure settings for the ad server

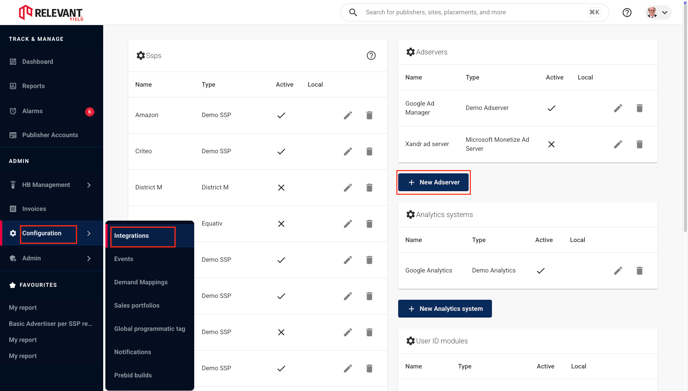
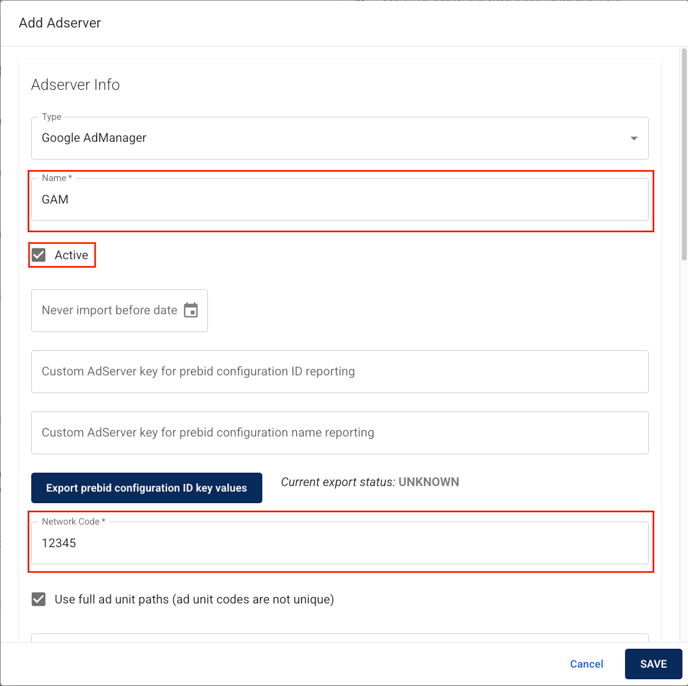
To add a new adserver connection, go to **Configuration -> Integrations** and click "**+ New Ad server**". Some of the settings are adserver specific, but in most cases you need to add at least a network id / code.

![](/files/6564c5186cbf00c502c230aadedf73c0fdc1b3d6)

If you have any questions regarding the settings, please don't hesitate to contact our support.
{% endstep %}

{% step %}

## Save.

The ad server can be selected in the Placement editing after you have successfully added a connection to it.
{% endstep %}
{% endstepper %}


# Mapping Adserver and SSP placement IDs to Relevant Yield Placements

One of the tasks during HB Manager onboarding is to map adserver and SSP placement IDs to corresponding Relevant Yield placements.

Before you start, **make sure that SSPs and Adserver are saved in Configuration** > **Integrations** view.

### How to map SSP IDs to corresponding Relevant Yield Placements

{% stepper %}
{% step %}

## Navigate to a Placement

Go to Publisher Accounts > Edit Publisher > Websites > Placement

![](/files/44ab9f0c3352acbb4e90fa400c42a23a00ff4985)
{% endstep %}

{% step %}

## Add your Adserver

In placement settings you select your adserver. If not yet integrated, follow [this guide](/hb-manager/setup/setting-up-an-ad-server).

![](/files/76baefb3eeb1de81ffd12d7c16151abdf109739d)
{% endstep %}

{% step %}

## Add an SSP and the SSP ID

* In placement settings you select the SSPs you wish to use in the Placement. If no SSP is integrated yet, follow [this guide](/hb-manager/integrations-and-connections/setting-up-a-new-ssp-connection-with-hbm-hba).
* Add the SSP ID into the ID\* field

![](/files/d55da062dfd6bd99b88aa02270d80c291d6afb12)
{% endstep %}

{% step %}

## Remember to add all of the SSP you have

Use The onboarding sheet provided by your Technical account manager and fill in all of the SSPs ids.
{% endstep %}

{% step %}

## Save

At the bottom of your account settings you find the "Save" button.

![](/files/fe4554d0c9ddf00d4a1ff2656e0973d9f0bc3b50)
{% endstep %}
{% endstepper %}


# Setting up your HB Manager configuration

### Different setup levels of your Header Bidder

You can decide In HB Manager whether you want to run Prebid settings on global level (affecting all of your placements), publisher level (affecting Publisher's placements) or if you'd like to have different settings for each placement.

This is so that it is as easy as possible for you to create cross Publisher/site setups of your most common placements, but at the same time give you the opportunity to really dig in and granularise your prebid setups exactly as you want to.

The 3 main levels the HB Manager works with are:

* **The Global level:** This is intended for your most common placements types and prebid parameters that will be used across your entire Publisher/website network.
* **The Publisher level:** If you prefer to override your Global Placements types/prebid Parameters or simply add additional ones for a particular Publisher, you can do so in the Publisher account. You can override your Global Placements types/Bid Parameters or simply add additional ones for a particular Publisher in the Publisher account. This will then be available to all the Websites in that particular Publisher account.
* **The Website Level:** You can override your Global Placements types/preid Parameters or your Publisher account Placement types/prebid parameters in the site level. You can even create multiple "Section" or "Placement" instances per website. This enables you to have a completely different Prebid setup for a particular placement or section if needed.

Utilising these different levels or hierarchies can very useful in situations where you want run specific Bidder/SSP setups, have different adservers involved, or when you want to run prebid setups based on specific media types. For instance, when you want a different prebid setup for your Video Bidders/SSPs. You could even create a unique prebid setup for each placement on each webpage/article but we certainly do not recommend you to do it!

### Setting up your Global Placement types and Bid Parameters

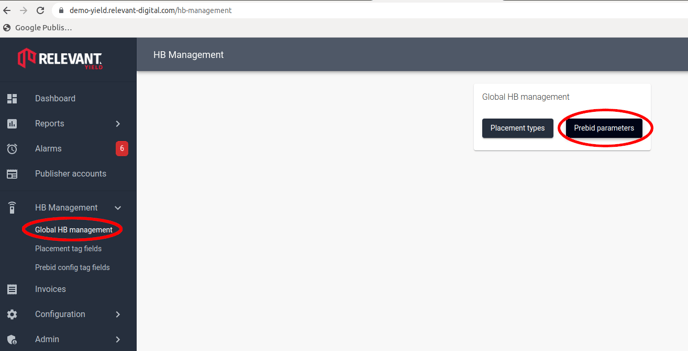
First navigate to HB Management -> Global HB Management.

We recommend that you think about the Placement types that you intend to run across most or all your Publishers/Websites when setting up your Global placements and Bid parameter.

![](/files/67ed54e7e85b7a6bba8490f624ba6d65e2583ca2)

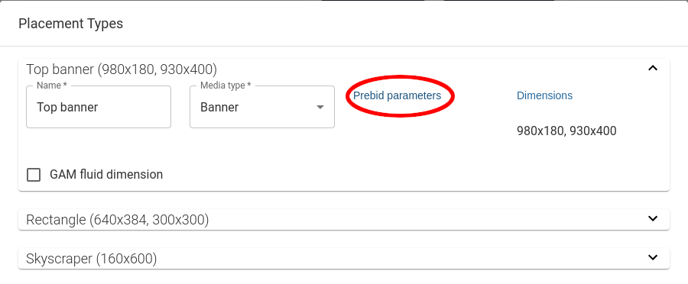
By pressing **Placement types** in the Global HB Management area, you can create the type of placements you intend to use:

![](/files/5afd0bd3f03e5c63ccbe7d142177ec1dc3409052)

Normally you would give the placement type a name and then add the dimensions the placement type is intended to call. Click Dimensions to add all of the dimensions the placement type is intended to call. [More on this in Setting up Placement Types.](/hb-manager/setup/setting-up-placement-types) You can also setup a viewport configuration, if you intend to use Responsive placements on your website:

![](/files/cd85d80e4e2bd746346d3bf74e0951d8b5dcff4b)

You don't have to add any **Prebid paramters** unless you want/need to. There are cases where certain Bidders require you to enter in additional information, but we will always help you with this during the Onboarding phase. If you are uncertain, feel free to reach out to our support. Please notice that if you select to add a **Prebid parameter** to a particular placement, it will only apply to that particular placement.

If you want to add a global Prebid parameter, you simply press the **Bid parameters** button in the HB management, next to the **Placement types** we just edited above. This will bring you to these options:

![](/files/049c5f5fed46d074fa5f04cb78e6a9a78e796322)

Here you can add Prebid parameters that will apply to all your Prebid setups, unless you override them on a lower level. So it may be useful if you plan to use them everywhere.

The **Generic placement data** in the view above will give you the option to add generic data for your placements, such as borders or other custom parameters. This is also where you would activate Prebid server so you can call both Client-side and Server-side.

### Related articles

* [Setting up the Relevant Digital (RD) Bid Adapter](https://help.relevant-digital.com/e3t/Ctc/OO+50013/cyHXp04/JlF2-6qcW8wLKSR6lZ3llW4jcqY_1bmRQBW8TQyM47kWqDvW86GPdJ90v9m-W5Yq2v97Dd_DdW7dyD0V6ZYd7hW8qnrVy6gRT1bW2ySLY26QTFtYW6_9MWY8WHqmfW5lCYN05fGW5kW6HCtB87vZL0JW6cdBsd2xknztVNs-YF5lPmP7VGPNM37xD0FcW8hd55S3S9ZjyW39xwvp2NmT0BW511KmS7YcqF2W2_QxG_1FcCrQVnt6Np5k5TzMW7b-wVD3sNdTBW4wK4ZV3t5k0WW17k1d-8p8_jRW4m62HW3wrhHFW1cZ6dP7rNVswW1_qLCv3MgSC8W1Qx1803Jv2rKW7bbdqX4Y5FHCW5yW03L2QDd7NW1_J5tG5rhG0_f8cfXVb04)
* [What is HB Manager?](https://help.relevant-digital.com/e3t/Ctc/OO+50013/cyHXp04/Jl22-6qcW7lCdLW6lZ3kDW7cmsNk6sqwsfW7Wt6Sn1NxCBzN5F1Qr1tvV6WW5v83Px1bpR6hW8Lr_1y2T1lXxW4ZWCqs4FdgHhW8ZykYx5d0cJmW45vFTp1pHC1DW6Dhzfd7DFpBXW4DtbhT1sbstnW2cFn-p6YCWDtW8WznDL6knKqNW5G0q5b89Hr64W7f4cR-45WGYhW24rJ3r61kRfyW4wHszg7qxS-JW3Ns-K96pjKVxW996nzm3-BLcGW79qrHG1Y3t98W5-k9Vl65FQwkW7gJXht2cKNlmVH0Jkz3rhMy8W6kC9dc4TCrVYW6Kvjll5M2frCf5bZ6Rs04)
* [Setting up and working with the Prebid User ID](https://help.relevant-digital.com/e3t/Ctc/OO+50013/cyHXp04/Jl22-6qcW7lCdLW6lZ3mVN5J_-YLljhNfW23vpjP57WdP8W4_2QlR5frc1sW3xswp-3rj77ZW2KxfwT7yCf1MVLN6s36G92R_W28D6_Q89p8zLW1GktD21SbXNtW1hvZY86lF1w7W4cfY9j8KFJ5lW5WD8kk7HSnJmW3FYP5c2T88t6W8GnMtL874yw0W6dQyB_7JL-0JW1ktncp7qsBMxW1GZQWC94YXp7W95gTfr72rsRjW91rkpV4Y2XtsW2B9CBQ2HLFRKW2sbfc48qymGJN2D1bMlghRM9W5-WyTV3J0NQdW82gLzc6LjTgyW3js6Sw6TV9Q3f1542g-04)
* [Lazy Loading Ads in HB Manager](https://help.relevant-digital.com/e3t/Ctc/OO+50013/cyHXp04/Jll2-6qcW7Y8-PT6lZ3lRW2ZVV_K6lT14yW8lHnXp6dknbdW6Z5Nbl3QSQSWW80ZJKs45Xtj-W1LZJg59dRcXJVP5rRl68fLF6W2HQVcR4DXbzxW7bq7z02MyCw9W6rgV178Gr3kYVf6qbh4Yyr7FW7fHVgc8VXJjkN51jsCwq0YmRW1m0nMl3HlJ68W49glLJ4Q_278W5f39S-21snyMW3XzKpd11NMrKW1t07yf67CS0lM9llG0hgPDSW3-Z4tb2-c9r8W3KZt614t8Yp0W83cbrm7rvP0zN3dg3x2CqqRnW5cPKlw2YfXj4N7vrNcDqbY4gW3wHKV41VxBvLW1rM_4W596s8Gf91JW_P04)
* [CDN Configuration](https://help.relevant-digital.com/e3t/Ctc/OO+50013/cyHXp04/Jl22-6qcW7lCdLW6lZ3l6VrSk0r6-R1LLN2_lv_4WX-8dW1Gy4dv4k6Z4PW6Xbb1q1Q8vXfW7KFmnD9kJz68W3Dj4hr8vH29GW1Xjz7K3XFCsNW8LdBt99kyNL5VwVnL34JDG6-W7CmVWh6Ntp9bW5YTZ-K1pKJfsW3wsKCX3QGjLGW1FyfBG7Hrr8BW4_F6Zp3vG02VW6hb-wM2y417vW4nCz1T7pR1p0W1b1b5w8qnZWRW5l3Dcv647FzgW1qW__j5FjDDgW1QHnTb9lYWgsW913zPm7C35tHW74MQ8s6xY16jW8VC5xD4ssy4zW6w28KW7tMJStf1MsscT04)


# Setting up placement types

* HB Manager Placement types are used to configure the ad sizes you wish to load on a certain placement
* Placement types can be created on a Global, Publisher or Website level.
* Add global Placement types

{% stepper %}
{% step %}

## Navigate to HB Management -> Global HB Management and select Placement types

![](/files/67ed54e7e85b7a6bba8490f624ba6d65e2583ca2)

![](/files/5afd0bd3f03e5c63ccbe7d142177ec1dc3409052)
{% endstep %}

{% step %}

## Click + sign to add a new Placement type and give it a name

{% endstep %}

{% step %}

## Select which sizes your placement type should use

Click Dimensions to add all of the dimensions the placement type is intended to call. For example, 980x180, 980x400 728x90.

![](/files/cd85d80e4e2bd746346d3bf74e0951d8b5dcff4b)

Use **Limit to viewport dimensions** if you have a responsive site and you need to limit ad sizes based on viewport size.
{% endstep %}

{% step %}

## If needed, add Placement type specific Prebid parameters.

They are not mandatory. More on this in [Setting up your HB Manager configuration](/hb-manager/setup/setting-up-your-hb-manager-configuration) If you're uncertain, don't hesitate to reach out to our Relevant Yield support. Prebid parameters can also be added on a global/website/placement level.
{% endstep %}

{% step %}

## Save placement type

{% endstep %}
{% endstepper %}


# Create or Edit Prebid configuration

Prebid configuration holds your `"prebid.js"` script and the optimizations you create(d) in Relevant Yield, including the hierarchy of your `"Prebid parameters"` (site / placement / SSP).

{% stepper %}
{% step %}

## Where can I create/edit Prebid configurations?

Prebid configuration can be created/edited on the website level in your publishers account. Navigate to desired site and open "Prebid configurations". If no configurations exists, simply press the "plus" button and name your configuration accordingly.

*Publisher accounts > edit account > site/app Prebid Configurations*

![](/files/6280fa0d700a55695af0dfbef79308fa72d8668d)
{% endstep %}

{% step %}

## How to create/edit Prebid configurations?

Open Prebid configurations and create a new one.

![](/files/23a1906d9d5d20d10afb605db5922e2d7e4216c7)

Or edit your configuration.

You can:

* exclude/include certain placements from participating in the auction
* disable SSPs just on that site or just on that placement
* add any additional prebid parameter

![](/files/2574fc45e62949bff3543b3972da1dc389f74901)
{% endstep %}

{% step %}

## Save

Don't forget to save your changes. Now all your changes will be included/excluded.

You can copy the Relevant Yield wrapper that is created within the configuration and adjust it so it is compatible with your site. If you have any questions do not hesitate to contact your account manager or [support.](broken://pages/b548f0284d8ea70222f204b00f639c1eebe8ab00)
{% endstep %}

{% step %}

## Create child configurations

For testing purposes you can create child configurations withing your main configuration and optimize your header bidding further. Read more about multivariate testing in RY [HERE](broken://pages/cca054d6311b80724d2af557ecf73512299a573d).
{% endstep %}

{% step %}

## Mobile Prebid Configurations

For mobile configurations you will first navigate to your app level " *Prebid Configurations*" and enable " *mobile mobile"* settings on *placement level* as show on the bottom two images.

![](/files/e858449fa45e0036992d821bf977379507112ac3)

![](/files/3c469505f9c35adf46ce027b706200e10beac9c8)

### Retrieve Prebid mobile IDs

In the Prebid Mobile setup you can copy you placement IDs:

* Prebid server account ID
* AdUnit Config ID

![](/files/1bdb362d1bbc7fff50e3bf6ecd66ec27feebb0f2)
{% endstep %}
{% endstepper %}


# Adding Placement Tag Fields - Advanced

The Placement Tag Fields can be setup and included in the calls, and it works like this:

Everytime your Prebid loads through our HB Manager we utilize all the settings you have set in the HB Manager. These settings can be anything related to the Prebid standard really, but we can also send other things with the code as well. Normally the prebid allows you to set things related to fx FloorPrices or maybe a specific Bidder parameter, but the “Placement Tag Fields” focusing on the placement load itself.

By handling all of this in the HB Manager you can adjust how and where your placements load on your websites, making it really easy to try or add new formats/designs, **without having to include your tech department.**

These functions can included things like: Rendering IDs (Where should the placement load), Borders (Should there be a border around the placement), Breakpoints (Should it load at specific breakpoints), Active (Is the placement active) Padding (Should the placement have Padding) etc etc.

You can find the Placement Tag Fields in the HB Management menu item:

![screenshot\_placement\_tag\_fields](/files/c6ff8a4ffabcf6b1cdee06d41b0ec9523a48bb53)

### Why is this important?

This really makes the decision on how and when to load very flexible for you; especially in combination with your Prebid settings of course.

We are always trying to give you the maximum amount of freedom, putting as much of the control on you, you can actually create new Placement Tag Fields on your own by combining several types of selection:

![Näyttökuva 2021-11-16 kello 11.15.03](/files/439feae0cc059a0922368ac8c4c83f0c6ef804d3)

Please notice that adding the Placement Tag Fields yourself require some coding skills, and we do suggest that you contact the support or your account manager for help if needed.

As always our Onboarding team will help you with setting this up during the Onboarding, and you can then utilize the support if you would like to do changes. Once setup, it is simply a matter of selecting these functions on your placement level:

![Tag\_Placmeent\_Selection.png](https://relevantdigital.zendesk.com/hc/article_attachments/360012614998/Tag_Placmeent_Selection.png)


# Prebid Config Tag Fields - Advanced

Using Prebid Config Tag Fields you can create custom settings in Yield to control site behavior. The settings are applied using JavaScript implemented in the site-code or via custom code in Yield.

In order to create custom settings per *placement* one can use [Placement Tag Fields](broken://pages/8f017c8d4044c912c7a0d23732447be75304cc4e) - while for settings that are not connected to individual placements - the **Prebid Config Tag Fields** page is used. This creates settings that are available *Globally*, per *Account*, per *Site* and *Prebid Configuration*.

The settings will be available from the **Prebid parameters** menu via the **Generic Prebid Config Data** section, except for in *Prebid Configurations* where it will be available directly in the **Configuration Data** section. For more information about the settings hierarchy in Yield, read about [**Prebid Parameters**](broken://pages/8b7006f574964243f6eb592104e02fba5bf61bf5).

*Example of such settings can be:*

* Extra .js files that should be loaded.
* Custom Prebid settings per site that can be applied e.g. by calling [relevantDigital.addPrebidConfig()](broken://pages/a9fffdd117fc36121adcb0140d78230f65b73bb2).
* ..and anything else that can be done via JavaScript including CSS-customization, etc.

The result of the settings is available in an object named **data** that is available directly via the *prebid configuration* and *auction* objects accessible via JavaScript. (the methodology is similar as for the **AdUnit.data** object created per placements when using [**Placement Tag Fields**](broken://pages/8f017c8d4044c912c7a0d23732447be75304cc4e))

### Creating the custom settings

This is done via the **Prebid Config Tag Fields** page:

![Pb config tag fields](/files/90218f55b27a7dc65d9321d2f709c2bbb95e1b69)

Settings can have different types such as *String*, *Number*, *Array* and *Object*. The example above shows a hypothetical setting that can be used to control which *Consent Management Platform* (CMP) that is loaded. In the example we enable **Options** for the string and add the available options using the **Edit** menu. This turns the setting into a selector with predefined values instead of a free-text field.

### Changing settings and using them from JavaScript

The screenshot below combines changing our new setting as well as implementing the code that is applying the setting on the site. (although the CMP-init code is just illustrated by console-messages..)

![Pb config tag fields apply (zoomed)](/files/31e50431c43b458df9ac249ca76a6a80e1f9f284)

To take action upon the settings - one option is to use **Custom Config JavaScript code** as above. But if you for example want to implement the behavior directly in the site-code instead - then it's possible via the [relevantDigital.addAuctionCallbacks()](broken://pages/4417303e71670e65c08b2323ba2734247fec8a59) function combined with the **onBeforeAuctionSetup** callback for [relevantDigital.loadPrebid()](broken://pages/b6fbef807cab617da8413b4bd54ece17dbc2dcc1).

```javascript
const loadCmp = (cmp) => {
    if (cmp === 'quantcast') {
        console.info('Load Quantcast CMP stub/init code here');
    } else if (cmp === 'onetrust') {
        console.info('Load OneTrust CMP stub/init code here');
    } else {
        console.info('No CMP');
    }
};
let hasLoadedCmp = false // We only want to load CMP once
window.relevantDigital = window.relevantDigital || {};
relevantDigital.cmd = relevantDigital.cmd || [];
relevantDigital.cmd.push(function() {
    relevantDigital.addAuctionCallbacks({
        onBeforeAuctionSetup: ({ auction }) {
            if (!hasLoadedCmp) {
                // 'auction.data' is the object with the selected Generic Prebid Config Data
                loadCmp(auction.data.cmp)
                hasLoadedCmp = true;
            }
       },
      });
});
```

#### Applying the settings in JavaScript before first call to relevantDigital.loadPrebid()

Depending on implementation it might take a while until the site code is ready to call **relevantDigital.loadPrebid()**. If you don't want to waste any time waiting for that, for example if you need to load other .js files - then a workaround is to trigger an *empty* auction by using an empty **allowedDivIds** array, like below:

```javascript
window.relevantDigital = window.relevantDigital || {};
relevantDigital.cmd = relevantDigital.cmd || [];
relevantDigital.cmd.push(function() {
    relevantDigital.loadPrebid({
        configId: '[CONFIG-ID]',
        allowedDivIds: [],
        noGpt: true,
    });
});
```


# Bulk import (automated mapping) of your HB structure with .csv

## Import your complete or partial mapping structure with adserver and SSP placement IDs with just a few steps

#### The steps described here are following the path that is needed in order to successfully bulk import your structure.

If your account manager completed all these steps during the Relevant Yield onboarding, you have the option to request a copy of the .csv file or you can start filling out the example .csv file that you downloaded in step 4..

{% stepper %}
{% step %}

## Configure settings for the adserver

Follow [Setting up an ad server](/hb-manager/setup/setting-up-an-ad-server).
{% endstep %}

{% step %}

## Add the new SSPs

Follow [Setting up a new SSP connection with HBM/HBA](/hb-manager/integrations-and-connections/setting-up-a-new-ssp-connection-with-hbm-hba).
{% endstep %}

{% step %}

## Set up Placement types

Follow [Setting up placement types](/hb-manager/setup/setting-up-placement-types).
{% endstep %}

{% step %}

## Download example .csv

Navigate to > Publisher Accounts > Import from CSV > Download Example CSV

<div data-with-frame="true"><img src="/files/a67f09c88993b7a87deea646570ec022874901da" alt=""></div>

When you click on the "CSV Import/export" and option to select or drag and drop your CSV file will appear.

You can " **Download example CSV**" file.

<div data-with-frame="true"><img src="/files/4d053a6ee93fd7b4ab7cd52b1074aaffad2f5757" alt=""></div>
{% endstep %}

{% step %}

## Export current structure to CSV

If you already have a structure in place, but want to see what all *Publishers > sites > placements > SSPs* you have in Relevant Yield, you can do that by clicking on the "Export current structure" as seen on bottom image.

<div data-with-frame="true"><img src="/files/e670535b1a56a3b6b5358e5b2d6549d53af83575" alt=""></div>
{% endstep %}

{% step %}

## Do a test import

Perform a test import by modifying the "Publisher name" to a test publisher name. This action will automatically generate a new publisher in your account. By doing this, you can verify the import and see how the structure will appear once you upload it for real.

* Columns with **typos** and wrong names will be **skipped - left empty**, so make sure the names match your integration names.
* **Extra spaces** in the names will also cause **typos** and will be skipped
* **Uppercase vs lowercase** letters will also cause **typos**

If there are no upload errors and you are satisfied with the appearance of the structure, you can safely remove the test publisher and proceed with the actual import.

**WARNING**! - Warning messages usually appear when something already exists in the RY system (e.g. adserver, placement name...). You can **ignore** those warning messages as it is just a reminder that you are updating the said "placement" with newly added SSPs.
{% endstep %}

{% step %}

## Do a "real" import and include new placements in configuration

After completing the import, the final step is to navigate to the "Prebid configuration" on the site level and make sure newly imported placements are enabled in the configuration (they should be added by default when importing, but its good to double-check everything is as it should).

This will ensure that the placements are included in the overall setup and can be used effectively.

<div data-with-frame="true"><img src="/files/03406ecd0821abf49cef02feee49fdb2bf091826" alt=""></div>

<div data-with-frame="true"><img src="/files/9e7d52836d270a5b837a4fe44501e669d1ae758b" alt=""></div>

And don't forget to confirm with **OK button** and then **SAVE button**!
{% endstep %}
{% endstepper %}


# Disable Bidders in HB Manager

## Effortlessly Customize Your SSP Stack for Optimal Performance Across Publishers, Sites, and Placements

Take full control of your SSP stack, making it easy to activate or deactivate bidders in just a few clicks. This level of flexibility lets you fine-tune your demand partners to help maximise revenue and ensure strong performance across all your digital properties.

### Key Features

1. **Global Pausing**

   Temporarily pause SSP activity across all properties while retaining existing mappings. This can be useful when responding to changes in demand or for troubleshooting, without the need to remove configurations.
2. **Account, Site, or Placement-Specific Disablement**

   Disable individual bidders at the account, site, or placement level to refine how demand is managed. This allows for more precise control, whether the change is temporary or permanent.
3. **A/B Testing**

   Use A/B testing to compare SSP performance on specific sites. This helps identify which configurations deliver the best results, supporting data-driven optimisation of your setup.

### Additional Benefits

* **Streamlined Workflow**

  Simplify the management process with an intuitive interface designed to support efficient day-to-day operations.
* **Improved Monetisation**

  Adjust your SSP stack to meet the specific needs of each digital property, helping to optimise revenue performance.
* **Ongoing Support**

  Access expert guidance from the Relevant Digital team to assist with setup, troubleshooting, and ongoing optimisation.

### How to Disable SSPs (Bidders)

When integrating a new SSP, it will be enabled and active by default across all levels.

![](/files/ca4fb25e143509384d6aca9a316b69951f05c37e)

#### Disable Globally

**Go to:** HB Management > Global HB management > Prebid parameters > Edit SSP

![](/files/ec8b225a89445346ca5734001bec306ae5a5368d)

#### Disable on Account Level

**Go to:** Publisher Accounts > "Edit" Account settings > Account Prebid parameters > Edit SSP

![](/files/08ce393021737f0545612c35b6402720deb6f908)

#### Disable on Website Level

**Go to:** Publisher Accounts > "Edit" Account settings > website level Prebid parameters > Edit SSP

![](/files/e82d84287664cb21c20463f73679ce85c070c09f)

#### Disable on Placement level

**Go to:** Publisher Accounts > "Edit" Account settings > Open website > Open placement > Prebid parameters > Edit SSP

![](/files/cb4922bd9e9299333ab1f55f1cf2ece4dd904cbc)


# Bidding types in HB Manager

In Relevant Yield’s HB Manager, there are three primary bidding types: Client-Side Bidding Server-Side Bidding, and Parallel-Side Bidding. Understanding these options will help you choose the best approach for your ad monetization

## Activating different bidding types

You can change the bidding type within the " **Prebid parameters**" settings.

This can be done on different levels (global/publisher/site) or used in for A/B testing (configuration level) purposes. Read about how to manage your prebid parameters [HERE](broken://pages/fad823c07ee3bcbe5f1070f3392bd2a94b669970)

![](/files/f7fadbc93a0a43b738340f10b3b6efef0afbb170)

Before activating server or parallel side please contact your account manager or support to verify the setup to avoid any issues.

{% stepper %}
{% step %}

## Client-Side Bidding

### What is Client-Side Bidding?

Client-side bidding (or browser-side bidding) occurs directly in the user’s browser. The HB Manager makes requests to multiple demand sources (SSPs, ad exchanges, and DSPs), collects bids, and returns them in real time before sending the winning bid to the ad server.

### Benefits

* Higher transparency and control over bid requests
* Stronger competition among bidders, increasing revenue potential
* Direct interaction with demand partners, allowing for granular optimizations

### Challenges

* Increased page latency due to multiple bid requests being processed in the browser
* Limited by browser concurrency and network constraints

### Best Practices

* Optimize timeout settings to balance bid competition and page load speed
* Implement lazy loading to reduce unnecessary requests
* Use a limited number of high-performing bidders to avoid excessive latency
  {% endstep %}

{% step %}

## Server-Side Bidding

### What is Server-Side Bidding?

Server-side bidding moves the auction process from the user’s browser to an external ad server (e.g., Prebid Server). Instead of handling all bid requests in the browser, they are sent to a central server, which aggregates bids and returns the highest one.

### Benefits

* Reduced page latency and improved user experience
* Greater scalability by allowing more demand partners without overloading the browser
* Better handling of identity solutions and user data

### Challenges

* Reduced transparency as bid data processing happens on the server
* Potential loss of cookies and user data, leading to lower bid values

### Best Practices

* Use a hybrid approach by combining Client Side Bidding and Server Side Bidding for optimal results
* Leverage first-party data and alternative identity solutions to improve targeting
* Monitor discrepancies between bid responses and actual revenue to optimize setup

### Prebid server support

Not all SSPs (bidders) are supporting server side bidding type.

* You can always reach out to your SSP representatives, to make sure they do support prebid server.
* You can have look at the [bidder specific features](https://docs.prebid.org/dev-docs/bidders.html) from the official prebid documentation
* If you don't want to wait on the SSP to respond, maybe the most reliable source to make sure bidder supports PBS is directly from the [source code](https://github.com/prebid/prebid-server/tree/master/adapters).

![](/files/dc8b0b93ebe950080071cb3356b5a4c8e2db2696)
{% endstep %}

{% step %}

## Parallel Side Bidding (Client & Server)

### What is Parallel-Side Bidding?

Parallel-side bidding combines the strengths of both Client Side Bidding and Server Side Bidding by running auctions simultaneously in both the client and server environments. The winning bid form both sides is then compared and the higher bid wins.

### Benefits

* Optimized revenue potential by leveraging both client-side and server-side demand
* Balanced latency, as the browser and server work in parallel
* Improved fill rate by increasing demand competition

### Challenges

* More complex implementation and configuration
* Potential bid duplication if not properly managed

### Best Practices

* Implement deduplication logic to prevent duplicate bids from appearing in the auction
* Use dynamic timeout settings to adapt to bid response times
* Regularly analyze performance data to optimize bidder allocations

### Report on the parallel bidding in analytics, follow these steps:

{% stepper %}
{% step %}
Creating a new analytics report, navigate to the report settings.
{% endstep %}

{% step %}
Locate the "Other options" drop-down menu on the right-hand side of the settings.
{% endstep %}

{% step %}
Select the " **Split by auction runner**" option from the drop-down menu.
{% endstep %}
{% endstepper %}

By choosing this option, the analytics report will separate the client and server bidder data. This separation allows you to view and compare the individual metrics from both client-side and server-side bidding.

Analyzing the data in this way provides insights into the performance of each bidding method, helping you optimize your header bidding setup for maximum revenue and efficiency.

![](/files/d2b3d3ed23dfdec9e971d58848fb3f1ac88fe7ff)

In the reports, the single bidder will then appear as two. One for client side and another for server side (S2S)

![](/files/f992678c00781816493ca35247da0ae4a57bfa21)

### Performance Metrics to Monitor

Regardless of the bidding type, tracking key performance indicators (KPIs) will help optimize your setup:

* **Bid Response Rate**: Measures how often a bid request results in a bid response
* **Fill Rate**: The percentage of ad requests that result in an ad being served
* **Latency**: The time it takes for bids to be received and processed
* **Revenue Per Thousand Impressions (RPM)**: The revenue generated per 1,000 ad impressions
* **Timeout Rate**: Percentage of bid responses that exceed the set timeout threshold

### Choosing the Right Bidding Type

* If **transparency and control** are your top priorities, **Client-Side Bidding** is the best choice.
* If **reducing latency** and **scalability** are critical, consider **Server-Side Bidding**.
* If you want **the best of both worlds**, **Parallel-Side Bidding** offers an optimized solution.
  {% endstep %}
  {% endstepper %}


# Customizing Bidder Logos

This document explains how to customize bidder logos in Prebid to enhance clarity and reduce visual confusion caused by aliased bidders.

## Overview

In the Prebid environment, some bidders presented in the bidder section are “aliased bidders” of existing bidders. For example, the “Project Agora” bidder is an aliased version of the “Appnexus” bidder. This situation can also occur with agencies utilizing Supply-Side Platforms (SSPs) that are integrated directly into publishers' Prebid setups.

To enhance clarity and avoid visual confusion when multiple bidders share similar identities, we have added an option to override the default logo for the original bidder with the correct company logo. This ensures that the correct logos are displayed, making it easier to distinguish between similar bidders in your setup.

## How to Override Bidder Logos

{% stepper %}
{% step %}

## Navigate to Configuration

{% endstep %}

{% step %}

## Access Integrations

Click on the SSP to which you want to assign a new logo.
{% endstep %}

{% step %}

## Add Logo URL

Enter the URL of the logo you would like to use for the aliased bidder in the designated field.

<div data-with-frame="true"><img src="/files/eae4ee57e16b9db74b7e5701f2275487c71a1955" alt=""></div>
{% endstep %}
{% endstepper %}

By implementing these changes, you can provide a more accurate visual representation of your bidders, reducing confusion and improving the overall user experience.


# HB Manager Integration Types: manageAdserver True or False

This article describes two ways of implementing the Relevant Yield Header HB Manager wrapper with managed and unmanaged ad server.

### Understanding `manageAdserver` in Prebid

The `manageAdserver` setting is a fundamental decision that defines how Prebid via Relevant Yield HB Manager integrates with your ad server. It dictates who manages ad slots, key-values, and overall ad delivery logic.

| If the Publisher Wants...                                             | Then Choose...              | Why?                                                                                                                |
| --------------------------------------------------------------------- | --------------------------- | ------------------------------------------------------------------------------------------------------------------- |
| Operational Simplicity & All Relevant Yield Optimisation Capabilities | **`manageAdserver: true`**  | Leverages Relevant Yield for making faster changes without developers and easy optimisation & testing capabilities. |
| Absolute Control & Custom Logic                                       | **`manageAdserver: false`** | Offers maximum independence and flexibility for complex, custom or established in-house setups.                     |

***

### Option 1: `manageAdserver: true` (Managed Ad Server)

Choosing `true` means programmatic and advertising teams are able to use actively and easily make changes in ad server configuration and delivery without the need of developers. This approach centralises much of the logic outside of the site code and into Relevant Yield user interface.

#### Key Considerations for Managed Approach

* Configuration Hub: Most configuration changes are handled through Relevant Yield's interface, rather than directly in the site's codebase.
* Reduced Direct Control Through Site Codebase: The site has less immediate, direct control over the ad server's internal behavior and scripts because the handling is done in Relevant Yield.
* Custom Setups: Highly custom or experimental ad server logic may require adjustments to integrate properly.

#### Detailed Description of Managed Ad Server Functionality

* Streamlined Operations: Less ad server-specific scripting is required on your site, reducing complexity.
* Agile Updates: You can adjust ad sizes and formats quickly within Relevant Yield without frequently changing site code.
* Flexible Placements: Easier handling of dynamic or responsive ad placements and div IDs.

***

### Option 2: `manageAdserver: false` (Unmanaged Ad Server)

Setting `manageAdserver` to `false` is ideal when the publisher site retains full control and responsibility for all ad server scripts, slots and targeting logic. The site manages the integration and Prebid only handles the auction.

#### Key Considerations for Unmanaged Approach

* Resource Demand: Requires more dedicated hands-on management from the publisher's internal ad operations team.
* Manual Key-Values: All ad server scripts and key-value targeting must be implemented and maintained manually by the site team.

#### Detailed Description of Unmanaged Ad Server Functionality

* Maximum Independence: The site team maintains full, direct control over all ad server scripts, logic, and behavior.
* Unrestricted Customisation: Best for sites with highly custom, complex or unique ad server setups.
* In-House Troubleshooting: Updates and troubleshooting can be managed entirely in-house, without reliance on a third-party interface.

***

### Summary

If the site prefers simplicity and faster changes, choose `manageAdserver: true`.

If the site requires full control of the ad server and already has robust in-house ad management, `manageAdserver: false` may be preferable.

No matter which approach you choose, you'll be able to leverage [Yield's API capabilities](broken://pages/b6fbef807cab617da8413b4bd54ece17dbc2dcc1) for maximum control.

| Setting | Managed by       | Site Ad Server Code | Flexibility                | Maintenance |
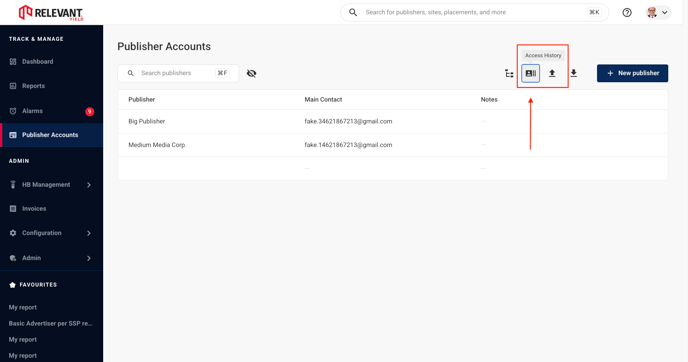
| ------- | ---------------- | ------------------- | -------------------------- | ----------- |
| `true`  | Yield / Prebid   | Minimal             | High (dynamic divs, sizes) | Low         |
| `false` | Site / Publisher | Full                | Full ad server control     | Higher      |

### Related articles

* [Native Integration Guide](https://help.relevant-digital.com/e3t/Ctc/OO+50013/cyHXp04/Jll2-6qcW7Y8-PT6lZ3nCW1fwVPz5mcPMlW2TY3xV6ZMkXDW8m1NkN3tw2jMW4zy_xC7GwGn8W93MVyV7HDVFPN802VFzhGQ96W8Mz2bv84lXR4Vn8j5C71VQqrW3n6bJJ8Fkp2kW2_B08B7c6tPcW2W9_0p23v1zMW3c3J0s6DQ9RPN4H1zfCtd6qkW97Cb445By6P1W7NpJ1B4xwBsMW3jL0wQ31vVb-W1_lzQ_6yj8sCW6Zkjl16yl8DTW2Dy1lj3J4SKTW4rLzFk3RYS0TN8b348Vjf34HW63sJ0v2jg9_MW6QRxbC2YxKj2W3xW8fW5M4-vTW36S3HJ5qS9jfW1PrZrC1YTrm4f1X5JvM04)
* [Bidding types in HB Manager](https://help.relevant-digital.com/e3t/Ctc/OO+50013/cyHXp04/Jl22-6qcW7lCdLW6lZ3lPW8SMY004Gfcd6N8W4rlTX1G_4W6lzGX94HHkvmW9lwZTC2WKc46W1jGVNN8L9zNMW1J77Vh1YgbmQW3gnXjb395CNCW5JpcCN85ht_QW2r4Kxp6xbfB2W93W--d8g4ZHkW8_p0W97jKt7KW1b6bBP4sKg4pVZG1H92zX5tVW7JBvlY7D95hFW841SmX6VhY5pN1H2y9L2VtYWW3bVG832RL4BFW7hJKq28jJBw9V6QRH83qgSyZW1fvvsV3kTvL4W138xwR63GHMCW6m-Vdg2JGXjNW7fNZt38kfbPwW16MxcM56gLJtd27QGb04)
* [Lazy Loading Ads in HB Manager](https://help.relevant-digital.com/e3t/Ctc/OO+50013/cyHXp04/Jll2-6qcW7Y8-PT6lZ3lHW4ppngv38pqT-W8P8mDH3Ss8PtW1x3KjQ1B9bvfW8sSGvB4F2HM3W2b_cvH4yCfP2W45PRMS3-C6VlW97fbWs7GQCj9VTyQxN2Vgg2DW460lZ35mXS1wV7yJ6V6HCLTKW1VQ0Wc915X2CW7tqlMS3VCh5CW1Yn0Q176yrQsW5s88Cp4SKQMKVnd_0W7pHD-gN2Td2tLNlNqPN6B_kknd6Md-W2KPHZv3NSXRtW8p_Pzy38kHdTVd1T-G6Bg7YMW4ct41g6wBB7lW7bQk-R2W6ntXN3kfhcR_JmfSW5RGLb14kXfkhW1Ghwgp2VQb3NN88hk6n8c5MRf5jVldM04)
* [Setting up Prebid Mobile in HB Manager](https://help.relevant-digital.com/e3t/Ctc/OO+50013/cyHXp04/Jll2-6qcW7Y8-PT6lZ3lLW6qxTl13xR-tYW52nVJF5b2fLnW6wlDwx5LsKChW51v6Wv8KmRzWW1ZmRb32fvsJNW6w7dBj5ss1YLW2fWBrh4FdM46W5ttRSD8r9nyYW5n-Fld1BL305N6_y0K9X7Yq9W8kZ9hs4ZjSBkW9kp16x8lJ-ftW7CH_qS1bWFN_W5m3x0z3PmP35W3HQyXv4j82ttN7FYZTjLFNfXW6pG2CB2Zy_JMW4qnWdC81SMqBW7L0CVg7yqS1QVGj-4_5J4xmzW1nyQnq1jyR8cW2btgJS7YXM5pVxbb4R2-67QhW1qy3rB3YVqwWN2FyCnB2kph2VfrqHK4y4f2mf9l0GZl04)
* [Overview of setting up HB Manager](https://help.relevant-digital.com/e3t/Ctc/OO+50013/cyHXp04/Jll2-6qcW7Y8-PT6lZ3mdW7WHF6M3rR_4MW2nn3fM7HLKNjW9btkRc41m8YGW5G7kzj98RfSfVwFdCj3_PkY4VB_V766xsv_tVzkZxR3W5lsKW3z3r0n5JPdwVW5l88gM9jv6HVN8X5lmPlKCCpVNMXr4722Qf9W8p3ZKr2Fc4thW1pH7884q8p_QW2GFJTJ8NQcmfW2glKjQ6yWLLpW2gZhFw4L71B3W7VjJxZ6kD1SdW17dVH_8gCbpcW77-9bj1S3Jj0Mp54WFH8G8jW3VR0dQ2h7VV6W2H6tYb7gHTtlW3PWXyX4nvXdFW4HSQnF95wV1_W2LcfZZ2kLBlFW4rBCtZ9bvlBxf7MN5s404)


# What is HB Manager Empty Bidder?

When adding a new SSP connection in Configuration - Integrations, it is possible to select HB Manager Empty Bidder.

HB Manager Empty bidder is a bidder to be added for placements not using Prebid.

![](/files/293cf4de0623576c811c218c179d4926fd804953)

See also: [What is HB Manager Generic Bidder?](broken://pages/619f8f98f8487fed1da99f569a399c56cfd8260b)


# What is HB Manager Generic Bidder?

When adding a new SSP connection in Configuration - Integrations, it is possible to select HB Manager Generic Bidder.

HB Manager Generic bidder is a bidder to be added that doesn't have an accompanying API connection.

![](/files/293cf4de0623576c811c218c179d4926fd804953)

See also: [What is HB Manager Empty Bidder?](broken://pages/448423270c16221b2a4c0ad1d053d52e30a4db3a)


# Integrations and connections

Connect HB Manager to SSPs, adapters, Amazon, and Prebid Server.

Connect HB Manager to the demand and infrastructure services used by your header bidding setup. Add SSP connections first, then configure optional adapters, Amazon demand, or Prebid Server.

### Start here

* [Setting up a new SSP connection with HBM/HBA](/hb-manager/integrations-and-connections/setting-up-a-new-ssp-connection-with-hbm-hba) — Create and configure a new SSP connection.

### Additional connections

* [Setting up the Relevant Digital (RD) Bid Adapter](/hb-manager/integrations-and-connections/setting-up-the-relevant-digital-rd-bid-adapter) — Configure the Relevant Digital bid adapter.
* [OpenAds integration](/hb-manager/integrations-and-connections/openads-integration) — Configure The Trade Desk OpenAds wrapper.
* [Adding Amazon UAM/TAM to your Prebid setup](/hb-manager/integrations-and-connections/adding-amazon-uam-tam-to-your-prebid-setup) — Add Amazon demand to your Prebid configuration.
* [Adding the Prebid Server to your calls](/hb-manager/integrations-and-connections/adding-the-prebid-server-to-your-calls-old) — Add Prebid Server to your header bidding calls.
* [How to Confirm Which Prebid Server Version We're Using?](/hb-manager/integrations-and-connections/hbm-and-prebid-server/how-to-confirm-which-prebid-server-version-were-using) — Identify the Prebid Server version used by your setup.


# Setting up a new SSP connection with HBM/HBA

## How to add a new bidedr adapter in Relevant Yield for HB Manager and HB Analytics modules

If you are looking to establish an [**API connection for the Ad Revenue Insights module**](/ad-revenue-insights/data-connections/setting-up-a-new-ssp-connection-with-api), please contact your account manager for detailed guidance on the required credentials.

{% stepper %}
{% step %}

## Go to **Configuration > Integrations** and click "**+ New Ssp**"

![Näyttökuva 2025-06-19 kello 8.58.26-1](/files/30b540254ef0bd7b3024475a55b1328f2e33f063)
{% endstep %}

{% step %}

## Select an **SSP Type** you would like to add to your prebid stack.

![HBM add new SSP (1)](/files/a1f67d7afe5d46b435ed569bfc001c2c76476bc0)
{% endstep %}

{% step %}

## Give it a Name

Give it name that you want to see in your reports for this SSP
{% endstep %}

{% step %}

## Add global prebid parameter if there is one

That will usually be your "SSP account ID" or "SSP member ID" or some other ID, e.g. Network code

![](/files/648ea38ae8a7f0c7c62185da95f892d4aed1c582)

Global parameter name you see in Relevant Yield may be different from the actual bidder adapter. If not sure please contact support for further assitance
{% endstep %}

{% step %}

## Insert dummy credentials before saving

System won't allow you to save your newly added SSP unless you add some dummy placeholder into **User\*** field

![](/files/09711e0a2ba82c6a435c728f8f99dc3e2791de34)

You can add

![](/files/97a80fbbcaf930f74ca6d1956e695929692763f8)

{% hint style="info" %}
**Note:**

" **Active**" should be enabled only for importing SSP data via the API connection. For this integration you can have a look at how to [set up a new connection with API](/ad-revenue-insights/data-connections/setting-up-a-new-ssp-connection-with-api)\*

Also all the other fields you see in the integration that are not described here are a part of connection the SSP with the API. So no need to add anything else
{% endhint %}
{% endstep %}
{% endstepper %}

#### HB MANAGER GENERIC BIDDER

If you cannot find the SSP you wish to integrate in the list, but you know it is an official Prebid bidder, select **“HB Manager Generic Bidder”**.

Required Prebid parameters for each bidder can be found [here](https://docs.prebid.org/dev-docs/bidders.html).

* **Default bidder name**\* = Prebid bidder code
  * ![](/files/7d5becfb9f640e2379dd711dd73a677468b98802)
* **ID Bidder param**\* = Prebid required parameter (usually representing the placement ID)
  * ![](/files/5e6c04c310736f5d841c9fc301ee34e5f1452fe0)

If you need assistance, please contact your Technical Account Manager.

#### **REQUIRED FIELDS**

Most fields in the SSP configuration are straightforward (e.g., Publisher ID or Account ID). However, if you encounter any difficulties or require clarification, please don’t hesitate to contact your account manager for assistance.

If multiple parameters are required, they should be added later to the [Prebid parameters](/hb-manager/auction-behavior-and-optimization/manage-prebid-settings-with-prebid-parameters) at the appropriate level (global, publisher, site, or placement), following JSON syntax rules.

#### Basic JSON structure

A typical JSON structure for defining additional Prebid parameter looks like this:

```json
{
  "site": "example-site",
  "adUnitElementId": "div-ad-slot-1",
  "placement": "placment-name"
}
```

✅ Use **double quotes** for keys and string values.

✅ Keep **consistent formatting** (indentation, commas, and spacing).

✅ Validate your JSON using tools such as [JSONLint](https://jsonlint.com/).

✅ Include only the necessary parameters to avoid errors.

See the **bulk import for automated SSP placement mapping** [HERE](/hb-manager/setup/bulk-import-automated-mapping-of-your-hb-structure-with-.csv).

### Possible Errors

**Prebid build error:**

If you receive an error after saving, you have most likely selected a bidder adapter that is not supported in your current Prebid.js version. Please verify that each bidder or module is available in the selected version. Also, be aware that although you can download older versions of Prebid.js, only the most recent major version is officially supported.

**Missing credentials:**

Those credentials are for the API connection with the SSP. If you are only trying to integrate the adapter for header bidding then you can insert a dummy placeholder to the fields and save.

Read how to disable SSP [here](/hb-manager/setup/disable-bidders-in-hb-manager)


# Setting up the Relevant Digital (RD) Bid Adapter

This article explains the basics of the Relevant Digital Prebid Adapter, and how to set it up.

#### What is the RD bid adapter?

The RD bid adapter is a Prebid-compliant bidder adapter that lets you participate in an existing publisher wrapper auction — without owning the wrapper. A typical use case is a sales house or network that wants to monetise inventory for a publisher who already runs their own Prebid setup. By adding the RD bid adapter to the publisher's wrapper, bid requests flow into a secondary auction where you can run your own SSPs, maximising demand and revenue.

Full technical details from Prebid's side are available at [docs.prebid.org/dev-docs/bidders/relevantdigital.html](https://docs.prebid.org/dev-docs/bidders/relevantdigital.html).

#### How it works

![RD bid adaper flow (1)](/files/dfa11530a4a827289e6711c64224b17afe029b6f)

The original wrapper auction runs as normal, with its own set of SSPs and the RD bid adapter as one of the bidders. When the wrapper sends a bid request to the RD bid adapter, it triggers a separate secondary auction on our side — among the SSPs you have configured in Relevant Yield. The winning bid from that secondary auction is returned to the original wrapper, where it competes alongside all other bids.

#### Key considerations

* **No ad server connection**\
  The RD bid adapter does not control ad serving. Set **Adserver: None** at the placement level in Relevant Yield — the original wrapper handles everything after the auction.
* **No reloads or ad refresh**\
  Refresh logic is owned by the original wrapper. Reload/refresh settings in Relevant Yield will have no effect here.
* **Dimensions are inherited automatically**\
  The RD bid adapter picks up the dimensions defined in the original wrapper's bid request. You still need to select a placement type in Relevant Yield, but the dimension values themselves will be ignored. If you need to force specific dimensions instead, you can use the [`skip_imp_format`](broken://pages/8567b993dded2d546154f8c8560ab5e046b496a7) override — though this is not recommended as a default.

#### Setup in Relevant Yield

{% stepper %}
{% step %}

## Create the website and placements

Set up the site and placements in Relevant Yield as you would for any normal website. Add the SSP placement IDs for the SSPs you want to run in the secondary auction.

> **Important:** Set **Adserver: None** at the placement level.

![](/files/3b5acde263a9a78aca399692848da0bcbe983098)
{% endstep %}

{% step %}

## Enable Mobile in Prebid Parameters

Go to **Prebid Parameters → General Settings → Enable Mobile** and turn it on.

Once enabled, a small mobile icon will appear next to each placement.

![](/files/da2b425679c8315bd9aa259c67f4378caa3484df)
{% endstep %}

{% step %}

## Retrieve your adapter IDs

Click the mobile icon on the relevant placement. This gives you two IDs you will need:

| Field in RY              | Prebid parameter name |
| ------------------------ | --------------------- |
| Prebid Server Account ID | `accountId`           |
| AdUnit config ID         | `placementId`         |

You will also need your **`pbsHost`**. If you are unsure what this is, contact your Customer Success manager.
{% endstep %}
{% endstepper %}

#### Publisher integration checklist

Once your setup in Relevant Yield is complete, send the following information to whoever manages the publisher's Prebid wrapper.

1. **Ads.txt — update required**\
   The publisher's `ads.txt` file must include entries for each SSP you have added in the RD bid adapter auction.
2. **CMP consent**\
   Relevant Digital must be given consent in the publisher's CMP. Our vendor ID is **1100**.
3. **Universal IDs**\
   Because bidding runs server-side, universal IDs are often required by the SSPs. Ask each SSP which IDs they prefer (e.g. Unified ID, SharedID, ID5).
4. **Iframe user sync (recommended)**\
   Adding the snippet below to the publisher's Prebid config improves match rates and should increase revenue:

```javascript
userSync: {
    filterSettings: {
      iframe: {
        bidders: "*",
        filter: "include"
      }
    }
  }
});
```

```javascript
pbjs.bidderSettings = {
            standard: {
                     storageAllowed: true
            },
    }
```

If you have any more questions around the Prebid Adapter set up , or would like to know more about how it works in general, feel free to reach out to your Customer Success manager for Relevant Yield.


# Adding Amazon UAM/TAM to your Prebid setup

You can utilise your Amazon UAM/TAM in a parallel auction to your Prebid, and let the HB Manager select the highest value to send to your Adserver. This will make both auction systems compete as one, even though Amazon, not being an official partner of Prebid.

{% hint style="warning" %}
This setup is only available if you are using GAM as an ad server.
{% endhint %}

As a general rule, Amazon should be seen as and added in a very similar way as any other SSP. So set up the SSP in Global Settings - Add SSP and select Amazon

![](/files/11c9ee9dd2a9e46ed88b58b93982cfa4d1b81fd7)

In the setup, you need to add the Publisher ID if you want to use it in the HB Manager/Analytics.

## Relevant Yield Ad Revenue Insights Module

If you also want to collect the API data, you should add the Credentials in the Consumer Key fields, and the S3 location:

![](/files/f7044a0b25029610d404a7146d1819ca4bc19d5a)

Once set up in the Programmatic configuration, you can add the SSP to the placements you want it to run on, just like you would any other SSP. It will work with the placement functionalities, like Floorprices and Reload functionality.

You can use an integer for the placement ID or give it a name of your choice.

![](/files/858a41388e6551b35b0ef73300200c0c2080d8e5)


# Adding the Prebid Server to your calls (OLD)

## Understanding how to leverage server-side calls in tandem with Relevant Yield Header Bidding Manager

Prebid Server is a powerful solution that enables publishers to execute header bidding auctions on a server rather than entirely in the user's browser (client-side). This feature, available through the Relevant Yield HB Manager, is key to scaling your auction performance and increasing competition.

### 💡 **What is Prebid Server?**

Prebid Server is an open-source solution that allows you to shift the workload of calling multiple demand partners (SSPs) from the user's browser to a high-performance server.

### **How Does Prebid.js Initiate a Server-Side Call?**

{% stepper %}
{% step %}

## The browser loads the Prebid.js wrapper.

{% endstep %}

{% step %}

## Instead of calling 10 individual SSPs directly, Prebid.js makes a **single request** to the Prebid Server endpoint.

{% endstep %}

{% step %}

## The Prebid Server then takes that request and simultaneously calls the 10 demand partners for their bids.

{% endstep %}

{% step %}

## The Prebid Server collects all bids and sends the winning server-side bid back to the client-side wrapper.

{% endstep %}

{% step %}

## The winning server-side bid competes in the final GAM auction alongside any remaining client-side bids.

{% endstep %}
{% endstepper %}

This setup potentially reduces the client-side latency burden.

**Note on SSP Readiness:** Most major SSPs support Prebid Server. However, you must contact your SSP account manager to ensure your account is activated for server-side calls before enabling it in Relevant Yield.

### 📈 **Potential Advantages of Server-Side Bidding**

Utilizing Prebid Server offers tangible benefits that can improve the user experience and the financial yield potential of your inventory, primarily by shifting processing load.

| **Advantage**             | **Benefit**                                                                           | **Impact**                                                                                                  |
| ------------------------- | ------------------------------------------------------------------------------------- | ----------------------------------------------------------------------------------------------------------- |
| **Increased Competition** | Allows more bidders to participate per auction without adding client side load.       | Higher chances of receiving a top bid, potentially leading to **yield uplift**.                             |
| **Improved Page Speed**   | Reduces the number of HTTP requests and code execution required on the client-side.   | Lower client side latency and faster page loads, which can **improve user experience** and **viewability**. |
| **Reduced Timeouts**      | Moves resource-intensive bidder calls off the browser.                                | Frees up browser resources for essential page rendering and faster execution of remaining client-side bids. |
| **New Integrations**      | Enables collaboration with demand partners who cannot integrate directly client-side. | Access to **new revenue streams** and unique demand.                                                        |

### **Important Consideration:**

While the server-side architecture is **designed to be faster**, actual performance improvements (or the reduction of timeouts) are **not guaranteed** and must be tested:

* Relevant Yield provides the tools to manage the shift, but **SSPs' individual server response times** and the latency of the chosen **Prebid Server endpoint** still dictate the final auction speed.

**Testing:** Publishers should **A/B test** server-side against client-side (using the Parallel mode) to determine which partners perform better server-side. In some cases, a bidder may experience *higher* latency or timeouts when moved to the server due to various reasons.

### ⚙️ **Activation: Configuring Prebid Server in Relevant Yield**

Prebid Server can be activated on the **Global**, **Publisher Account**, or **Site** level, mirroring your Prebid configuration hierarchy.

To activate, navigate to the desired level and configure the **Prebid Parameters**:

<div data-with-frame="true"><img src="/files/e9409f85e298fc29be5fd28577895f444f98f2ee" alt=""></div>

### **Selecting the Call Type**

Within the Prebid parameters setup, you will choose how the server-side logic is executed:

1. **Client-Side Only:** (Default) Traditional header bidding; all bidders are called directly from the browser.
2. **Server-Side Only:** All bidders are called via the Prebid Server endpoint (useful for mobile or latency-sensitive setups).
3. **Parallel (Hybrid):** Uses **both Client-Side and Server-Side** calls in the same auction. This is the most common approach, where high-value/fast bidders remain client-side, and the remaining bidders are moved server-side.
   * Parallel bidding acts as a **safety net**, allowing you to test the new Server-Side route without risking the loss of demand from a specific partner.

#### ⚠️ **Important Deployment Notice**

{% stepper %}
{% step %}

## Consultation

You should **consult with Relevant Yield support** before your initial Prebid Server activation.
{% endstep %}

{% step %}

## Using Parallel (Hybrid) for Safer Testing

Choosing **Parallel (Hybrid) bidding** is indeed the safest way to test the Server-Side integration.

* **Risk Mitigation:** When you select Parallel, the bidder remains active on the Client-Side (its original setup) while simultaneously being called Server-Side. If a demand partner does *not* support Server-Side (or if their configuration is incorrect), the Server-Side call will fail, but the Client-Side call will **continue to function**.
* **The Result:** You avoid a major integration break. You continue generating revenue via the Client-Side call while you work with the SSP and Relevant Yield support to resolve the Server-Side issue.
  {% endstep %}
  {% endstepper %}

### 📊 **Reporting and Analysis: Splitting by Auction Runner**

To accurately evaluate the performance of your Prebid Server integration, you must configure your Relevant Yield (RY) reports to distinguish between bids processed client-side and those processed server-side.

This ensures you can attribute revenue, impressions, and eCPM to the correct auction environment.

### **Configure Report Settings**

When building or editing a report in the RY interface, focus on the following two areas to activate the required granularity:

| **Setting Area**                | **Action**                                                       | **Purpose**                                                                                                                              |
| ------------------------------- | ---------------------------------------------------------------- | ---------------------------------------------------------------------------------------------------------------------------------------- |
| **What to report** (Dimensions) | Add the **Bidder** dimension.                                    | This is essential for seeing which partners are bidding and how their performance changes when running server-side.                      |
| **Other options**               | Check the box for **"Split by auction runner (client/server)."** | This crucial step divides all metrics (Revenue, Impressions, eCPM, etc.) into two distinct buckets: **Client-side** and **Server-side**. |

By using the **Bidder** dimension combined with the **"Split by auction runner"** option, you can precisely measure the impact of moving partners to the server and optimize your hybrid configuration.

![](/files/737928781ae61e2b0b111e7658682adb5c0d0831)


# HBM and Prebid Server

## What Is Prebid Server, and When Do You Need It

**Prebid Server (PBS)** is an open-source solution — Relevant Digital runs its own Go-based fork — that shifts the work of calling multiple demand partners (SSPs) from the user's browser to a high-performance server. It's the shared engine behind three otherwise-separate integration paths: **AMP** (which has no client-side JavaScript at all), **Mobile App** (the stored-request/resolved-request mechanics covered in Mobile App Integration), and optional **server-to-server** bidding on ordinary web pages.

If you've read either of those sections already, you've been using PBS without a dedicated page for it until now — this section documents the engine itself.

### The three call types (web context)

On a standard web page, you can run Prebid one of three ways:

| Type                  | What happens                                                          | When to use                                                                 |
| --------------------- | --------------------------------------------------------------------- | --------------------------------------------------------------------------- |
| **Client-Side Only**  | Traditional browser-based bidding — every bidder called from the page | The default; no server involvement                                          |
| **Server-Side Only**  | Every configured bidder is called via PBS instead of the browser      | Once you're confident in server-side performance                            |
| **Parallel (Hybrid)** | Both run simultaneously, client and server bids compete               | Recommended for initial testing — lets you compare safely before committing |

### Reported benefits — and the honest caveat

Moving bidder calls server-side can mean: more bidders competing without loading down the browser, faster page speed from fewer HTTP requests, fewer client-side timeouts, and access to demand integrations that only exist server-side.

**None of this is guaranteed automatically.** Actual performance improvement depends on your specific bidder mix, traffic, and page weight — it needs to be verified with A/B testing (the Parallel/Hybrid mode above is exactly how you'd run that test) rather than assumed from the general pitch.


# Setup & Config

Configure server-side bidding with Relevant Digital support before activating it.

{% stepper %}
{% step %}

### Confirm the activation plan

Contact Relevant Digital support before enabling server-side bidding on a site.

Confirm the call type and bidder configuration together. This avoids wasting a test cycle.
{% endstep %}

{% step %}

### Choose the call type and scope

Open **Prebid Parameters**. Configure settings at the required scope:

1. **Global** applies to all publisher accounts and sites.
2. **Publisher Account** applies to all sites in that account.
3. **Site** overrides higher-level settings for one site.

Select one call type:

* **Client-Side Only** runs bidding in the browser.
* **Server-Side Only** runs bidding through Prebid Server.
* **Parallel (Hybrid)** runs both auctions simultaneously.

Use **Parallel (Hybrid)** for initial testing. It lets client-side and server-side bids compete.

For scope details, see [Manage Prebid settings with Prebid Parameters](/hb-manager/auction-behavior-and-optimization/manage-prebid-settings-with-prebid-parameters).

<div data-with-frame="true"><figure><img src="/files/dr5Q8gcmR4lD7gFANVAq" alt=""><figcaption></figcaption></figure></div>
{% endstep %}

{% step %}

### Configure reporting

Add the **Bidder** dimension to your report. Enable **Split by auction runner (client/server)**.

The split keeps client-side and server-side bids separate. You can then compare both auction paths for each bidder.

<div data-with-frame="true"><figure><img src="/files/6tbOTS7JOG7k3X38lxhS" alt=""><figcaption></figcaption></figure></div>
{% endstep %}

{% step %}

### Confirm the PBS version

After activation, confirm the running Prebid Server version. This helps with release-note comparisons and version-specific support requests.

See [How to Confirm Which Prebid Server Version We're Using?](/hb-manager/integrations-and-connections/hbm-and-prebid-server/how-to-confirm-which-prebid-server-version-were-using).
{% endstep %}
{% endstepper %}


# How to Confirm Which Prebid Server Version We're Using?

## Checking Your PBS Version

**On the RY side:** the Prebid Server version in use is visible from the help menu in the HBM UI.

1. Click the **?** (question mark) icon in the top-right corner of the interface.
2. This opens a menu with several resources: knowledge base access, release notes, and an AI Assistant.
3. The current Prebid Server version is displayed within this menu.

<div data-with-frame="true"><img src="/files/2beeda1302a2444535481b9feaf5718298abd950" alt=""></div>

This matters most when you're comparing behavior against upstream [Prebid Server release notes](https://github.com/prebid/prebid-server/releases), or reporting something that might be version-specific to Relevant Digital support.


# OpenAds Integration

Configure The Trade Desk OpenAds wrapper in HB Manager.

Relevant Yield supports OpenAds, The Trade Desk’s Prebid wrapper. It also supports the established The Trade Desk Prebid adapter.

{% hint style="info" %}
Initial testing showed no significant performance difference between the two options. This may change as The Trade Desk develops OpenAds.
{% endhint %}

### Supported setups

Choose either integration for each site:

* **The Trade Desk Prebid adapter** — The established integration.
* **OpenAds** — The Trade Desk’s newer wrapper.

Compare performance for your setup before choosing an option.

### Enable OpenAds

Configure OpenAds in the **Prebid Parameters** for the The Trade Desk bidder.

1. Open **Prebid Parameters** and select **The Trade Desk**.
2. Enable **Publisher ID**, then enter your Publisher ID.
3. Enable **Use OpenAds**.

![OpenAds settings in Prebid Parameters](https://4674099.fs1.hubspotusercontent-na1.net/hubfs/4674099/image%20\(6\).png)

{% hint style="info" %}
Prebid Parameters support site-level configuration. You can enable OpenAds on selected sites while other sites use the standard The Trade Desk Prebid adapter.
{% endhint %}


# Auction behavior and optimization

Tune auctions, bidder behavior, loading, targeting, and optimization.

Control how HB Manager runs auctions, loads placements, and applies bidder settings. Start with shared auction parameters, then tune demand paths, placement behavior, targeting, and experiments.

### Configure auction behavior

* [Manage Prebid settings with Prebid Parameters](/hb-manager/auction-behavior-and-optimization/manage-prebid-settings-with-prebid-parameters) — Apply shared Prebid settings across configurations.
* [Prebid parameters - Advanced](/hb-manager/auction-behavior-and-optimization/prebid-parameters-advanced) — Configure advanced Prebid parameters.
* [Bidder specific Demand Path Optimisation (DPO) setup](/hb-manager/auction-behavior-and-optimization/bidder-specific-demand-path-optimisation-dpo-setup) — Configure bidder-specific demand paths.
* [How to Use alternativeBidder](/hb-manager/auction-behavior-and-optimization/how-to-use-alternativebidder) — Configure fallback bidder behavior.
* [When to Use Consent in Relation to Yield](/hb-manager/auction-behavior-and-optimization/when-to-use-consent-in-relation-to-yield) — Choose the right consent approach for your setup.

### Control placement loading

* [Ad Refresh in HB Manager](/hb-manager/auction-behavior-and-optimization/ad-refresh-in-hb-manager) — Configure refresh behavior for HB Manager placements.
* [Lazy Loading Ads in HB Manager](/hb-manager/auction-behavior-and-optimization/lazy-loading-ads-in-hb-manager) — Delay ad loading until placements are needed.
* [Lazy loading with GAM](/hb-manager/auction-behavior-and-optimization/lazy-loading-with-gam) — Coordinate lazy loading with Google Ad Manager.
* [How to Activate/Deactivate Prebid/Header bidding on specific placements (Only for web)](/hb-manager/auction-behavior-and-optimization/how-to-activate-deactivate-prebid-header-bidding-on-specific-placements-only-for-web) — Enable or disable bidding for selected web placements.

### Optimize and test

* [How to Use the Prebid Floor Price Module and Automatically Set Floor Prices in Your Ad Server](/hb-manager/auction-behavior-and-optimization/how-to-use-the-prebid-floor-price-module-and-automatically-set-floor-prices-in-your-ad-server) — Configure price floors and ad server targeting.
* [Multivariate A/B testing and using child prebid configurations](/hb-manager/auction-behavior-and-optimization/multivariate-a-b-testing-and-using-child-prebid-configurations) — Test configuration changes with controlled experiments.
* [Configuration targeting for User countries](/hb-manager/auction-behavior-and-optimization/configuration-targeting-for-user-countries) — Target configurations by user country.


# Dynamic Placement Insertion

Automatically insert HB Manager ad placements into page content with CSS selectors, spacing rules, and placement-level controls.

Dynamic Placement Insertion adds ad slots to page content using CSS selectors and rules. It removes the need to hardcode ad containers in your HTML.

### What is Dynamic Placement Insertion?

Dynamic Placement Insertion automatically places ad slots into your page content — without you having to hardcode ad divs into your HTML. Instead, you define CSS selectors and rules, and the system figures out where and how to insert ads based on those rules.

This is especially useful for content-heavy pages like articles, comment sections, and forums, where page structure varies and manually placing ads isn't practical. It also lets your team define insertion rules that apply consistently across your whole network.

{% hint style="info" %}
Dynamic Placement Insertion can increase the reported **Auction** metric. Auction splitting enables reporting on custom parameters.
{% endhint %}

### How it works

1. The system scans the page (DOM) for elements matching your configured CSS selectors.
2. For each match, it checks your spacing rules, restriction selectors, and count limits.
3. If everything checks out, an ad div is inserted at the position you specified (before, after, etc.).
4. Ad sizes are filtered based on available container width, so layouts don't break.
5. If multiple placements could match the same element, one is chosen based on priority.

If **continuous background scanning** is turned on, the system keeps re-scanning the page at a set interval. This is helpful for pages where content loads dynamically (like infinite scroll), since it can insert ads beyond what's currently in the viewport.

### Get started

All you need to get going:

1. Enable Dynamic Insertion on a placement.
2. Add at least one target with a valid CSS selector.

That's it! The system will start inserting ads using the default settings. Everything else in this article is optional fine-tuning.

**Path:** **Publisher Accounts** → **Edit Account** → **Open Website** → **Open Placement** → **Built-in Settings** → **Dynamic Placement Insertion Settings**

Expand the Dynamic Placement Insertion settings, toggle **Enable dynamic insertion**, and add a target selector (e.g. `article > p`). Save, and the placement starts inserting on the next page load.

{% hint style="success" %}
Start with one placement and one target selector. Add limits and restrictions after validating the result.
{% endhint %}

### Placement settings

Once enabled on a placement, these settings control its behavior. All have sensible defaults — only adjust what you need.

| Setting                           | What it does                                                                                                                                                                                                                                                  |
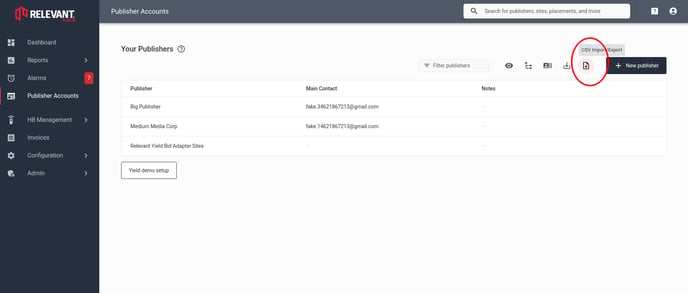
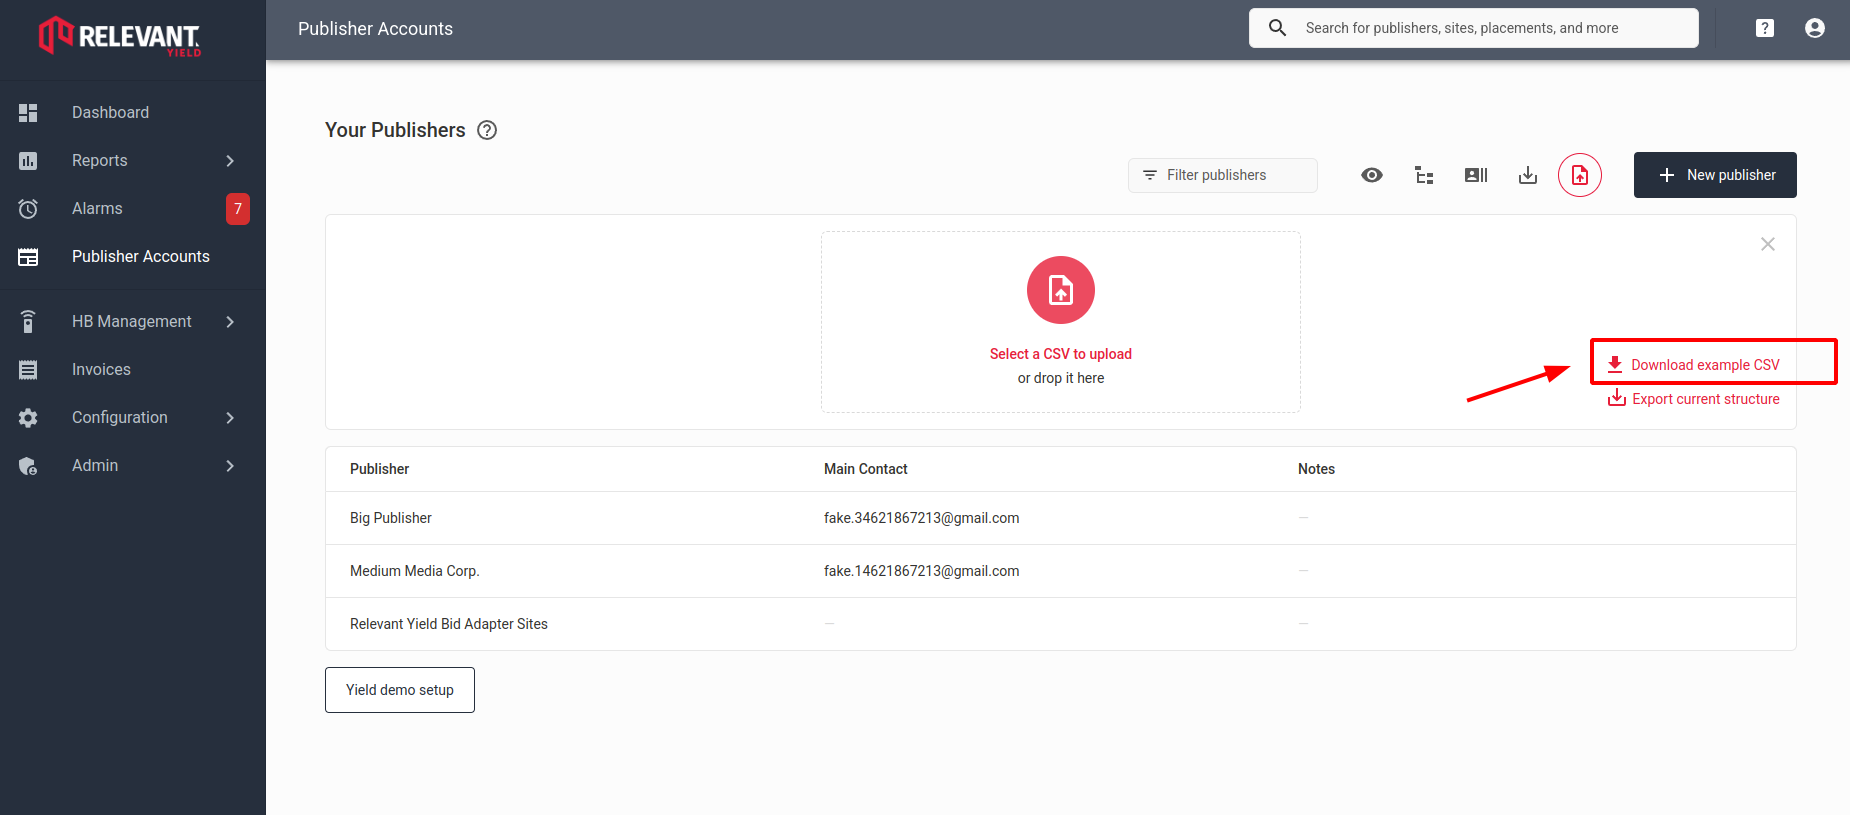
| --------------------------------- | ------------------------------------------------------------------------------------------------------------------------------------------------------------------------------------------------------------------------------------------------------------- |
| **Enable dynamic insertion**      | Turns Dynamic Placement Insertion on/off for this placement.                                                                                                                                                                                                  |
| **Priority**                      | Decides which placement wins when multiple match the same element. Priority 1 is highest and wins most often. Priority 2 is half as likely to be picked as Priority 1. Ties are broken randomly. *Default: 1*                                                 |
| **Max inserts per page view**     | Caps how many times this placement can appear on one page. Leave blank to use the global setting. *Range: 1–30*                                                                                                                                               |
| **Max allowed layout growth (%)** | Limits how much the page layout can grow when an ad is inserted. The system test-places each ad size and measures the height change; if it exceeds this % of the ad's height, that size is skipped. Set to 0 to block any growth. *Range: 0–100, Default: 10* |
| **Platforms**                     | Restrict the placement to specific devices (Desktop, Mobile, Tablet). Leave blank for all platforms.                                                                                                                                                          |
| **HTML Template for insertion**   | The markup used to create the ad div. Default: `<div id="{{id}}"></div>`. Can be customized, see below.                                                                                                                                                       |
| **Target elements to insert at**  | Defines where ads get placed. See Target Elements.                                                                                                                                                                                                            |
| **Shared spacing containers**     | Enforces spacing across side-by-side containers. See Shared Spacing Containers.                                                                                                                                                                               |
| **Restriction selectors**         | Elements ads should stay away from. See Restriction Selectors.                                                                                                                                                                                                |
| **URL Blocklist**                 | Pages where this placement should never insert. See URL Blocklist.                                                                                                                                                                                            |

#### Customize the HTML template

Add markup around the ad container when needed:

```html
<div id="{{id}}" class="ad-wrapper" {{divAttribute}}="{{id}}">
  <div class="ad-label">Advertisement</div>
</div>
```

Available template variables include:

* `{{id}}` — ad unit path.
* `{{divId}}` — complete DOM element ID.
* Any ad unit data field, such as `{{placementTypeName}}`.

#### Target elements

Targets define **where** ads are inserted. Select **+ Add** under **Target elements to insert at**.

| Field                                 | Description                                                                                                                                           |
| ------------------------------------- | ----------------------------------------------------------------------------------------------------------------------------------------------------- |
| **CSS Selector for target element**   | Identifies candidate elements. E.g. `p` for all paragraphs, or `.article > p:nth-of-type(3n)` for every third paragraph in an article.                |
| **Minimum distance between ad-slots** | The minimum gap required between two dynamically inserted ads, so they don't cluster together.                                                        |
| **Distance unit type**                | Pixels, or Percent of viewport height.                                                                                                                |
| **Position of insert**                | Where the ad lands relative to the matched element: **After** (most common), **Before**, **Before First** (first child), **After Last** (last child). |

#### Container settings

Containers let you scope and cap insertions within a specific parent element.

| Field                         | Description                                                                                                                                                                                  |
| ----------------------------- | -------------------------------------------------------------------------------------------------------------------------------------------------------------------------------------------- |
| **Container CSS Selector**    | The parent element to scope within, e.g. `article` or `.content-section`. The target selector will only match elements inside this container.                                                |
| **Max inserts per container** | Caps insertions within a single instance of the container. E.g. with container `article` and a max of 6, each article gets at most 6 ads — capped further by the global max if that's lower. |

#### Restriction selectors

Use these to keep ads a safe distance away from specific elements like headers, comment sections, or other sensitive content.

Select **+ Add** under **Restriction selectors**.

| Field                                    | Description                                      |
| ---------------------------------------- | ------------------------------------------------ |
| **CSS Selector for restriction element** | The element to avoid, e.g. `.banner`.            |
| **Minimum pixel distance**               | The required minimum distance from that element. |

#### Shared spacing containers

Use this to enforce spacing rules across sections that sit side by side on the page (e.g. columns in a grid), even when they're in separate DOM containers. If two ads share a common ancestor matching a spacing container selector, the spacing rule still applies between them.

#### URL blocklist

Block Dynamic Placement Insertion on specific pages using URL patterns. Wildcards are supported.

**Example:** `*/sports/` blocks Dynamic Placement Insertion on any URL containing `/sports/`.

#### Path resolution

Dynamic placements match against ad unit paths and where they occur on the page:

* **Exact match:** the ad unit path exactly matches a resolved path on the page.
* **Wildcard match:** uses `*` to match patterns (e.g. `3377764/*-box_banner`), resolved based on previous static placement path resolutions.

{% hint style="warning" %}
Wildcard insertion requires a prior static placement-path resolution on the site.
{% endhint %}

### Shadow DOM support

Dynamic Placement Insertion can insert ads inside Shadow DOMs and iframes if Shadow DOM support is enabled. Shadow roots are cached per context for faster querying, but note that enabling Shadow DOM requires extra DOM traversal, which has some performance impact.

### Site-level configuration

For control across an entire site, configure Dynamic Placement Insertion at the Prebid configuration level. These settings apply to all placements on the site.

**Path:** **Publisher Accounts** → **Edit Account** → **Site Prebid Configurations** → **Edit Configuration**

Open your Prebid configuration and expand **Dynamic placement insertion**:

| Setting                               | Description                                                                                                                                                                                                    |
| ------------------------------------- | -------------------------------------------------------------------------------------------------------------------------------------------------------------------------------------------------------------- |
| **Enable continuous background scan** | If off, insertions are only found on first page load and on subsequent `load_prebid` calls. If on, the system re-scans every N milliseconds, backing off exponentially when no new insertion points are found. |
| **Max dynamic inserts per page view** | Global cap across all placements. *Range: 1–30*                                                                                                                                                                |
| **Scan interval (ms)**                | How often the system checks for new insertion opportunities.                                                                                                                                                   |
| **Look-ahead distance (px)**          | How far below the current viewport the system looks for insertion candidates.                                                                                                                                  |
| **Global restrictor selectors**       | CSS selectors that block insertion across *all* placements, e.g. `div[id^="my_blocking_id"]` to avoid custom div IDs.                                                                                          |

### Reporting impact

Dynamic Placement Insertion may inflate the **Auction** metric in your reports. This happens because each dynamically inserted ad triggers auction splitting via AdUnit custom params — so the reported auction count depends on how many unique custom params are in play.

To track performance specifically, the system can set a custom parameter on dynamically inserted slots, so you can filter and segment Dynamic Placement Insertion results in your HB Analytics reports.

### Debug tools

Available in **Live Preview mode only** (to avoid leaving debug code in your live tag).

#### Debug panel

Lets you adjust settings in real time and preview the effect without saving:

* Max inserts per page view
* Look-ahead distance (px)
* Scan interval (ms)
* Debug flags (show borders, enable tracing, skip excluded check)
* Max anchors per scan / max chunk duration (ms)
* Per-placement settings (priority, max inserts, template, targets, restrictions)

Click **Re-apply** to test changes, or **Clear All** to reset.

### Example configuration

A typical setup for inserting ads into article content:

**Target:** insert an ad after every paragraph inside an article, with 100px minimum spacing, capped at 6 per article:

| Setting                | Value         |
| ---------------------- | ------------- |
| CSS Selector           | `article > p` |
| Minimum distance       | 100           |
| Distance unit type     | Pixels        |
| Position of insert     | After         |
| Container CSS Selector | `article`     |
| Max per container      | 6             |

**Restriction:** stay at least 100px away from any banner:

| Setting                | Value     |
| ---------------------- | --------- |
| CSS Selector           | `.banner` |
| Minimum pixel distance | 100       |

**URL Blocklist:** don't insert on sports pages:

| Setting     | Value       |
| ----------- | ----------- |
| Blocked URL | `*/sports/` |

### Recommendations

* Start with few targets. Scale after validating placement and page performance.
* Use **Live Preview** before publishing changes.
* Set spacing rules to prevent clustering and protect viewability.
* Use precise selectors and containers to reduce unnecessary DOM scanning.
* Measure revenue impact with [multivariate A/B testing](/hb-manager/auction-behavior-and-optimization/multivariate-a-b-testing-and-using-child-prebid-configurations).

### Related guides

* [Lazy Loading Ads in HB Manager](/hb-manager/auction-behavior-and-optimization/lazy-loading-ads-in-hb-manager)
* [Ad Refresh in HB Manager](/hb-manager/auction-behavior-and-optimization/ad-refresh-in-hb-manager)
* [Auction behavior and optimization](/hb-manager/auction-behavior-and-optimization)


# When to Use Consent in Relation to Yield

{% stepper %}
{% step %}

### When using our Prebid server

Consent is required for Prebid server configurations to ensure proper handling of user data.
{% endstep %}

{% step %}

### When using the relevantDigital bid adapter (essentially Prebid server)

If you're using user sync in server-side, you must list it. While it's not mandatory, not using it may have a significant impact on revenue.
{% endstep %}
{% endstepper %}

{% hint style="info" %}
Consent is **not required for client-side configurations**.
{% endhint %}


# Bidder specific Demand Path Optimisation (DPO) setup

Configure bidder-specific DPO rules using performance metrics and geographic targeting.

## Configure bidder-specific Demand Path Optimisation

Some bidders and SSPs support publisher-managed DPO. Others prefer to receive all traffic and optimise demand themselves.

Confirm each bidder's preferred approach before enabling DPO.

{% hint style="info" %}
This feature is available for web inventory only.
{% endhint %}

### Configure DPO at different levels

Limit traffic to one or more bidders at the following levels:

* **Global**
* **Publisher**
* **Website**
* **Placement**

Configure DPO through **Prebid Parameters** at the required level:

<div data-with-frame="true"><img src="/files/72fbdc50b730db164610dfc35807d302c26e6948" alt=""></div>

Go to **Generic Prebid Config Data → Demand Path Optimisation → Enable**. Set the criteria that determine when a bidder or SSP receives a call.

<div data-with-frame="true"><img src="/files/b399f00c5221fa0848d2d53ddd42cc1fe01980cb" alt=""></div>

#### Performance Filter

Apply performance filters using fill rate and ad-unit eCPM. You can assess performance by country.

<div data-with-frame="true"><img src="/files/feccc531a51229de062d8aaafed5af42252869e2" alt=""></div>

A common approach excludes countries with weak performance. Include only selected countries for regional bidders.

The available performance filters are:

* **Ad Unit eCPM** — Revenue per thousand ad-unit impressions.
* **Fill rate %** — Percentage of ad requests that receive an ad.
* **Bid rate %** — Percentage of bid requests that receive a bid.
* **Win rate %** — Percentage of submitted bids that win the auction.
* **Timed out bids %** — Percentage of bid requests without a response before the timeout.
* **Avg. response ms** — Average bidder response time, in milliseconds.

### Include or exclude traffic by country

Use geographic targeting to include or exclude traffic from specific countries:

<div data-with-frame="true"><img src="/files/5870b18e7bb2ccb02be2f75995757e11c715ae1f" alt=""></div>

### Choose countries for each bidder

Start with a report grouped by bidder and country. Then select the metric that matters most.

Use **Revenue** to prioritise bidders that deliver the most value in each country. Use **Ad Unit eCPM** to assess monetisation quality. Use **Fill rate %** where lower-value bids may still provide useful coverage.

This breakdown shows where each bidder performs well. Use it to decide which countries to include or exclude.

{% hint style="warning" %}
Excluding traffic may reduce revenue because fewer bidders receive calls. Fewer calls may also reduce environmental impact.
{% endhint %}


# Ad Refresh in HB Manager

This document provides comprehensive guidance on configuring and optimizing refresh settings for Prebid calls in the HB Manager to enhance revenue generation while maintaining a positive user experience.

## Ad Refresh

Refreshing your Prebid calls on your placements in a proper and functional way can generate extra revenue without compromising the user experience. This is why we have added advanced reload functionality to the HB Manager, allowing you to handle, set, and test various refreshing scenarios.

### Recommendations

We recommend experimenting with a few placements at a time to find the right balance for your site. Excessive low-quality refreshes can lead to poor viewability and lower eCPMs, whereas quality refreshes can maximize inventory from your premium placements.

**Read more about what ad refresh is and how you can benefit from it** [HERE](https://blog.relevant-digital.com/header-bidding-management-how-to-get-started-with-ad-refresh?hsLang=en).

### Refresh Settings

{% stepper %}
{% step %}

### Reload Interval in Seconds

This is the number of seconds until the placement is refreshed (if using GAM, the minimum is 30 seconds).
{% endstep %}

{% step %}

### Count Reload Interval By

This defines what should trigger the initiation of the refresh count in seconds. As such, it can be understood how aggressive the refresh policy will be. There are three alternatives to select from:

* **Time Since Loaded**: This will refresh after x number of seconds since it was loaded for the first time.
* **Time Since First Viewable**: This will start the refresh count only when the placement has been viewable for the first time.
* **Time Being Viewable**: This will only count as long as the placement is in view.
  {% endstep %}

{% step %}

### Count the Page as Visible

This defines when the page should be considered for refreshing:

* **When Document is Focused:** If the user's cursor is actively working in the window, the document is considered to be in focus. Pages on another screen, or multiple tabs in the same browser does not count as viewable.
* **When Document is not Hidden:** This option allows for multi-screen ad refreshing, meaning that each visible surface will refresh while non-visible tabs in the same browser will not. This improves viewability for the end-user.
* **Always (no check, not recommended):** This option disregards checks entirely but is not recommended, as it will likely bring down both your viewability and CTR% score significantly.
  {% endstep %}

{% step %}

### Maximum Number of Reloads

This sets the number of times the placement will refresh.
{% endstep %}

{% step %}

### Minimum Viewability % for Reload

Sets how many % of the placement should be in view to qualify for a refresh.
{% endstep %}

{% step %}

### Set CSS Min-Width/Height When Reloading

Activating this option prevents "jumping" effects on reloads, as it will leave the ad slot open during refreshes, avoiding temporary collapses in columns.
{% endstep %}

{% step %}

### Continue Reloading After ad-div Replacement

{% endstep %}

{% step %}

### Allow Updating Settings via postMessage API

This setting is needed if you want to use the refresh filters to filter on creatives.
{% endstep %}

{% step %}

### Refresh if Empty Ad Return

This enables triggering the ad refresh faster if there is no ad returned. Systems like GAM expect a minimum of 30 seconds before triggering an ad refresh when an ad has been served, but if no ad has been rendered, there is nothing preventing a faster refresh.

{% hint style="info" %}
**Please note:** this might cause more “auctions” to be generated; so we suggest that you experiment with caution when using the function, and use the limitations we provide with the feature.
{% endhint %}
{% endstep %}

{% step %}

### Exclude/Include Line Item Types/Advertisers/Orders/Creatives (Only for GAM)

The option to either **include or exclude** specific things in the ad refresh options. If you are using this option, you do not have to utilize the advertiser/order blocking; however, you can combine both if desired.

Please note that enabling GAM real-time imports for HB Analytics is required to map out the line item types effectively.

![](/files/f2c26894b5a159a7e3c940880f44233b9879c86e)

In order to utilise the creative option, you will have to enable the **Allow updating settings via postMessage API,** which can be found in the **Prebid parameters.**
{% endstep %}
{% endstepper %}

### Activation Levels for Refresh

In Yield, you can work with our refresh on multiple levels: global, publisher account, site, placement type and placement. Below the activation on different levels is described in detail.

#### Placement Type Activation

**Path**: HB Management > Global HB management > Placement types > Prebid parameters > Generic Placement Data > Edit Built-in Setting

Setting up refresh settings on the placement type allows you to assign the same functionality to placement types across multiple sites. This is helpful when your sites share a similar structure and have similar repetitive patterns.

![](/files/be0ffeb172f16411daa4aa797494127e099e8bc0)

#### Account Level Activation

**Path**: Publisher Accounts > "Edit" Account settings > Account Prebid parameters > Generic Placement Data > Edit Built-in Settings

Setting up refresh settings at the account level allows you to assign the same functionality to placement types across the sites mapped under this publisher account. This is useful when these sites share a similar structure and have similar repetitive patterns.

![](/files/7b93cf00fd2c90917235ca608bec749c9a2b868d)

#### Website Level Activation

**Path**: Publisher Accounts > "Edit" Account settings > Website level Prebid parameters > Generic Placement Data > Edit Built-in Settings

This option allows for customization of refresh settings at the website level.

![](/files/842a25aeab3b284521406f2ba3c562fb1d7d245e)

#### Placement Level Activation

**Path**: Publisher Accounts > "Edit" Account settings > Open website > Open placement > Edit Built-in Settings

This is ideal for specific placements or if you would like to override any refresh settings that were set up at the higher levels.

![](/files/5fc582a697744b54b8e90137b73c346c3fe3118d)

### How to enable/disable/override ad refresh settings

![](/files/95f864324b087436d0fa8c92628bf5ea8a3e13c6)

#### Don't forget to save your changes.


# Prebid parameters - Advanced

This article explains the basics of the Prebid parameter menus and the order they are applied in.

Many settings for HBA are available from the **Prebid parameters** menus. These settings are applied via a hierarchy described later in this document.

<div data-with-frame="true"><img src="/files/69280523ec98dd8cde28364d817ca210642bbaa9" alt=""></div>

The settings have different scopes. In general they are applied per **placement**, with the exception of **Generic Prebid Config Data** and **User ID modules** that are applied per **Prebid configuration**.

* **General settings** - Used for enabling *Mobile App* and *AMP* support per placement.
* **Generic Placement Data** - Both *built-in* settings per placement (e.g. reload / lazy-load) and *user-created* settings per placement. Such user-created settings are available in JavaScript and created using [**Placement Tag Fields**](broken://pages/8f017c8d4044c912c7a0d23732447be75304cc4e).
* **Generic Prebid Config Data** - Both *built-in* settings per **Prebid configuration** (e.g. custom JavaScript and prebid timeouts) and *user-created* settings per Prebid configuration. Such user-created settings are available in JavaScript and created using [**Prebid Config Tag Fields**](broken://pages/b3142ee728d67df65ee037741736e54d63ccc947).
* **Outstream video settings** - Settings for *outstream* video per placement.
* **Instream video settings** - Settings for *instream* video per placement.
* **Native settings** - Settings for *native* content per placement
* **SSPs** - One box of settings per header bidding-supported SSP. These settings are applied per placement and include the [*bidder parameters*](https://docs.prebid.org/dev-docs/bidders.html). See below.
* **User ID modules** - One box of settings per [User ID module](broken://pages/43b09c50d13cb0d9cb47900cc1f74238ae488b2b) added.

## SSPs and bidder parameters

The SSP settings let you control settings including custom bidder parameters per SSP and placement.

<div data-with-frame="true"><img src="/files/ba5a2a3fbdf56f82c219b27fe82527459c1b89bf" alt=""></div>

* The first parameters are built-int parameters such as **Disable Bidder** and **Bidding type**.
* For some SSPs, there are built-in UI elements for certain bidder parameters. In the example above **Site ID** is used to control the **siteId** bidder parameter for Rubicon/Magnite ([link](https://docs.prebid.org/dev-docs/bidders/rubicon.html#bid-params)).
* **Custom Parameters** are used for manually editing the bid parameters so that there are no built-in UI elements.
* **Inherited parameters** show settings already inherited from a higher level in the setting hierarchy (*read-only*). **Parameters** are where you can edit the bid parameters directly using JSON.

## Order prebid parameters are applied - the "settings hierarchy"

Sometimes you want to apply settings globally, sometimes per websites, and sometimes per placement, etc. Therefore the **Prebid parameters** settings are available on multiple levels and applied in a certain order.

On every level in this hierarchy, **you can override the settings from the higher levels** using the "*override toggle*" that exists for every setting. When a setting is not overridden the grayed-out value represents the current value as *inherited* from a higher level - or from the settings' default value.

### Order per-placement settings are applied:

1. Global level - Prebid parameters
2. Global level / Account level - Placement type prebid parameters
3. Account level (Publisher) - Prebid parameters
4. Site level - Prebid parameters
5. Placement level - Prebid parameters
6. Prebid configuration prebid paramters on Account level
7. Prebid configuration prebid paramters on Site level
8. Prebid configuration prebid paramters on Placement level
9. *(when applicable)* Child Prebid configuration prebid paramters on Account level
10. *(when applicable)* Child Prebid configuration prebid paramters on Site level
11. *(when applicable)* Child Prebid configuration prebid paramters on Placement level

### Order per-placement settings are applied - with images where they are located:

1. Global level - Prebid parameters

   <div data-with-frame="true"><img src="/files/be568b414385d3c2ac2dad7b69b60d5aea518044" alt=""></div>
2. Global level / Account level - Placement type prebid parameters

   <div data-with-frame="true"><img src="/files/ad2f9253e62579fcc99f72b9fc1d1a52f47697a4" alt=""></div>
3. Account level (Publisher) - Prebid parameters

   <div data-with-frame="true"><img src="/files/132115181b67d253177db2e659f989f336fd6d66" alt=""></div>
4. Site level - Prebid parameters

   <div data-with-frame="true"><img src="/files/3311f0e6b4246e181978d27e2326e6be3320c273" alt=""></div>
5. Placement level - Prebid parameters

   <div data-with-frame="true"><img src="/files/42fdc3cb9ef86dc703d708ffaa3ecbf1b4465740" alt=""></div>

   **Notice:** The **Generic Placement Data** settings are available directly *below* the **Prebid parameters** *instead* of in the menu itself.
6. Prebid configuration prebid paramters on Account level
7. Prebid configuration prebid paramters on Site level
8. Prebid configuration prebid paramters on Placement level

   <div data-with-frame="true"><img src="/files/99e1c5faba1c9183403ead018acc95c09164b1df" alt=""></div>

   **Notice:** The image above shows all 3 of levels 6-8.
9. *(when applicable)* Child Prebid configuration prebid paramters on Account level
10. *(when applicable)* Child Prebid configuration prebid paramters on Site level
11. *(when applicable)* Child Prebid configuration prebid paramters on Placement level

<div data-with-frame="true"><img src="/files/2578da58a0c0cca2f6da5a148bc1ab9ff7a31657" alt=""></div>

**Notice:** The image above shows all 3 of levels 9-11. These settings are only applied when a *child* prebid configuration is indeed used.

### Order Generic Prebid Config Data settings are applied:

1. Global prebid parameters
2. Account (Publisher) prebid parameters
3. Site prebid parameters
4. Prebid configuration - under **Configuration data**
5. *(when applicable)* Child Prebid configuration - under **Configuration Data**


# Manage Prebid settings with Prebid Parameters

In HB Manager you can decide if you want to run Prebid settings on global level (affecting all of your placements), publisher level (affecting Publisher's placements) or if you'd like to have different settings for each placement.

This is so that it is as easy as possible for you to create cross Publisher/site setups of your most common placements, but at the same time give you the opportunity to really dig in and granularize your prebid setups exactly as you want to.

### The 3 main levels the HB Manager works with are:

* **The Global level:** This is intended for your most common Prebid parameters (as well as Placement types) that will be used across your entire Publisher/website network.
* **The Publisher level:** If you prefer to override your Global Prebid parameters or simply add additional ones for a particular Publisher, you can do so in the Publisher account. This will then be available to all the Websites in that particular Publisher account.
* **The Website Level:** You can override your Global Prebid Parameters or your Publisher account Prebid parameters in the site level. You can even create multiple "Section" or "Placement" instances per website. This enables you to have a completely different Prebid setup for a particular placement or section if needed.

Utilising these different levels or hierarchies can be very useful in situations where you want to run specific Bidder/SSP setups, have different adservers involved or when you want to run Prebid setups based on specific media types. For instance, a different Prebid setup for your Video Bidders/SSPs can be maintained this way. In fact you could create a unique Prebid setup for each placement on each webpage/article. However, we certainly don't recommend you to do it!

### Setting up your Global Prebid Parameters

You don't have to add any **Prebid paramters** unless you want/need to. There are cases where certain Bidders require you to end in additional information but we will always help you with this during the Onboarding phase. If you are uncertain, feel free to reach out to our support. Please notice that if you select to add a **Prebid parameter** to a particular placement, it will only apply to that particular placement.

### How to add a Global Prebid Parameter

{% stepper %}
{% step %}

## Navigate to HB Management -> Global HB Management

{% endstep %}

{% step %}

## Click the Prebid parameters button in the HB management

This will bring you to these options:

![](/files/049c5f5fed46d074fa5f04cb78e6a9a78e796322)

Here you can add parameters that will apply to all your Prebid setups unless you override them on a lower level. It is useful if you plan to use the same Prebid parameters everywhere.

The **Generic placement data**(in the above screenshot) will give you the option to add generic data for your placements, for example, borders or other custom parameters. This is also where you would activate Prebid server, so you can call both Client-side and Server-side.
{% endstep %}
{% endstepper %}


# Lazy Loading Ads in HB Manager

In this section, we will walk you through the different lazy loading settings in HB Manager.

## Lazy Load

Lazy loading your Prebid calls on your placements can improve page performance and content rendering, optimise ad placement, and reduce ad impression waste.

Consider setting up an [A/B test](broken://pages/cca054d6311b80724d2af557ecf73512299a573d) to enable or disable lazy loading on those placements for a certain period and see what works best for your sites/apps.

### The Lazy Load Settings

* **Pixel distance from screen (vertically)\*** - Determine the pixel distance from the screen (vertically) that should trigger the loading of ad unit. The ideal threshold can vary depending on factors like your website's layout, user behavior, and ad placement strategy. It's recommended to find a balance that ensures ads load in a timely manner without negatively impacting the user experience. A common practice is to initiate the load when the ad unit is within a certain range (e.g., 200-300 pixels) of the viewport.

### Placement Type Level Activation

**Go to:** HB Management > Global HB management > Placement types > Prebid parameters > Generic Placement Data > Edit Built-in setting

Setting up lazy load settings on the placement type allows you to assign the same functionality across multiple sites. This comes in handy when for example your sites share similar structure and have similar repetitive patterns.

![](/files/76b4a71cc0f9f8499c497bcc12fe4a4e6fec0b8c)

### Account Level Activation

**Go to:** Publisher Accounts > "Edit" Account settings > Account Prebid parameters > Generic Placement Data > Edit Built-in settings

Setting up reload settings on the account level allows you to assign the same functionality placement types across the sites that are mapped under this publisher account. This comes in handy when for example these sites share similar structure and have similar repetitive patterns.

![](/files/484dfa4c80706ef2fadd2e97ea8c595f64dda04d)

### Website Level Activation

**Go to:** Publisher Accounts > "Edit" Account settings > website level Prebid parameters > Generic Placement data > Edit Built-in settings

![](/files/6083eee883a10455833b932e0c09a8b88072a329)

### Placement level Activation

**Go to:** Publisher Accounts > "Edit" Account settings > Open website > Open placement > Edit Built-in settings

![](/files/dfeedbcdc56a198a92ab77fe9e8c8662ec5691df)

## How to Enable/Disable/Override Lazy Loading Settings

![](/files/d946f4cb02912b7f450548ee3d8c08462de2f2b0)

{% hint style="warning" %}
Don't forget to save your changes!
{% endhint %}


# Lazy loading with GAM

## In this section we will walk you through Google Ad Manager lazy loading settings in HB Manager

Google AdManager lazy load

In addition to our own lazy load function, we have added support for the more standardized, GAM's lazy load.

You can find the setting by going under the wanted Publisher account, and selecting the Prebid Parameters next to the website where you want to enable the GAM lazy load.

Find the section in

**Prebid Parameter > Generic Prebid Config Data > GAM Lazy Load Settings.**

### ![Näyttökuva 2023-12-20 kello 15.37.11](/files/ac74d912ebba3b6563540c4a14fd81a47b774f64)

Google Ad Manager (GAM) uses viewport-based lazy loading to ensure that ads are only loaded when they are likely to be seen. This improves page load speed and user experience by prioritizing content over below-the-fold ads.

### 1. Fetch Margin

The **Fetch Margin** determines when the ad request is sent to the server.

* **What it does:** It tells the browser, "Go get the ad data from GAM now."
* **The Math:** This value is a percentage of the viewport height.
* **Example:** A value of **500** represents 500% (or 5 viewports). If the user is 5 screen-lengths away from the ad slot, the fetch process begins.
* **Why it matters:** Fetching is usually set higher than rendering to account for network latency, ensuring the "creative" is ready before the user arrives.

### 2. Render Margin

The **Render Margin** determines when the ad is actually displayed on the page.

* **What it does:** It triggers the browser to draw the ad and insert it into the DOM.
* **The Math:** Also a percentage of the viewport height.
* **Example:** A value of **200** (2 viewports) means the ad won't actually appear until the user is significantly closer to the slot.
* **Why it matters:** Postponing the render saves the user’s device CPU and memory. It also ensures that the "Impression" is tracked as close to the actual view as possible.

### 3. Mobile Multiplier

Mobile users typically scroll faster than desktop users, but mobile networks can be less stable. To account for this, GAM provides a **Mobile Multiplier**.

* **How it works:** This is a scaling factor applied to both the Fetch and Render margins specifically for mobile devices.
* **The Logic:** If your Desktop Fetch Margin is 200 and your **Mobile Multiplier is 2.0**, the effective Fetch Margin on mobile becomes **400**.
* **The Goal:** By doubling the margin on mobile, you start the ad process even earlier, giving the ad more time to load before a fast-scrolling mobile user reaches the slot.

| Feature               | Unit          | Purpose                                               |
| --------------------- | ------------- | ----------------------------------------------------- |
| **Fetch Margin**      | % of Viewport | When to call the server for an ad.                    |
| **Render Margin**     | % of Viewport | When to display the ad in the browser.                |
| **Mobile Multiplier** | Scalar (x)    | Increases margins on mobile to offset fast scrolling. |

{% hint style="info" %}
Whereas [with our lazy load function](/hb-manager/auction-behavior-and-optimization/lazy-loading-ads-in-hb-manager) you can adjust the lazy load per placement, **GAM's lazy loading applies only on a site level** and should be adjusted under the site level parameters.

However, you can utilise both technologies side-by-side if needed. Basically there is no priority, but the "laziest" will win.
{% endhint %}


# How to Use alternativeBidder

The **alternativeBidder** setup allows you to access additional demand through the same bidder in your auction configuration by using more than one seat (essentially).

If you wish to activate the **alternativeBidder** option, you can do so through the **Edit - SSP** view on your **Configuration --> Integration** page.

Edit your SSP and select the "Alternative Bidder" you would like to use:

![2025-01-22 11\_49\_43-image.png (792×695)](/files/88c7e887173558842f0262749e3ef9b796274496)

This will then enable the calls to route through the sources added in this manner.


# How to Use the Prebid Floor Price Module and Automatically Set Floor Prices in Your Ad Server

**Optimize Revenue with Prebid Floor Prices: Override SSP Values, Set Currency, and Include Amazon TAM/UAM. You can also set the floor price in your preferred Adserver, guaranteeing a fair competition.**

The **Prebid Floor Price Module** allows you to set floor prices directly within the auction, overriding the values configured in your specific SSPs. This tool is highly useful as it enables significant optimisation across all your revenue sources.

**Please note that if an SSP does not support the Prebid Floor Price Module, it will default to using the floor price set within that particular SSP.**

## Placement-Level Floor Price

Floor prices can be set at the placement level within the **HB Manager** tool. To adjust the floor price for a specific placement, navigate to the desired placement under **Publisher Accounts > Publisher > Website**. The interface will appear as follows:

![](/files/def2060fa2cb56ecce3866700cb575ce4cdafb42)

* **Price Floor**: Enables the floor price you have entered across all SSPs running on that placement (for SSPs that support the Floor Price Module).
* **Price Floor Currency**: Sets the currency you would like to use for the auction.

Please note that the Floor Price Module also works with **Amazon TAM/UAM** if you are using them within the **HB Manager**, even though they are not technically part of the Prebid auction.

## Website-Level Floor Price

You can also set a floor price at the website level, which will apply to all placements under that website.

To do this, navigate to the desired website in your publisher account and click on **"Prebid Parameters"**.

![](/files/198779100c88a0f5dd33f2ce6b0ff4ba6a044b5a)

Next, click to open the **"Generic Placement Data"** section, where you will have the option to set the floor price. After making the necessary adjustments, **click OK and save the changes at the bottom of the page.**

![](/files/1bd8f80eeba6671d424fa441416baf7c0d928456)

## Account-Level Floor Price

You can also set a floor price at the account level, which will apply to all websites under that publisher.

In your publisher account, locate the **"Prebid Parameters"** at the top, under **"Programmatic Info"**, and follow the same steps as outlined above.

![](/files/0300a0b6cee503c1e82692a47a0eceaa7b307e26)

## Global-Level Floor Price

You can also set a floor price at the global level, affecting all publishers. This can be configured under the **"HB Management"** tab by navigating to **Global HB Management > Prebid Parameters**.

![](/files/d82a06285a23b380b1bb95dce72efc636f4802d1)

## Ensuring that Floor Prices are Applied in Your Ad Server of Choice (Web Only)

You can configure the ability to send the floor price to your ad server, rather than relying solely on the winning Prebid value to carry over to the ad server, in the XXX section. This ensures that the ad server operates with the intended floor price. Currently, we support the following:

* Xandr
* Equativ
* GAM - which is slightly more complex, as explained further down in this article.

For non-GAM ad servers, enabling this functionality is straightforward. A single setting allows you to inject the floor price. You can choose to set it for the ad server only, for Prebid only, or for both:

![Screenshot\_from\_2024-09-23\_14-45-36](/files/7eab2d4c4e6c88e8503d535852ee7d8b101dfd59)

### Building Price Rules in GAM

For GAM, handling floor prices is slightly more complex, as this must be managed through GAM price rules.

You can activate this functionality in the XXX.

![Screenshot\_from\_2024-09-23\_14-44-11](/files/87bcdb1b22f8a9c6a081a241477c690b911c1a77)

The good news is that there is an intuitive GUI in Relevant Yield, where you can create, edit, and delete the price rules you wish to use for this.

Simply clicking " **Enable Floor Prices in GAM**" will not have any effect, as a set of "bucket" unified price rules is required. Since the regular API is not being used and the process mimics the GAM UI, it is essential to input the **Google UI credentials** first.

The **Set up price rules** dialogue will look something like this:

![Screenshot\_from\_2024-09-23\_14-44-48](/files/abc4010c71cf04cab5248a93fd245884ec21b6d0)

As this process might seem slightly complicated the first time, it’s a good idea to consult your Customer Success representative. However, if you’ve worked with GAM price rules before, it should be fairly straightforward.

First, the **rlv\_floor\_bucket** key-value must be set up. Once that is done, you can proceed to add or edit the price rules.

By ticking the **Edit** checkbox, you enter "edit mode." At present, it’s not possible to edit the rules individually; instead, you can configure the general characteristics of the rules:

* **Num. active rules** - Numbers of active price rules (of our **rlv\_floor\_bucket** targeted rules)
* **Median CPM** - The "median" CPM. While this might not always represent the exact median value, it is the CPM value where the differences between rules are smallest. This allows for more granularity in the range where price floors are typically expected, with less "density" further from this range.
* **Range multiplier** - The factor by which the highest floor exceeds the median CPM.

By clicking **Preview**, you can see the potential outcome of applying the selected settings. Finally, pressing **Apply changes in GAM** will push the updates to GAM.

### Leveraging Google's Internal Optimization Feature in GAM with Price Rules (Not Recommended)

You have the option to enable Google's internal optimization feature, which is currently in beta, and designate a percentage of your traffic for "Google-optimized" processing. However, we advise against using this feature.

![Screenshot\_from\_2024-10-22\_09-43-11](/files/68791dc3a8d670256d3827895680ffaabd14c69e)

It should be noted that we do not recommend this approach, as our experience suggests it provides very little uplift. Additionally, the floor prices tend to become very low, which could potentially undermine a long-term floor pricing strategy. Moreover, it may override other price rule settings you might be using in GAM.

If you choose to utilise the GAM optimisation, you can evaluate its performance via HB Analytics using the **Ads. Floor-Optimised** dimension.

![Screenshot\_from\_2024-10-22\_10-45-21](/files/54f01feb527f9b900022dd8d09a2246828d31e95)

And it will also appear as a special floor when viewed in the **Floor-Range** dimension:

![Screenshot\_from\_2024-10-22\_10-55-17](/files/cfd820f520d6015bf2cb3508bbac0ef351eee93d)


# How to Activate/Deactivate Prebid/Header bidding on specific placements (Only for web)

Maybe you would like to have the option to turn your Prebid auctions (and header-bidding in general) on and off in an easy way? This is possible by following the steps below.

You now have the ability to turn the Header-bidding auction on/off; without removing anything from the set up as such.

![Screenshot\_from\_2024-10-31\_21-01-40](/files/b1741636a617f6931bda8555e7a3c72a0d29b2f3)

You find the setting on different levels in your setup, So it can be done globally, on a Publisher level, on a Site level or on a placement level; simply access the **Prebid parameters**, and look at the **Generic Placement Data**.

As this feature will disrupt the normal flow of the Auction, it is important to use the right setting for how to make the system react, if something is turned off, and that is why there is some different settings available to regulate that behaviour:

![Screenshot\_from\_2024-10-31\_21-00-31](/files/0d1bdf4e7ec9e90e4f4efef0a175706c135d583f)

The settings can be found under **Generic Prebid Config Data.**

{% hint style="info" %}
We recommend that you consult your Customer success representative the first time you try out this functionality, so we can help you select the appropriate setting for your need.
{% endhint %}


# Multivariate A/B testing and using child prebid configurations

This article describes how to use child prebid configurations as a way to perform multivariate A/B testing on a site.

A/B testing on a site is pretty straight-forward after understanding the concept of *child prebid configurations*. Using this concept, users can be split into two or more test-groups where you control how many % of visitors each group should contain. The groups can then be compared against each other using the headerbid analytics in order to determine the outcome.

Examples of parameters that can be used for A/B testing:

* Enabling/Disabling of one or more bidders.
* Changes of floor prices.
* Changes of headerbid timeouts.
* Switching between server-/client-side bidding.
* Custom execution of JavaScript code - to e.g. programmatically change Prebid.JS settings, load some other JavaScript, or whatever else.
* User-defined settings in [**Prebid Config Tag Fields**](/hb-manager/setup/prebid-config-tag-fields-advanced)**.**
* ..etc

### Child configuration

A *child* prebid configuration creates as a "child" to a normal prebid configuration. Which SSP-placements that are selected is still decided in the normal ("parent") prebid configuration. This means that whenever the set of SSP placements for the normal configuration is changed - the child configurations will be updated automatically.

All **Prebid parameters** and **Configuration Data** settings in the parent configuration will be applied as well - *but they are all possible to override in the child prebid configuration*. To read about how settings are applied and in which order - read about [**Prebid parameters**](/hb-manager/auction-behavior-and-optimization/manage-prebid-settings-with-prebid-parameters).

### Introduction by example - benchmark enabling a bidder server- or client-side

In this hypothetical example we imagine that we've just got ourselves an account in Xandr and want to test the performance (as measured by **Ad unit eCPM**). This is a good example where A/B testing can be beneficial as it's not always clear how much of added revenue that is "cannibalization" on other SSPs, and how much revenue that is lost because of the possibly longer load times when adding yet another SSP.

#### Preparation - Set the SSP as disabled as default before adding SSP placements

![disable xandr](/files/17377470c2b8ec1d2eec0c23f62d065ecf6e453f)

This can for example be done *globally.* If necessary - read the introduction on [**Prebid parameters**](/hb-manager/auction-behavior-and-optimization/manage-prebid-settings-with-prebid-parameters).

{% stepper %}
{% step %}

## Create child prebid configurations for the site we want to run the test

Select "Prebid configurations" on the Website/Apps level, and this will bring you the currently existing Configurations.

Select one of the existing configurations, which will take you to the option of creating child configurations:

![child config](/files/244f00a5bb5ca07c3c4ad1b07d03a873b0641b73)

In this test we'll create two child configurations, one called " *Xandr client-side*" and another called " *Xandr server-side*":

![child configs prebid params selected](/files/b0becc168d9f055279c786ad603fb82721232453)

In this example we'll give them a **Percentage** of 25% each (although you might normally use a much smaller fraction of the traffic like 1%). Make sure to switch on **Enabled child configuration** when you want to start the test.

We're then ready to change the settings we want to change. As we don't want to only test individual placement(s) but *all* placement in the prebid configuration - select **Prebid parameters** on the Account/Publisher level ( **red** marking above).

**Note!** If you would like to change settings for just one or a few placements, then open up the drop down, which lists all your placements, and then select the Placement you would like to do the change on, by pressing **Prebid parameters.**
{% endstep %}

{% step %}

## Change settings for the child configurations

Change the settings on the Account/Publisher level in the configurations (see above), so that we un-check the **Disabled Bidder** setting in the " *Xandr client-side*" configuration:

(If you want to do changes to other settings, like Floor prices or reloads, these can be found under the "Generic placement Data)

![enable xandr](/files/83d8d527dd7494c03e8262b307b782ecf127f037)

In the " *Xandr server-side*" configuration we'll do the same, but we'll also change **Bidding type** to **Server-side**:

![enable xandr server-side](/files/b651a74d1f81caeec841a67c19deed1521f2f93c)
{% endstep %}

{% step %}

## Save settings and run the test

That's it! You can now save the the settings and then save the Account/Publisher. Immediately after saving, the child configurations will be used - in this case for 25% + 25% of the visitors.
{% endstep %}

{% step %}

## See the result of the test

The **Prebid configuration** dimension in the HB Analytics header bidder reports can now be used to measure the performance of the test. The most important metric is normally the **Ad unit eCPM** metric as it shows how much revenue that is generated in average per ad request. You cna add your results as a Dashboard reporting module if you would like to keep a close eye on your test all the time, and even build alarms on it.

But there is also an **A/B Test statistics** section in the parent prebid configuration that shows you the base metric Ad Unit eCPM, if you prefer not using the reporting or dashboards.:

![ab test results](/files/7912b1ea4419035abf6570718130814e59b4f265)

We recommend that you utilize the reports and the Dashboard reporting modules, if you would like follow your progress over longer time periods though, but it is of course your own choice. In the reporting and dashboard reporting modules you can also filter for the configurations you would like to see:

![](/files/7426d89129291677dd5d4a81337107f847cab018)
{% endstep %}

{% step %}

## Apply the "winning" settings

In our example it turned out that the " *Xandr server-side*" configuration came out on top. What we probably would do in this case is to **1)** disable the the **Disable Bidder** setting in the *global* settings (see the *Preparation..* section earlier), **2)** set **Bidding type** to **Server-side** and **3)** delete the no longer needed child configurations.

However, in case the testing we're doing is only about optimizing the site/configuration we're currently testing - then we can *copy* the child configuration's settings into the parent configuration using the button outlined below:

![copy child config](/files/1cb179001b51fa7c21764d2fd6260ef8c7f47da2)

This concludes the step by step guide, but if you would like to add more customized code to your child configurations and your tests, we recommend that you read through the section below.
{% endstep %}
{% endstepper %}

### Executing custom JavaScript code for a child configuration

Using **Custom Config JavaScript Code** we can execute any JS code.

![Code](/files/5ed101f13d3affd35e64a9ed4996c622aa1adc3c)

This code will be executed ***once*** immediately when doing the ***first*** call to [relevantDigital.loadPrebid()](broken://spaces/thyujPhgXh1WtJZy8bjr/pages/28d0e242e33c72426e17b4dc7700f6629be560ea).

{% hint style="warning" %}
**NOTICE:** As such code is only executed once per page-view / page-session it's worth to notice that in the case of a *Single Page Application* style page with *different* prebid configurations for e.g. frontpage/articles - then *only* the code for the *first* used configuration will be executed. If needed it's possible to create an own code-field with different behavior using [**Prebid Config Tag Fields**](/hb-manager/setup/prebid-config-tag-fields-advanced).
{% endhint %}

#### Data available in the Custom Config JavaScript code

The following variables will be available in the JavaScript code in the field:

* **data** - An object with the **Configuration Data** for the prebid configuration. This includes the *Built in settings* (like the code itself). The keys for these built-in fields will be prefixed with " *rlv*". It also contain custom user-created settings created using **Prebid Config Tag Fields**.
* **pbConfig** - The prebid configuration object itself. It will be one of the objects returned by [relevantDigital.getConfigs()](broken://spaces/thyujPhgXh1WtJZy8bjr/pages/ae89e984aeba5911f599c02cb956319d59743200).


# Configuration targeting for User countries

## With the Configuration targeting of user countries, you can target traffic from specific GEOs to specific configurations, and optimise them as you see fit.

Please notice that you can of course also see how your general performance is in your HB Analytics, by reporting on the Countries dimension; without setting up any country targeted configurations. In fact a good starting point is to look if you have big differences between your country statistics, before deciding to set up a country targeted Prebid configuration; or if you have a local SSP, that you feel only benefits a specific region.

If you decide to add a country targeted configuration, The configuration targeting for GEOs works similar to setting up a child configuration in Relevant Yield.

Simply find the configuration you would like to split a country defined target to, usually under the Prebid configurations on your Website/Apps:

![](/files/7a3dbb6af5ff7d5d0132616264ce6c8d553245d3)

and then add a child configuration. You can then select which country or countries you would like to allocate the new configuration to, and select how much big % of the traffic you would like to target towards it:

![](/files/c3e2abafd8b00f65db38766f5ad3eddf76b113a9)

If you choose to assign 100% traffic to your country targeted child configuration, that child configuration will utilize all the traffic from the selected countries.

Please notice that by splitting up your configuration into multiple child configurations targeting the same country, you can of course also use the child configurations for the same purposes as you would normally when running multivariate testing.

Once added the configuration will deliver towards the selected countries, and you can see the statistics in your HB Analytics Prebid Configurations, and slice and dice on Bidders and all the other relevant Dimensions and Metrics in the tool:

![](/files/cb40cae31efb9b3daa9717f23cbb733ec9d4d2d1)


# Setup

Set up HB Analytics and configure core data inputs.

<div align="left"><figure><img src="/files/oOJVYnukx9CWezONZKMB" alt=""><figcaption></figcaption></figure></div>

Set up HB Analytics and configure core data inputs.

Install the unique HB Analytics tag for each website before any Prebid calls. Then configure the optional data sources and dimensions your reports require.

### Setup guides

* [Overview of setting up HB Analytics](/hb-analytics/setup/overview-of-setting-up-hb-analytics) — Install the HB Analytics tag and choose its load timing.
* [Adding Custom Dimensions](/hb-analytics/setup/adding-custom-dimensions) — Add dimensions for more detailed reporting.
* [Real-time analytics for GAM in HB Analytics - How it works and how to set it up.](/hb-analytics/setup/real-time-analytics-for-gam-in-hb-analytics-how-it-works-and-how-to-set-it-up.) — Connect Google Ad Manager data and enable approximations.
* [HBA instream reporting with Google IMA SDK](/hb-analytics/setup/hba-instream-reporting-with-google-ima-sdk) — Configure instream video reporting with Google IMA SDK.


# Overview of setting up HB Analytics

## Integration of the HB Analytics

You’ll see a Programmatic tag link for each site in the Publisher account page when you choose to edit a publisher: "Programmatic tag"

![](/files/304d84cb97747a278b6b8d99d40e6126710b9996)

In the top of the tag page you’ll see the script you should put on the site:

![](/files/72ba5126aa8cac81fa83dddb05a1c9edc19a44a6)

{% hint style="warning" %}
You must place the tag before any other calls to Prebid.js, and that includes any other call to **pbjs.queue.push()**.
{% endhint %}

The loading of the actual HBA script (hosted by Relevant) can however be delayed any amount of time. In the tag this is controlled by the **LOAD\_TIMEOUT\_MS** variable at the top.

Delaying the load will naturally increase the % of traffic/revenue/events that will be missed. The HBA script is designed to be light on resources. But if you’re concerned about your page load time and accept that a certain % of traffic will be missing in the report you can e.g. set it to **3000** for a **3 second** delay.

A real world example that we’ve observed for a specific site was that a 10 second delay lost \~35% of the traffic/revenue in the reports. But this varies obviously for different sites depending on the average time users spend on each page.

*Delaying the load might be desirable during initial testing of HBA.*

That is it!

Please notice that it is important to use unique scripts per website. We recommend that you take a look at [**Adding Custom Dimensions**](/hb-analytics/setup/adding-custom-dimensions) in the help section if you need to build a higher granularity or log special parameters.

## Related articles

* [How to Export Reporting data through HB Analytics Pull API](broken://spaces/thyujPhgXh1WtJZy8bjr/pages/4d5985be40553c088172936988a90adcba3a7419)
* [Real-time analytics for GAM in HB Analytics - How it works and how to set it up.](/hb-analytics/setup/real-time-analytics-for-gam-in-hb-analytics-how-it-works-and-how-to-set-it-up.)
* [What is HB Analytics](/getting-started/what-is-hb-analytics)
* [Adding Custom Dimensions](/hb-analytics/setup/adding-custom-dimensions)
* [Date-based event notifications in HB Analytics](/hb-analytics/alarms-and-notifications/date-based-event-notifications-in-hb-analytics)


# Adding Custom Dimensions

### What are Custom Parameters?

Adding Custom Dimensions or Parameters can be really useful to measure specific events or themes on your website. Examples of this can be anything from a specific website section to screen dimensions or more content-oriented things, such as "Car brands", for articles featuring different car brands.

With this added information you can do more in-depth analysis of your Header Bidder (both technically and from a revenue perspective). So what Custom parameters you want to add (if any) is really down to your imagination and needs for your website.

### Adding Custom Parameters:

{% hint style="info" %}
This article is about web. To learn about how to use custom dimensions in Mobile Apps, please read about [Prebid Mobile Extensions](broken://spaces/thyujPhgXh1WtJZy8bjr/pages/8e369759e40746c367eef702e9a89c1b534a429a).
{% endhint %}

Custom parameters can be used to add more dimensions and filters in the reports, such as “Is user logged in”, “Is there consent”, etc.

What is needed is to create a function named `RELEVANT_ANALYTICS_SETTINGS.getCustomParams`. This function needs to exist before *either* Prebid.js is loaded *or* our tag is loaded. It will, however, not be *called* until after the first auction has completed.

```html
<script>
 window.RELEVANT_ANALYTICS_SETTINGS = window.RELEVANT_ANALYTICS_SETTINGS || {};
 RELEVANT_ANALYTICS_SETTINGS.getCustomParams = function() {
   return {

     // A string (new report dimension + filter)
     'Is logged in': isUserLoggedIn() ? 'Yes' : 'No',

     // Number (new report filter)
     'Times visited': getTimesVisited(),
   };
 };
</script>
```

* If the value is a string it will appear as a new dimension + filter in the report.
* If the value is a number it will appear only as a filter in the reports, where you can filter by *min* and *max* values.

The system scans for custom parameters that have occurred during the last 2 hours when populating the report settings. There is also an up to 5 minute delay in these checks. Therefore there might be situations where you can’t find new custom parameters immediately in the report settings.

{% hint style="warning" %}
Avoid using string custom parameters where the different values will be in the *millions*, such as “user id”, “timestamp”, “pageview id”, etc. This will not work for reporting and it might also degenerate performance for all types of HBA reports on your instance.
{% endhint %}

### To simplify the deployment of custom parameters you can use the JavaScript fields that will inject code in the HBA tags.

For code (e.g. a custom parameter function) that should be *global* for all publishers, override **Custom Global JavaScript code** under **Configuration** => **Global Programmatic Tag:**

![screenshot\_setup](/files/2365d7898e04ef8b6653fb0498bc942d14d09b64)

For code that should execute for a single *publisher* use **Custom Publisher JavaScript code** under **Master Programmatic Tag** on the publisher page for the publisher:

![screenshot\_master\_programmatic\_data](/files/4e8c2d598def5b35d9e1206e0953e0a9f59264a7)

![](/files/fd13942f676e4f00cc57a2b81b247fb5d537baf1)

For code that should execute for a single *site* within a publisher use **Custom Site JavaScript code** under **Programmatic Tag** for the *site*. This is important if you want to use different custom parameters for different websites:

![](/files/9c6d7dc6b5d5c6f2e324858d4fca61162a37deea)

For example, this shows a simple implementation of a “Is Reload” custom parameter for a publisher (notice that this is just an example and will not work for all page designs):

![](/files/d33c951e06c8aa3b4bcfa632450b64046f0facdf)

{% hint style="warning" %}
All codes in the “JavaScript” boxes will run in a *function scope*, so in the example above the “calls” variable will not be global.
{% endhint %}

### **Combining Global / Per Publisher / Per Site Custom Parameters**

The custom JavaScript code is executed in the following order:

1. Custom Global JavaScript code
2. Custom Publisher JavaScript code
3. Custom Site JavaScript code

This means that if you e.g. have *global* custom parameters and want to add *publisher*-specific custom parameters you can for example save the **getCustomParams()** function, get the result from it and combine it with the publisher specific parameters:

```javascript
window.RELEVANT_ANALYTICS_SETTINGS = window.RELEVANT_ANALYTICS_SETTINGS || {};

// Save global/previous function
var prevCustomFn = RELEVANT_ANALYTICS_SETTINGS.getCustomParams;

RELEVANT_ANALYTICS_SETTINGS.getCustomParams = function() {

 // Get the global/previous parameters
 var res = prevCustomFn ? prevCustomFn() : {};

 // Then add more specific parameter(s)
 res['Publisher specific parameter'] = getPublisherSpecificParameter();

 return res;
};
```

### **Example: IAB consent custom parameter**

Let’s take the previous example-code and expand it so that a “Has Consent” custom parameter is logged based upon the response from a TCF 2.0 compatible CMP.

```javascript
window.RELEVANT_ANALYTICS_SETTINGS = window.RELEVANT_ANALYTICS_SETTINGS || {};

// Save global/previous functions
var prevCustomFn = RELEVANT_ANALYTICS_SETTINGS.getCustomParams;
var prevWaitFn = RELEVANT_ANALYTICS_SETTINGS.waitInit;

var consent;

RELEVANT_ANALYTICS_SETTINGS.waitInit = function(doneCb) {
  function initConsentData() {
     // Notice that the CMP “stub” code must have been loaded at this stage.
     // Else __tcfapi will not exist
     if (!consent && window.__tcfapi) {
        __tcfapi("getTCData", 2, function (data) {
           // Let's use Rubicon (vendor-id 52) as our "benchmark"
           consent = data.vendor.consents[52] ? 'Yes' : 'No';
           doneCb();
        });
        // "Failsafe timeout" after 2 seconds
        setTimeout(doneCb, 2000);

     } else {
        doneCb();
     }
  }

  // If needed wait for global/previous waitInit function
  if(prevWaitFn) {
    prevWaitFn(initConsentData)
  } else {
    initConsentData();
  }
};

RELEVANT_ANALYTICS_SETTINGS.getCustomParams = function() {

  // Get the global/previous parameters
  var res = prevCustomFn ? prevCustomFn() : {};

  // Add our parameter
  res['Has Consent'] = consent || 'CMP Not loaded';

  return res;
};
```

In this example we’re defining a **waitInit()** function that will delay sending any analytics even until the **doneCb** function has been called. This is used here to make sure that we receive the callback from the CMP (or times out) *before* **getCustomParams()** is called. We also consider that we might have already defined another **waitInit()** function and make sure to call it before we run our code.

Notice that “having consent” is a bit blurry as the user theoretically might have ticked/unticked different vendors and purposes in the UI dialog. So in the example we check a specific vendor (Rubicon) that we expect to have consent to using the default settings in the CMP.

Sounds tricky? Our support and Onboarders are there to help you, so you can always ask us for assistance regarding setting up the custom Parameters.


# Real-time analytics for GAM in HB Analytics - How it works and how to set it up.

## In this Section we will guide you on how to set up real-time analytics for GAM for HB Analytics

### How it works

The first thing to know is that the real-time analytics data collected from GAM is strictly not real-time, but a few hours old, and the real-time data seen is a projection forward based on API data collected from GAM. This projection is quite accurate for most major Metrics, like Revenue, Fillrate, Revenue Type; but some more granular metrics, like Browser might have a slightly bigger increase of unorthodox data listed; due to the projection calculation.

Please notice that we only collect GAM revenue data for Ad slots that are added in the Prebid configuration.

### How to set it up

As the data is based on API and logged data in the auction; rather than 100% logged data in the auction, you will need to add credentials to the API, in order for us to be able to collect the data for you.

You can add your credentials in the "Adserver" integration page:

![](/files/59fdde1e2239c3f4edb91bb3cf5e1989abd1c066)

And then add the credentials data like you would for an Adserver:

[Setting Up a New Ad Server Connection](/ad-revenue-insights/data-connections/setting-up-a-new-ad-server-connection)

And finally Activate/Enable the collection of Real-Time data:

![](/files/46bd75314c6a5f09bc12d01db9cdcfb61c020811)

With this enabled, you should start seeing your GAM account showing as a Bidder in HB Analytics (please notice that it might take a few minutes).

If you would like to switch between seeing the data, or switch between not seeing approximated data, only real GAM data, this is also possible through switches in the reports:

![](/files/951bb569bbc23d2482665325d4a80e1f020af363)

Activating the Adserver approximations, will approximate forward towards real-time, and you will also see when the latest real data was collected. Turning it off will only show real collected GAM data. If you select Headerbidding only, you will just see Bidders that are present directly in the Headerbidding Auction (removing GAM; as a bidder).

### Related articles

* [Date-based event notifications in HB Analytics](/hb-analytics/alarms-and-notifications/date-based-event-notifications-in-hb-analytics)
* [How to Export Reporting data through HB Analytics Pull API](broken://spaces/thyujPhgXh1WtJZy8bjr/pages/4d5985be40553c088172936988a90adcba3a7419)
* [What is HB Analytics](/getting-started/what-is-hb-analytics)
* [Adding Custom Dimensions](/hb-analytics/setup/adding-custom-dimensions)
* [Overview of setting up HB Analytics](/hb-analytics/setup/overview-of-setting-up-hb-analytics)


# HBA instream reporting with Google IMA SDK

## Learn how to enable HBA to pick up revenue and impressions when using Google's IMA SDK for instream video - either directly or via a 3rd party video player.

When using Google's [IMA SDK](https://developers.google.com/interactive-media-ads/docs/sdks/html5/client-side) the [instreamTracking](https://docs.prebid.org/dev-docs/modules/instreamTracking.html) module for Prebid.js is not working. Instead it is necessary to "manually" register instream impressions using the **relevantDigital.Auction.registerImpressionByAdId()** function.

{% hint style="info" %}
This method is comparing ids in **VAST** XML for so called *Wrapper* ads - with the ids in Prebid bid responses. Potentially it might happen that the *same* instream ad (with the same id) is delivered e.g. via **Open Bidding** in **Google Ad Manager** instead. In this case the impression + revenue will incorrectly be attributed to Prebid in the headerbid reports.
{% endhint %}

#### When using the IMA SDK directly

We need to listen for the [**google.ima.AdEvent.Type.IMPRESSION**](https://developers.google.com/interactive-media-ads/docs/sdks/html5/client-side/reference/js/google.ima.AdEvent) event and then extract the ad id(s) via the [Ad.getWrapperAdIds()](https://developers.google.com/interactive-media-ads/docs/sdks/html5/client-side/reference/js/google.ima.Ad#getWrapperAdIds) and [Ad.getAdId()](https://developers.google.com/interactive-media-ads/docs/sdks/html5/client-side/reference/js/google.ima.Ad#getAdId) functions that we'll then supply to **relevantDigital.Auction.registerImpressionByAdId()** .

First we create the event handler:

```javascript
// Our impression event handler
const onImp = (ev) => {
    window.relevantDigital = window.relevantDigital || {};
    relevantDigital.cmd = relevantDigital.cmd || [];
    relevantDigital.cmd.push(() => {
        // Loop through all ad ids starting from the innermost ad.
        // registerImpressionByAdId() will return true if it registered an impression
        const adIds = [
            ev.getAd().getAdId(),
            ...ev.getAd().getWrapperAdIds(),
        ];
        for (const id of adIds) {
            if (relevantDigital.Auction.registerImpressionByAdId(id)) {
                return;
            }
        }
    });
};
```

We can then use this **onImp** handler from the *existing* site code similar to this:

```javascript
const onAdsManagerLoaded = (ev) => {
  ...
  adsManager = ev.getAdsManager(...);

  // THE NEW LINE!
  adsManager.addEventListener(google.ima.AdEvent.Type.IMPRESSION, onImp);
};

...

// Create ads loader.
const adsLoader = new google.ima.AdsLoader(...);
// Listen and respond to ads loaded and error events.
adsLoader.addEventListener(google.ima.AdsManagerLoadedEvent.Type.ADS_MANAGER_LOADED,
onAdsManagerLoaded, false);
```

#### When using the IMA SDK *indirectly* via 3'rd party video players

Unfortunately it's currently not possible to listen for the impression-events in a supported way from "outside" using the IMA SDK as there is no reliable way to get access to the **google.ima.AdsManager** instances.

It is *highly* recommended that you check the documentation for your existing video player to see if there is a way to to listen to impression events and get ad ids in the same manner as via [Ad.getWrapperAdIds()](https://developers.google.com/interactive-media-ads/docs/sdks/html5/client-side/reference/js/google.ima.Ad#getWrapperAdIds) and [Ad.getAdId()](https://developers.google.com/interactive-media-ads/docs/sdks/html5/client-side/reference/js/google.ima.Ad#getAdId). If so it should be possible create a listener very similar to the **onImp** listener above.

#### Quick workarounds

As a *last resort* it's possible to "inject" some JavaScript-functionality into the IMA SDK instead - in order to capture the impression events.

{% hint style="warning" %}
The solution below overwrites **google.ima.AdsLoader** etc. In worst case a subsequent update of the IMA SDK might interfere with this solution in such a way so that instream ads breaks completely!
{% endhint %}

The setting below requires that the first call to [relevantDigital.loadPrebid()](broken://spaces/thyujPhgXh1WtJZy8bjr/pages/28d0e242e33c72426e17b4dc7700f6629be560ea) is executed *before* the video player code creates the **google.ima.AdsLoader** object, in order to work.

![1-3](/files/85cbd2431dc6a9c5212eb72dd1b760c84b6fab4c)

If that timing requirement is not possible, or in case of uncertainty - the code below will do the same thing:

```javascript
// Helper-function that triggers a callback when a variable is set
// in an object. Our use-case will be to react when
// google.ima.AdsLoader is set, and replace it with an own version.
const inject = (obj, [name, ...rest], cb) => {
    let val = obj[name];
    const update = (newVal) => {
        if (rest.length) {
            inject(newVal, rest, cb);
        } else {
            newVal = cb(newVal)
        }
        val = newVal;
    }
    if (val) {
        update(val)
    } else {
        Object.defineProperty(obj, name, {
            get() {
                return val;
            },
            set: update,
        });
    }
}

inject(window, ['google', 'ima', 'AdsLoader'], (org) => {
    // Our impression event handler
    const onImp = (ev) => {
        window.relevantDigital = window.relevantDigital || {};
        relevantDigital.cmd = relevantDigital.cmd || [];
        relevantDigital.cmd.push(() => {
            // Loop through all ad ids starting from the innermost ad.
            // registerImpressionByAdId() will return
            // true if it registered an impression
            const adIds = [
                ev.getAd().getAdId(),
                ...ev.getAd().getWrapperAdIds(),
            ];
            for (const id of adIds) {
                if (relevantDigital.Auction
                    .registerImpressionByAdId(id))
                {
                    return;
                }
            }
        });
    };

    const onAdsManagerLoaded = (ev) => {
        const orgGet = ev.getAdsManager;
        ev.getAdsManager = function () {
            const mgr = orgGet.apply(this, arguments);
            if (mgr) {
                mgr.addEventListener(
                    google.ima.AdEvent.Type.IMPRESSION,
                    onImp,
                    false
                );
            }
            return mgr;
        }
    };

    // Create our own version of google.ima.AdsLoader
    const loader = function () {
        const res = org.apply(this, arguments);
        this.addEventListener(
           google.ima.AdsManagerLoadedEvent.Type.ADS_MANAGER_LOADED,
           onAdsManagerLoaded,
           false
        );
        return res;
    };
    // Make our AdLoader "inherit" from the orignal AdLoader
    Object.assign(loader, org);
    loader.prototype = org.prototype;
    return loader;
});
```


# Reporting and metrics

Work with reports, dimensions, metrics, and report settings.

Work with reports, dimensions, metrics, and report settings.

Use HB Analytics reports to analyse auction performance by inventory, demand, user, and technical dimensions. Select metrics that answer the question, then refine the report with dimensions and settings.

### Reporting guides

* [HB Analytics - Dimensions and Metrics](/hb-analytics/reporting-and-metrics/hb-analytics-dimensions-and-metrics) — Review the available report dimensions and metrics.
* [Configuration Logging and Reporting in Your Ad Server](/hb-analytics/reporting-and-metrics/configuration-logging-and-reporting-in-your-ad-server) — Configure logging and reporting in your ad server.
* [How to Use HB Historical Reports - Dimensions and Metrics](/hb-analytics/reporting-and-metrics/how-to-use-hb-historical-reports-dimensions-and-metrics) — Work with dimensions and metrics in historical reports.
* [HB Analytics - 'Other options' in Report Settings](/hb-analytics/reporting-and-metrics/hb-analytics-other-options-in-report-settings) — Adjust report display and auction-runner settings.


# HB Analytics - Dimensions and Metrics

Here we cover the Dimensions and Metrics available in the HB Analytics. Please notice that the Dimensions shown here are the Default Dimensions, if you have added custom dimensions they are most likely not covered in this article.

## Dimensions

<table><thead><tr><th width="227.0531005859375">Dimension</th><th>Description</th></tr></thead><tbody><tr><td><strong>Time Period</strong></td><td>Defines the report breakdown granularity. HB Analytics supports periods down to 10 minutes, subject to your contract. Smaller periods aggregate into daily values.</td></tr><tr><td><strong>Publisher</strong></td><td>The publisher account where the auction occurred.</td></tr><tr><td><strong>Site</strong></td><td>The site where the auction occurred.</td></tr><tr><td><strong>Placement</strong></td><td>The placement where the auction occurred.</td></tr><tr><td><strong>Bidder</strong></td><td>The SSP or source returning a bid through your Prebid configuration.</td></tr><tr><td><strong>Source</strong></td><td>The bidder's name or ID for this auction and placement. Use it to verify setup IDs and investigate SSP rules.</td></tr><tr><td><strong>Bid-range</strong></td><td>Returned bidder values grouped into tiers. Use it to see where a bidder usually bids and adjust bid levels.</td></tr><tr><td><strong>Creative Size</strong></td><td>The served creative size, such as <code>300x250</code> or <code>160x600</code>.</td></tr><tr><td><strong>Media Type</strong></td><td>The served media type, such as video or banner.</td></tr><tr><td><strong>Revenue type</strong></td><td>Whether revenue and metrics relate to Direct, Deals, or OpenRTB performance.</td></tr><tr><td><strong>Demand Channel</strong></td><td>Whether revenue and metrics relate to ad server or header bidding performance.</td></tr><tr><td><strong>Country</strong></td><td>The user's country. Use it to compare regional and country performance.</td></tr><tr><td><strong>Prebid Configuration</strong></td><td>The name of the Prebid configuration, including child configurations.</td></tr><tr><td><strong>Hostname</strong></td><td>The domain name of the website or app hosting the auction.</td></tr><tr><td><strong>Operating system</strong></td><td>The operating system used to access the website or app during the auction.</td></tr><tr><td><strong>Browser name</strong></td><td>The browser used during the auction.</td></tr><tr><td><strong>Browser version</strong></td><td>The browser version used during the auction.</td></tr><tr><td><strong>Platform</strong></td><td>The platform used to access the website or app during the auction.</td></tr><tr><td><strong>URL</strong></td><td>The specific web address visited during the auction.</td></tr><tr><td><strong>Prebid.js version</strong></td><td>The Prebid.js version running on the site or publisher account.</td></tr><tr><td><strong>Floor range</strong></td><td>A description of the floor prices used.</td></tr><tr><td><strong>Ads. Floor optimised</strong></td><td>Whether Google floor price optimization is on or off when <strong>Adserver optimized %</strong> is set on placements.</td></tr><tr><td><strong>Host Name</strong></td><td>The host name. This usually matches the domain.</td></tr><tr><td><strong>Is approximation</strong></td><td>AdX revenue whose CPM is estimated from earlier traffic. GAM reports usually provide final data after about one hour.</td></tr><tr><td><strong>Adserver bids</strong></td><td>The number of bid requests sent as ad requests to an ad server with real-time logging.</td></tr></tbody></table>

## Metrics

<table><thead><tr><th width="189.3563232421875">Metric</th><th>Description</th></tr></thead><tbody><tr><td><strong>Revenue</strong></td><td>Gross revenue is the accumulated value of winning Prebid bids. It includes bids later overruled by the ad server.</td></tr><tr><td><strong>Auctions</strong></td><td>The number of Prebid auctions held.</td></tr><tr><td><strong>Ad Unit Requests</strong></td><td>The total number of ad unit requests. An auction can include multiple ad unit requests.</td></tr><tr><td><strong>Impressions</strong></td><td>The number of sold impressions used by Prebid.</td></tr><tr><td><strong>Winning Bids</strong></td><td>The number of winning Prebid impressions before the ad server decides whether to use them.</td></tr><tr><td><strong>eCPM</strong></td><td>The average CPM of all won and used impressions.</td></tr><tr><td><strong>Ad unit eCPM</strong></td><td>The average CPM of all ad unit requests.</td></tr><tr><td><strong>Auction eCPM</strong></td><td>The average value of all auctions. It is usually higher than ad unit eCPM because an auction can include multiple ad unit requests.</td></tr><tr><td><strong>Fill rate%</strong></td><td>The percentage of impressions relative to ad unit requests.</td></tr><tr><td><strong>Bid eCPM</strong></td><td>The average CPM of all bids returned for the Prebid auction.</td></tr><tr><td><strong>Bid requests</strong></td><td>The number of bid requests sent from auctions. Each ad unit request usually sends one request per connected SSP or source. Some SSPs send one request per dimension.</td></tr><tr><td><strong>Bid rate%</strong></td><td>The percentage of bid requests answered with a bid response.</td></tr></tbody></table>

{% hint style="warning" %}
**Important:** Bid rate% is not compatible with these dimensions:

* Bid Range
* Creative Size
* Media Type
* Revenue Type

Combining Bid rate% with these dimensions always returns a 100% Bid rate%.
{% endhint %}

<table><thead><tr><th width="223.1187744140625">Metric</th><th>Description</th></tr></thead><tbody><tr><td><strong>Total bid revenue</strong></td><td>Revenue from all returned winning bids across each ad unit request. It can exceed gross revenue because not every winning bid is shown.</td></tr><tr><td><strong>Cancelled bids</strong></td><td>Bids interrupted when a user closes a tab or similar.</td></tr><tr><td><strong>Avg. response ms</strong></td><td>The time from auction start until a bidder returns a response.</td></tr><tr><td><strong>Avg. render ms</strong></td><td>The time from auction start until the ad renders.</td></tr><tr><td><strong>Timed out bids</strong></td><td>Bids without a response before the timeout threshold. Slow loading can cause timeouts.</td></tr><tr><td><strong>Timed out bids%</strong></td><td>The percentage of bids that timed out.</td></tr><tr><td><strong>No bid responses</strong></td><td>The number of bids without a response.</td></tr><tr><td><strong>Bid responses</strong></td><td>The number of bids that received a response.</td></tr><tr><td><strong>Failed renderings</strong></td><td>The number of bids that failed to render.</td></tr><tr><td><strong>Unique bid revenue</strong></td><td>Revenue from bids where no other SSP returned a bid response.</td></tr><tr><td><strong>Incremental bid revenue</strong></td><td>Revenue added by the winning SSP, calculated as the winning bid minus the second-highest bid.</td></tr><tr><td><strong>Lost revenue to adserver</strong></td><td>Revenue lost when the ad server serves another ad or no ad.</td></tr><tr><td><strong>Bid density%</strong></td><td>Bid responses divided by ad requests. It can exceed 100% when an SSP sends multiple responses.</td></tr><tr><td><strong>Win rate%</strong></td><td>Impressions divided by bid responses.</td></tr><tr><td><strong>Page Views</strong></td><td>One page view for all auctions during one page load, until the user navigates elsewhere.</td></tr><tr><td><strong>Sessions</strong></td><td>Similar to page views, but remains valid while the user keeps the current tab open, including across page navigation.</td></tr></tbody></table>


# Configuration Logging and Reporting in Your Ad Server

With the configuration logging activated, you will be able to see how your configurations are performing on the adserver level - which means that you can follow your optimisation through the full funnel.

{% stepper %}
{% step %}

## Enablement

Add API credentials for your ad server. (If you are already utilising our Ad Revenue Insights module, this is most likely already added.)
{% endstep %}

{% step %}
Activate the option to log the configuration ID and Names as Keywords; by going into Configurations - Global programmatic tag:

![](/files/b17d139b75edb34b7b26700e73b865225aa15224)

Once this is enabled, we will start sending the configuration IDs and Names as Keywords to your ad server, which means that you can see how well a configuration is performing in the ad server, giving you a better holistic understanding of your optimisations.

If you do not want to use the default Keyword names we use for this, you can change it to your preferred keywords, by going into Configuration - Integrations, selecting your ad server and adding your own custom values:

![](/files/7caa571d013a7016e6a3c0dfce841dc784f7eb45)
{% endstep %}
{% endstepper %}

### Multivariate testing

This also works for child configurations, so when creating child configurations during a multivariate test, these configurations will automatically also be sent to the ad server, so you have a more complete understanding of how your new configurations perform in relation to each other and the test you are performing.

This is important because you don't want to end up "losing" the optimisation done in Prebid, in your ad server; you want your optimisation to stick through the full funnel of demand.

### Reporting on the Ad server Configuration data

The revenue data for the configuration (based on the keywords used) will be reimported automatically from the Adserver once every day (1-day delay), and we place the data in the HB Analytical Historical reports:

![](/files/9faeb44b8d28b024b02b349068188035236bc8bd)

In the HB historical you can then get an overview and compare how the configuration is performing both in your Prebid and your Adserver environment on a day-to-day granularity level.

We have also added a few new metrics, based on what is available from your ad server, but please notice that the reporting data is slightly different depending on which Adserver you are using. We currently support:

* Google Ad Manager:
* Equativ:

The reason for this is simply that different Ad servers choose to present data differently in their API reporting options.

* **Ad Server revenue:** The revenue reported back (per configuration) from the Adserver. This revenue unfortunately might differ slightly depending on the Adserver you are using, so here is a description:
  * **For GAM:** Revenue generated both from the prebid line items, and revenue coming from any other source in the ad server (that has the configurational keyword). Please notice that when using this metric, you should not add the "normal" revenue values, as they are roughly counted through the Prebid line-items revenue.
  * **For Equativ:** Only revenue that is generated from the Adserver (no prebid revenue), so in order to understand the full revenue value, you should add the "normal" revenue values also.
* **AdServer impressions:** The number of impressions that were sold in total on a specific configurational keyword.
* **AdServer requests:** The number of requests to the ad server on any particular configurational Keyword.
* **AdServer eCPM:** The calculated value of the Adserver revenue/Adserver requests \*1000. This is a good value for determining the efficiency of the configuration, but please notice to factor in how the revenue is treated slightly differently depending on which ad server is used; especially if Prebid revenues are counted in this value or now.

Please notice that these metrics will ONLY be available if you have activated the configuration logging, and the system has imported the first set of data.

### Tips and tricks on how to evaluate the data

* **For GAM:** it is best to look at the Adserver revenue and the Aserver eCPM, in order to compare if a configuration has been performing well or not. Please notice that the Prebid numbers will not be perfect, as this is based on the GAM line items, and therefore be subject to the granularity levels used by these line items. So it might be good to look at the Prebid data as well; but you cannot just add it into the mix, as revenues would then be counted double for GAM.
* **For Equativ:** For Equativ it is best to look at the "Revenue" level and the "Ad unit eCPM", and then add/compare it to the Adserver revenue and the Adserver eCPM metrics. There is no "double counting" in Equativ (due to line items), so revenues can actually be added for a total; and the eCPMs can be used for comparing efficiencies.


# How to Use HB Historical Reports - Dimensions and Metrics

This article outlines the features and limitations of HB Historical Reports, focusing on historical data, available dimensions and metrics, and their comparison with real-time data from HB Analytics Reports.

**HB Historical Reports** focus on reporting historical data, enabling users to look back in time (e.g., a month or a year) with a focused set of available dimensions and metrics that are stored permanently. **HB Analytics Reports** concentrate on real-time data with a few more available dimensions and metrics but the data is stored for the last 30 days.

### Available Dimensions in HB Historical Reports:

* **Time Period**: Defines the granularity with which you would like the report to be broken down.
* **Placement**: The placement where the auction occurred.
* **Publisher**: The Publisher (Account) for which the auction occurred.
* **Site**: The site where the auction occurred.
* **Prebid Configuration**: This dimension shows the name of your Prebid configurations and automatically includes any child configurations you have created.
* **Bidder**: The SSP or source returning a bid through your Prebid configuration.

### Available Metrics in HB Historical Reports:

* **Revenue**: Gross revenue is the accumulated value of the winning bids used by the Prebid. Any winning bids that were overridden by the Ad server are included here. Thus, gross revenue represents what is generated by the Prebid setup.
* **Impressions**: The number of sold impressions used by the Prebid.
* **Bid Responses**: The number of bids that received a response.
* **No Bid Responses**: The number of bids that did not receive a response.
* **Timed Out Bids**: Bids that never received a response. This can depend on various factors, but it is usually due to slow loading times or a specified cut-off point for when to stop waiting for a response.
* **Bid Requests**: The number of bid requests sent from the auctions. Please note that an auction can contain many Ad Unit requests, and each Ad Unit request typically contains one bid per SSP/source connected. Some SSPs use one bid request per dimension per Ad Unit request, leading to multiple bids per Ad Unit request in order to traffic all the dimensions.
* **Ad Unit Requests**: The total number of Ad Unit requests. An auction can contain multiple Ad Unit requests as multiple placements (Ad Units) are requested in the same auction.
* **eCPM**: The eCPM is the average CPM of all impressions (both won and used bids).
* **Fill Rate %**: The percentage value of the number of impressions compared to the number of Ad Unit requests.
* **Timed Out Bids %**: The percentage of bids that timed out.
* **Ad Unit eCPM**: The average CPM of all Ad Unit requests.
* **Bid Rate %**: The percentage of bid requests that were answered with a bid response.

{% hint style="info" %}
**Note**: This metric is not compliant with the following dimensions:

* Bid Range
* Creative Size
* Media Type
* Revenue Type

Using Bid Rate % in combination with these dimensions will always result in a 100% Bid Rate %.
{% endhint %}

* **Bid Density %**: This is calculated as Bid Responses / Ad Requests (how many bid responses per request, which can be greater than 100%) due to some SSPs delivering more than one response.
* **Win Rate %**: Calculated as Impressions / Bid Responses.


# HB Analytics - 'Other options' in Report Settings

When creating a report, you can adjust additional settings to format it according to your needs. This article explains these functions in detail.

You will find the **Other options** menu next to **Metrics** in the report settings.

![](/files/d8863966fd266fb970c5dde1bf5808c2220287e8)

## Hide header

By selecting **Hide header**, you can remove the top menu from your report. This makes the layout clearer and keeps the focus on the graphs and tables.

Before:

<div data-with-frame="true"><img src="/files/9983bf2513d9c241abc08cba23f4eeeefc7b651c" alt=""></div>

After:

<div data-with-frame="true"><img src="/files/6afea585da45f9b8d6d1e02922df369f6760aafa" alt=""></div>

## Split by auction runner (client/server)

If you are running Prebid both server-side and client-side on your sites, you can select **Split by auction runner (client/server)**. When combined with the **Bidder** dimension, this option allows you to compare the performance of both approaches in a single report.

The server-side bidder will have *s2s* appended to its name.


# Alarms and Notifications

Configure HB Analytics alarms.

Configure HB Analytics alarms.

Monitor auction performance with metric-based alarms and record important changes as date-based events. Use alarms for timely operational alerts. Use events to add context to report graphs.

### Alarms and notification guides

* [Setting up your HB Analytics Alarms](/hb-analytics/alarms-and-notifications/setting-up-your-hb-analytic-alarms) — Create, share, and manage alarms based on HB Analytics metrics.
* [Date-based event notifications in HB Analytics](/hb-analytics/alarms-and-notifications/date-based-event-notifications-in-hb-analytics) — Add events to graphs and share context with other administrators.


# Setting up your HB Analytic Alarms

How to create and manage alarms in HB Analytics to monitor metrics and get notified when thresholds are breached.

## Setting Up HB Analytics Alarm

HB Analytics alarms let you monitor any metric in real time and get notified when something goes wrong — a bidder dropping off, revenue falling below a threshold, timeouts spiking, and so on. Alarms trigger within the hour, making them the right tool for catching technical issues fast.

> ​<i class="fa-lightbulb">:lightbulb:</i> **HB Analytics alarms vs. Ad Revenue Insights alarms** Use HB Analytics alarms when you need fast, within-the-hour alerts on technical metrics. Ad Revenue Insights alarms run on daily imported data — better suited for longer-term revenue monitoring, but not for catching issues in real time.

{% stepper %}
{% step %}

### Creating a New Alarm

Go to Alarms in the top menu and expand the Alarms dropdown to see your active alarms.

<div data-with-frame="true"><figure><img src="/files/5Iklh8OgWu2RQCZzRNHf" alt=""><figcaption></figcaption></figure></div>

Here you can see and manage the existing alarms.
{% endstep %}

{% step %}

### Add new alarm

**Click + New HB Analytics Alarm** Choose **Custom alarm** to get full control. Presets are available for common use cases.

<div data-with-frame="true"><figure><img src="/files/jlEhUIQU4IL4I1oGy0Qa" alt=""><figcaption></figcaption></figure></div>
{% endstep %}

{% step %}

### Name your Alarm

Give it a clear name — this is what other users will see if you share it.

<div data-with-frame="true"><figure><img src="/files/6fm8aOqZpGBtfz6TAepx" alt=""><figcaption></figcaption></figure></div>
{% endstep %}

{% step %}

### Set the date range

Alarms use dynamic time periods, not fixed dates. Choose a period like **Per Day** so the alarm evaluates a full day of data each time it runs.\
![](/files/9udKimX0kQvHe1Ez9hVz)

{% hint style="info" %}
**Good to know:** HB Analytics uses real-time data. Shorter time periods catch problems faster.
{% endhint %}
{% endstep %}

{% step %}

#### Choose what to monitor <a href="#choose-what-to-monitor" id="choose-what-to-monitor"></a>

Select the `dimensions and metrics` you want to track. A few things to keep in mind:

* If you want to monitor a metric **per bidder** with different thresholds per bidder, create **one alarm per bidder** rather than one alarm covering all.
* Use **filters** to narrow down to the specific bidders, sites, or placements you care about.
  {% endstep %}

{% step %}

### Set up your trigger condition

There are two types of triggers — choose the one that fits your use case:

<div data-with-frame="true"><figure><img src="/files/nVhyZWoGhnRAX8hTsg8B" alt=""><figcaption></figcaption></figure></div>

| Trigger type   | When to use                                                                                                    | Alarm button                                     |
| -------------- | -------------------------------------------------------------------------------------------------------------- | ------------------------------------------------ |
| Absolute value | You have a fixed threshold (e.g. revenue drops below €1,000)                                                   | Left ALARM button                                |
| % change       | Levels vary a lot between dimensions and a relative drop makes more sense (e.g. a bidder drops 30% day-on-day) | Right ALARM button (requires Compare date range) |

To use % triggers, enable **`Compare date range`** first, then use the right-hand ALARM button.

<div data-with-frame="true"><figure><img src="/files/5jSHF4bOUPRL6sdrG7sQ" alt=""><figcaption></figcaption></figure></div>

<figure><img src="/files/Cngwli5ngNuw4qQoNZWk" alt=""><figcaption></figcaption></figure>

Once you press an ALARM button, set your condition (e.g. *Less than* → *10%*) and click **OK**.

> **Multiple conditions use AND logic.** For example: trigger only when CPM is low AND ad requests are above a threshold. OR logic isn't supported — create separate alarms instead (e.g. one for low revenue, one for high timeout %).
> {% endstep %}

{% step %}

### Save and set visibility

Choose **Private** (only you) or shared (visible to your organisation), then click **Save**.

<div data-with-frame="true"><figure><img src="/files/7BKTUbJ7QkNKAqNCkYfo" alt=""><figcaption></figcaption></figure></div>
{% endstep %}
{% endstepper %}

***

## Understanding the Alarms Panel <a href="#understanding-the-alarms-panel" id="understanding-the-alarms-panel"></a>

<div data-with-frame="true"><figure><img src="/files/4tht7LJ6YwNiq0N7EJ9C" alt=""><figcaption></figcaption></figure></div>

Once saved, your alarm appears in the list. Here's what the columns mean:

| Column              | Description                                                                                                         |
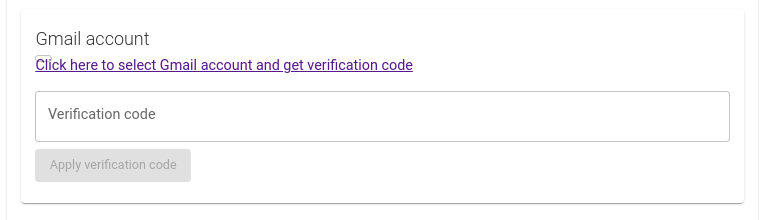
| ------------------- | ------------------------------------------------------------------------------------------------------------------- |
| Name                | The name of the alarm you created.                                                                                  |
| Active              | Alarm runs automatically on schedule. Inactive alarms can still be run manually.                                    |
| Owner               | Global or only visible to the current user you when private enabled.                                                |
| Sharing             | If set to private, you can still share alarm with another user, that will become available in their own alarm panel |
| Re-trigger          | Was alarm re-triggered or not                                                                                       |
| Acknowledged/Errors | How many checks are currently acknowledged vs. total errors generated.                                              |
| Check run           | Updates when the alarm is run manually — shows OK or error status.                                                  |
| Actions             | Check now, edit, deactivate, enable re-trigger and delete                                                           |

***

## Understanding the Checks Panel <a href="#understanding-the-checks-panel" id="understanding-the-checks-panel"></a>

<div data-with-frame="true"><figure><img src="/files/DBWjxUifxGpzCWb1hHYU" alt=""><figcaption></figcaption></figure></div>

Each alarm can generate multiple **checks** — one per failing dimension combination. For example, an alarm on revenue per bidder might create separate checks for each bidder that fails the condition.

| <p><br>Column</p> | Descritpion                                                                                              |
| ----------------- | -------------------------------------------------------------------------------------------------------- |
| Info              | The failing object, e.g. *site.com >> Rubicon* — the publisher/SSP combination that triggered the alarm. |
| Alarm             | Name of the alarm that generated this check.                                                             |
| Status            | 🔴 Failed (unacknowledged) / 🟠 Failed (acknowledged) / 🟢 Recovered                                     |
| Date              | Date of last check. Click to see the full history of status changes.                                     |
| Acknowledged      | Yes or no                                                                                                |
| Actions           | Acknowledge, bulk-manage, or click **View report** to see the report as it was when the check ran.       |

***

## Email Notifications

Go to **Generic settings** to configure who gets notified:

* **Edit global alarm recipients** — email addresses for all shared (non-private) alarms.
* **Edit my alarm recipients** — email addresses for your private alarms<br>

<div data-with-frame="true"><figure><img src="/files/zO5e0F6fRbFwydyzEYTx" alt=""><figcaption></figcaption></figure></div>

### Slack notifications

Email notifications remain available for alarm recipients. When the [Using the Relevant Yield Slack Integration](/general-platform/using-the-relevant-yield-slack-integration) is enabled, alarms can also send notifications to Slack. When editing alarm recipients, connect your Slack workspace and select Slack recipients. See [Using the Relevant Yield Slack Integration](/general-platform/using-the-relevant-yield-slack-integration) for setup details.

***

## Filtering Checks by Status

Use the **Show checks** dropdown to filter the checks panel:

* **Unacknowledged** — active errors not yet reviewed
* **Acknowledged** — errors you've marked as seen
* **Recently recovered** — checks that recovered in the last 7 days

<div data-with-frame="true"><figure><img src="/files/WdaR5yUJYflUVmtsx6Hh" alt=""><figcaption></figcaption></figure></div>


# Date-based event notifications in HB Analytics

The Date-based event notification is a great way to share information in your company, and makes sure that everyone is aware of significant events that has occurred!

The Date-based event notifications can be added in 2 ways. Either you add your notification under Configurations -> Events:

![](/files/701a8f504e39f88ab7ca857be9da10919cf37b20)

or you do it straight in the graph by pressing the

![](/files/91e587c43b03d41e2c31116cc253d8bd409dde3b)

We will focus on the option for Configuration -> Events, as also include a general Events overview; but new Events can be created in both places.

When pressing the Event in the Configuration menu, you enter the Events Overview Area, where you can set up new Events, or edit existing:

![](/files/dcb76544daad0146feee1ab598e2fe0af9e26b24)

When Adding a new event, you give it a name, that will show when hovering the line in the graph, and a more detailed description. The Event dates identify when the Event occurred, and the events are listed in the order the events happened, with the latest event on top.

You can also select if the event should be Public (visible for other Admin users), and if the event should be tagged (adding a tag makes it easier to filter out particular events in the graph).

Once created the Event will show up in the graphs, if turned on the the graph options, and if it is not filtered out based on it's Tag.


# HBA vs ARI alarms

Choose the right alarm type based on your metric and required response time.

Choose alarms based on the metric you need and how quickly you must respond.

### Quick recommendation

* Use **HB Analytics (HBA) alarms** for technical or operational issues. They trigger within the hour.
* Use **Ad Revenue Insights (ARI) alarms** for daily performance monitoring and longer-term trends.
* Use the module that provides the metric you need when a metric exists in only one.

### Choose the right alarm

1. **Need an urgent response?** Use HBA alarms.
2. **Monitoring daily revenue or other consolidated data?** Use ARI alarms.
3. **Need a metric from only one module?** Create the alarm in that module.

### Understand the data timing

ARI imports data daily. Some source data requires consolidation before reliable analysis is possible. ARI alarms based on API data therefore have a one-day delay.

This delay suits stable, long-term monitoring. HBA alarms are better for detecting technical changes quickly.

### Set up your alarm

Follow the relevant guide:

* [Set up an HB Analytics alarm](/hb-analytics/alarms-and-notifications/setting-up-your-hb-analytic-alarms).
* [Set up an Ad Revenue Insights alarm](/ad-revenue-insights/alarms-and-notifications/setting-up-your-ad-revenue-insights-alarms).


# Setup

Set up Ad Revenue Insights in Relevant Yield.

<div align="left"><figure><img src="/files/fFRPoejGmP8DSFMtxbKl" alt=""><figcaption></figcaption></figure></div>

Use this section to get Ad Revenue Insights up and running in Relevant Yield. The guide below walks through the full onboarding flow, from connections and mapping to validation and launch.

### In this section

* [Setting Up Ad Revenue Insights in Relevant Yield](/ad-revenue-insights/setup/setting-up-ad-revenue-insights-in-relevant-yield) — Follow the Ad Revenue Insights onboarding flow to connect integrations, map placements, validate data, and launch dashboards and alarms.


# Setting Up Ad Revenue Insights in Relevant Yield

Follow the Ad Revenue Insights onboarding flow to connect integrations, map placements, validate data, and launch dashboards and alarms.

Setting up Ad Revenue Insights in Relevant Yield is quick and easy. Below are the main steps to follow during the onboarding process for Relevant Yield's Ad Revenue Insights module.

{% stepper %}
{% step %}

## Create a Map of Your SSP Placements

Your Relevant Digital Technical Account Manager will provide you with a document where you can list all your ad server placements and their corresponding SSP placement IDs. This will be useful later when mapping the SSP placements to the corresponding Relevant Yield placements.
{% endstep %}

{% step %}

## Log In and Give Access to Your Colleagues

You will receive an email with your credentials and a login URL for your Relevant Yield account. You can read more about user roles and how to create users in the documentation about [user management.](/general-platform/user-management/user-management-in-relevant-yield)
{% endstep %}

{% step %}

## Define Your Publisher/Website/Placement Structure

Whether you are a publisher or a network user, this article will teach you how to create your own placement structure: [What Are Publisher Accounts?](/general-platform/inventory-management/what-are-publisher-accounts)
{% endstep %}

{% step %}

## Add Integration to Your Ad Server

Add an ad server connection in the **Integrations** view of Relevant Yield. Learn more about ad server settings in [**Setting Up a New Ad Server Connection**](/ad-revenue-insights/data-connections/setting-up-a-new-ad-server-connection).
{% endstep %}

{% step %}

## Add SSPs

Add your SSPs in the same way you added your ad server. Learn more about SSP settings in [**Setting Up a New SSP Connection**](/ad-revenue-insights/data-connections/setting-up-a-new-ssp-connection-with-api).
{% endstep %}

{% step %}

## Map Ad Server and SSP IDs to Corresponding Relevant Yield Placements

Read more about [**mapping ad server and SSP placement IDs to Relevant Yield's Ad Revenue Insights placements.**](/ad-revenue-insights/mapping/mapping-ad-server-and-ssp-placement-ids-to-relevant-yield-ad-revenue-insights-placements)
{% endstep %}

{% step %}

## Set up Dashboards

Read more about [**How to use dashboards and reports**](/general-platform/reports-and-dashboards/how-to-use-dashboards-and-reports)
{% endstep %}

{% step %}

## Set up Advertiser Reporting

Read more about [**Importing Advertisers for Mapping from your CRM**](/ad-revenue-insights/mapping/importing-advertisers-for-mapping-from-your-crm)

and [**Mapping Advertisers & Buyers for reporting**](/ad-revenue-insights/mapping/mapping-advertisers-buyers-and-dsps-for-reporting)
{% endstep %}

{% step %}

## Validate Data

Make sure you have mapped all the IDs and check that the Ad Revenue Insights numbers match with ad server and SSP reports. Learn [**How to make sure the system has mapped all my data?**](/support-and-troubleshooting/data-quality-and-mapping/how-to-ensure-the-system-has-mapped-all-my-data)
{% endstep %}

{% step %}

## Set up Alarms

Read more about [**Setting Up Your Ad Revenue Insights Alarms**](/ad-revenue-insights/alarms-and-notifications/setting-up-your-ad-revenue-insights-alarms)
{% endstep %}

{% step %}

## Done

Go live with Ad Revenue Insights Insights!
{% endstep %}
{% endstepper %}


# Dashboards and Reporting

Use dashboards, reports, dimensions, and metrics.

Use this section to build reports and dashboards in Ad Revenue Insights and understand the data available in them. These guides help you choose the right format, configure report settings, and work with dimensions and metrics.

### In this section

* [How to Use Dashboards and Reports](/general-platform/reports-and-dashboards/how-to-use-dashboards-and-reports) — Compare dashboards and reports in Ad Revenue Insights, choose the right format for your use case, and customise views for analysis.
* [Ad Revenue Insights - Dimensions and Metrics](/ad-revenue-insights/dashboards-and-reporting/ad-revenue-insights-dimensions-and-metrics) — Learn how to configure Ad Revenue Insights reports with dimensions, metrics, filters, trend metrics, and reporting limitations.


# Ad Revenue Insights - Dimensions and Metrics

Learn how to configure Ad Revenue Insights reports with dimensions, metrics, filters, trend metrics, and reporting limitations.

The Ad Revenue Insights module, which is used for dashboards, reports, and alarms, contains various settings that are listed below.

First, navigate to the Reports section and choose 'New Report' or select an existing report and go to Edit.

<div data-with-frame="true"><figure><img src="/files/9fQ91V4ahIxWdSGhzSvf" alt=""><figcaption></figcaption></figure></div>

<div data-with-frame="true"><figure><img src="/files/ZjHnMaGhf7oGDfLVAkme" alt="" width="375"><figcaption></figcaption></figure></div>

| Setting                      | Description                                                                                                                                                                                    |
| ---------------------------- | ---------------------------------------------------------------------------------------------------------------------------------------------------------------------------------------------- |
| **Title**                    | What is the name of the report or dashboard?                                                                                                                                                   |
| **Filter by My Advertisers** | If you are a Sales Rep user or an Admin user with a dedicated advertiser portfolio, select this option to filter by your specific Advertiser or Buyer portfolio.                               |
| **Forecast**                 | If selected, you need to choose a date that ends in the future. The system then forecasts based on the performance of the last three weeks and displays the average of that period.            |
| **Date Range**               | Select the dates for your report. Dates can be dynamic, such as the last 30 days, fixed, with a specific start and end date, or based on a named range, such as “This quarter” or “Last year”. |
| **Show**                     | Select a date breakdown, such as “Per Day” or “Per Month.”                                                                                                                                     |
| **Compare Date Range**       | Compare two sets of dates with the same length.                                                                                                                                                |

### **Dimensions**

The dimensions are at the core of what you want to report on. By adding multiple dimensions using the "+", you can organise the order in which they are listed and move them up and down using the arrows. If you want to remove a dimension, simply click the trash can icon.

<div data-with-frame="true"><figure><img src="/files/4IlXXJOlvIQBXgZJqdmi" alt="" width="375"><figcaption></figcaption></figure></div>

The Dimensions you can use are:

| Dimension           | Description                                                                                                                                                                                                               |
| ------------------- | ------------------------------------------------------------------------------------------------------------------------------------------------------------------------------------------------------------------------- |
| **Date**            | Shows the dates you have selected as a dimension.                                                                                                                                                                         |
| **Publisher**       | The Publisher accounts you have added in your setup.                                                                                                                                                                      |
| **Site**            | The websites you have added in your setup.                                                                                                                                                                                |
| **Placement**       | The placements added in your setup.                                                                                                                                                                                       |
| **Source**          | The SSP placement source collected from the SSPs.                                                                                                                                                                         |
| **SSP**             | The SSPs added to your setup.                                                                                                                                                                                             |
| **Revenue Type**    | Breakdown between “Direct campaigns”, “Deals”, and “OpenRTB”.                                                                                                                                                             |
| **Advertiser**      | Advertisers from the SSPs and your ad server.                                                                                                                                                                             |
| **Buyer**           | The Buyer or SeatID from your added SSPs.                                                                                                                                                                                 |
| **Sales Rep**       | Your company’s sales representatives added to your setup.                                                                                                                                                                 |
| **Deal**            | The deals in your systems. If you want extra data on your deals, the Deal ID and Deal Name are available as attributes below the metrics.                                                                                 |
| **Placement Label** | The label you have given to the placements in your account. If you do not have this dimension, you have not yet assigned a label to any placements.                                                                       |
| **Deal Type**       | Breaks down your deals based on the type of deal through which you generate revenue.                                                                                                                                      |
| **DSP**             | Breaks down your metrics by the DSP used through the SSPs.                                                                                                                                                                |
| **Payment Type**    | Breaks down your metrics based on the payment type used to create revenue, such as impressions or clicks.                                                                                                                 |
| **Media Type**      | Breaks down your metrics based on the media type being used, such as Display, Native, or Video.                                                                                                                           |
| **Creative Size**   | The creative dimensions that have generated revenue in your system.                                                                                                                                                       |
| **Order**           | Imported from Xandr, Ad Manager, and Adform. If you want extra data on your orders, the Order ID and Order Name are available as attributes below the metrics. This dimension only reports on Direct revenue.             |
| **Line Item**       | Imported from Xandr, Ad Manager, and Adform. If you want extra data on your line items, the Line Item ID and Line Item Name are available as attributes below the metrics. This dimension only reports on Direct revenue. |

### **Metrics**

<div data-with-frame="true"><img src="/files/473c76cb5ec0da5924a0d895ed429b73c26b03bc" alt="Näyttökuva 2021-11-15 kello 12.02.53" width="375"></div>

| Metric                            | Description                                                                                                                                                                                                                                              |
| --------------------------------- | -------------------------------------------------------------------------------------------------------------------------------------------------------------------------------------------------------------------------------------------------------- |
| **Total Revenue**                 | Revenue after the SSP and ad server revenue share. Some SSPs and ad servers deliver gross revenue, while others deliver net revenue.                                                                                                                     |
| **API Gross Revenue**             | The raw revenue values collected from the SSPs and ad servers, without any cuts subtracted.                                                                                                                                                              |
| **Network Revenue**               | If you have a revenue share on the publisher accounts, this is the network's revenue.                                                                                                                                                                    |
| **Publisher Revenue**             | If you have a revenue share on the publisher accounts, this is the publisher's revenue.                                                                                                                                                                  |
| **Ad Server In**                  | The number of impressions coming into your ad server placement or header bidder call. This value is used to calculate ad server eCPM (RPM) and fill rate percentage.                                                                                     |
| **Estimated SSP In**              | The impression traffic going into a particular SSP. Not all SSPs deliver this value.                                                                                                                                                                     |
| **Sold Impressions**              | The impressions sold in either the ad server or the SSPs. This metric is used to calculate fill rate percentage.                                                                                                                                         |
| **Page Views**                    | The number of page views collected from your analytics system. This metric is not compatible with all dimensions, including placements.                                                                                                                  |
| **Sessions**                      | The number of user sessions collected from your analytics system.                                                                                                                                                                                        |
| **Avg. Session Duration**         | The average duration of user sessions collected from your analytics system.                                                                                                                                                                              |
| **Total eCPM**                    | The eCPM value calculated as Total Revenue divided by Sold Impressions.                                                                                                                                                                                  |
| **Publisher eCPM**                | The eCPM value calculated as Publisher Revenue divided by Sold Impressions.                                                                                                                                                                              |
| **Ad Server eCPM**                | The eCPM value calculated as Total Revenue divided by Ad Server In.                                                                                                                                                                                      |
| **Page Views eCPM**               | The eCPM value calculated as Total Revenue divided by Page Views.                                                                                                                                                                                        |
| **Session eCPM**                  | The eCPM value calculated as Total Revenue divided by Sessions.                                                                                                                                                                                          |
| **Fill Rate Percentage**          | The percentage calculated between Sold Impressions and Ad Server In.                                                                                                                                                                                     |
| **Unfilled Inv.**                 | The actual amount of unfilled inventory, calculated from Ad Server In and Sold Impressions.                                                                                                                                                              |
| **Estimated SSP Fill Percentage** | The percentage calculated between Sold Impressions and Estimated SSP In.                                                                                                                                                                                 |
| **Network Revenue Percentage**    | The percentage share of Network Revenue versus Publisher Revenue.                                                                                                                                                                                        |
| **Clicks**                        | The number of times users click an ad after viewing it.                                                                                                                                                                                                  |
| **Click-Through Rate Percentage** | The percentage of ad impressions that resulted in clicks, calculated as `CTR(%) = (Clicks / Ad Impressions) * 100`.                                                                                                                                      |
| **Viewability Percentage**        | The percentage of an ad viewed on the user's screen. Based on IAB standards, an ad counts as viewed when 50% of its pixels are visible for at least one second. It is calculated as `viewable impressions / viewable measured = viewability percentage`. |
| **Viewable Impressions**          | The number of ad impressions that meet the viewability criteria.                                                                                                                                                                                         |
| **Viewable Measured**             | The number of ad impressions that were successfully measured for viewability.                                                                                                                                                                            |

#### **Trend Metrics**

Trend Metrics are similar to the normal metrics but focus on the changes across the periods that are selectable below the metrics.

| Trend Metric                | Description                                                                                                                                                                                                                                                                                                                                                                                            |
| --------------------------- | ------------------------------------------------------------------------------------------------------------------------------------------------------------------------------------------------------------------------------------------------------------------------------------------------------------------------------------------------------------------------------------------------------ |
| **Revenue Change (Rev)**    | The revenue change in real numbers.                                                                                                                                                                                                                                                                                                                                                                    |
| **Revenue Change (%)**      | The revenue change in percentages.                                                                                                                                                                                                                                                                                                                                                                     |
| **Efficiency Change (%)**   | Ad server eCPM change in percentages.                                                                                                                                                                                                                                                                                                                                                                  |
| **Efficiency Change (Rev)** | Change in revenue compared to a scenario where ad server eCPM had remained identical to the compared period. For example, if you earned $10 from 10,000 ad requests last week, with an ad server eCPM of 1.0, and $20 from 25,000 ad requests this week, with an ad server eCPM of 0.8, the Efficiency Change (Rev) is -$5.0. That means you lost $5.00 by not maintaining last week's ad server eCPM. |

### **Other Options**

These options are generally not used very often, but they can be very useful in certain cases.

| Option                  | Description                                                                                                                                                                                                                       |
| ----------------------- | --------------------------------------------------------------------------------------------------------------------------------------------------------------------------------------------------------------------------------- |
| **Currency**            | Select a different currency output than your default currency.                                                                                                                                                                    |
| **Advertiser Mapping**  | Select an alternative advertiser mapping instead of your default one. For more details, see [Mapping Advertisers, Buyers and DSPs for Reporting](/ad-revenue-insights/mapping/mapping-advertisers-buyers-and-dsps-for-reporting). |
| **Max Advertisers**     | Specify how many advertisers should be loaded in the report or dashboard.                                                                                                                                                         |
| **Revenue Corrections** | Select whether to apply the revenue corrections added to this report or dashboard.                                                                                                                                                |

### **Filter By**

All your dimensions are also filterable, which means you can limit the scope to one or several dimensions you want to report on. This can be very useful for narrowing down the dataset to only show the critical data you wish to examine, making the report more precise.

<div data-with-frame="true"><img src="/files/319fb804e5b1d5457b58bc65b30b2aa0ea30baec" alt="" width="375"></div>

### **Reporting Limitations**

Don’t be afraid to try different combinations; nothing will ever break. However, if your report becomes extremely large, it may time out. In that case, simply try again with a slightly smaller dataset.

{% hint style="warning" %}
Advertiser, line item, order, buyer, and deal filters only return 60 days of historical data.
{% endhint %}

For example, if you are building a report that uses filters to include or exclude advertisers, the suggestions will only show advertisers that have had revenue in the last 60 days. To filter by an advertiser that has not recorded revenue during this period, you can enter its exact name and click Use name. If the advertiser exists, you will be able to add it as a filter.

<div data-with-frame="true"><img src="/files/4b1f7f789b2b20a0dfbc5fc60a1dd013b4d35fca" alt="" width="375"></div>

In the screenshot below, you can see the view when an advertiser has been successfully added as a filter.

<div data-with-frame="true"><img src="/files/93abb12f477f22fdd9bb75b624c03d1a2a179041" alt="" width="375"></div>

If it does not exist at all, Yield will display the following error:

<div data-with-frame="true"><img src="/files/bd4a8428694f86e15b0be0560e3dfb4932398ed0" alt="" width="375"></div>

The same applies to buyers, advertisers, orders, line items, and deals. You can still filter by them, but you must use the exact name as it appears in your ad server or SSP.


# Data Connections

Connect ad servers, SSPs, analytics systems, and data feeds.

Use this section to connect the systems that power Ad Revenue Insights. These guides cover ad servers, SSPs, analytics inputs, and data-sharing connections across Yield instances.

### In this section

* [Setting Up a New Ad Server Connection](/ad-revenue-insights/data-connections/setting-up-a-new-ad-server-connection) — Connect a new ad server in Relevant Yield by creating an API user, adding the integration, and validating imported data.
* [Setting Up a New Analytics System Connection](/ad-revenue-insights/data-connections/setting-up-a-new-analytics-system-connection) — Connect an analytics system to import page view data into Ad Revenue Insights for dashboards, reports, and statement generation.
* [Setting Up a New SSP Connection with API](/ad-revenue-insights/data-connections/setting-up-a-new-ssp-connection-with-api) — Connect a new SSP through API by creating API access, adding credentials, importing data, and mapping incoming placements in Relevant Yield.
* [Setting Up a New SSP Connection Through a Scheduled Daily CSV File](/ad-revenue-insights/data-connections/setting-up-a-new-ssp-connection-through-a-scheduled-daily-csv-file) — Set up an SSP mail import with scheduled daily CSV reports when API access is not available.
* [CSV Support for Web-Analytics Imports](/ad-revenue-insights/data-connections/csv-support-for-web-analytics-imports) — Import web analytics data through scheduled CSV emails by configuring a Mail Import Analytics integration in Yield.
* [Creating a Yield-to-Yield API Connection](/ad-revenue-insights/data-connections/creating-a-yield-to-yield-api-connection) — Connect one Yield instance to another by setting up publisher-side access and configuring a Relevant Programmatic integration.


# Setting Up a New Ad Server Connection

Connect a new ad server in Relevant Yield by creating an API user, adding the integration, and validating imported data.

Relevant Yield collects data from the API sources on a daily basis. Depending on your geographical location, the timing may vary slightly throughout the day, but we aim to always have fresh data available when you start work.

{% stepper %}
{% step %}

## Create an API User

Your Relevant Digital Technical Account Manager will provide you with an "@relevant-digital.com" email address that you should use to create a new API user in the ad server. Depending on the ad server, the API user may differ from a normal user. **The most important thing is that the user has access to the API features of the ad server**.

This may require you to inform the ad server provider about the **frequency of the API calls**, which would be roughly **five calls per day**. Most ad servers do not charge extra for API access, so it is usually very easy to obtain this access.
{% endstep %}

{% step %}

## Add a New Ad Server Connection in Relevant Yield

To add a new ad server connection, go to **Configuration** → **Integrations** and click **+ New Ad Server**.

<div data-with-frame="true"><img src="/files/dc2319ce980f2768130a0cf596d79cfd8f444067" alt=""></div>

### Configure Settings for the Connection

The required fields are **Name** and **Network Code**. Some of the other settings depend on the specific ad server. The integration is marked as active by default. If you untick this option, the system will stop automatically retrieving data for the integration.

<div data-with-frame="true"><img src="/files/6bcf8891a83efcbbfb4e37813e687ae7d95df6fa" alt="" width="563"></div>

If you have any questions regarding the settings, please don’t hesitate to contact our support team.

### Add Credentials to Connect Relevant Yield with Your Ad Server

<div data-with-frame="true"><img src="/files/2d1b32e09ebec58c90db55b738a94577d4caf817" alt=""></div>

You will need to add credentials (the newly created API user) at the bottom of the settings pop-up. Authentication methods may vary between different ad servers, so if you need assistance when adding credentials, **please contact Relevant Digital Support**.

Once your credentials have been added, the system should begin to populate with data either automatically the following day or by triggering a manual import.
{% endstep %}

{% step %}

## See Ad Server Data

Once you see data coming in (please note that automatic ad server imports may take up to a day), you can use the **Admin → Missing SSP Traffic** section to view the names of the imported sites and placements. From there, you can proceed to map the new SSP IDs to the corresponding websites.

<div data-with-frame="true"><img src="/files/24278e8fa5fbf724a2e0a758d7128184ac91b7db" alt=""></div>

{% hint style="info" %}
It is possible to log detailed data from the Xandr (formerly AppNexus) ad server through the Relevant Yield interface. Please note that Xandr normally charges extra to extract this data, which incurs an additional cost from them. We also charge a small fee to cover the technical cost.
{% endhint %}
{% endstep %}
{% endstepper %}


# Setting Up a New Analytics System Connection

Connect an analytics system to import page view data into Ad Revenue Insights for dashboards, reports, and statement generation.

This article explains how to set up an Analytics API integration in Yield. By adding an analytics adapter, you gain access to two additional metrics: page views and page views eCPM.

On July 1, 2023 standard Universal Google Analytics properties stopped processing data. Google recommends to make a switch to Google Analytics 4.

### Why Should You Add an Analytics Adapter?

Adding an Analytics adapter gives you access to additional metrics in your Ad Revenue Insights dashboards and reports. It also allows these metrics to be used in the statement generation tool.

The available metrics are:

* **Page views**
* **Page views eCPM**

<div data-with-frame="true"><img src="/files/b66dacf8a11fb29f831c383566899ba2f3810ebb" alt="" width="375"></div>

{% hint style="info" %}
Depending on the dimensions selected, these metrics may not always be available because analytics systems do not typically record every dimension. Site-level and date-level dimensions should always work with Analytics data, so these are usually where the main benefits lie.
{% endhint %}

### How to Add a New Analytics System Connection

{% stepper %}
{% step %}

#### Open analytics integrations

Go to **Configuration** → **Integrations**.

<div data-with-frame="true"><img src="/files/cecee8af9adc1235d7d4e9c969e85a1973691413" alt="" width="375"></div>
{% endstep %}

{% step %}

#### Create a new analytics system

Click **New Analytics system** in the bottom-right corner to open the configuration window.

<div data-with-frame="true"><img src="/files/52f2af9e4630af939363931e31b810529b12a484" alt="" width="375"></div>
{% endstep %}

{% step %}

#### Configure the connection

Select the analytics type and give the adapter a name.

Choose the import date range and how the data should be grouped:

* Group by device category
* Group by country
* Group by hostname
  {% endstep %}
  {% endstepper %}

#### Verify Your Account

At the bottom of the configuration window you'll find Google verification field which will require you to log in to the connected Gmail account to retrieve a verification code.

Due to a recent Google Analytics feature update, account verification can now only be completed using an email address ending with “@relevant-digital.com”.

{% hint style="warning" %}
Please contact your Technical Account Manager or [support](mailto:support@relevant-digital.com) to complete the setup.
{% endhint %}

<div data-with-frame="true"><img src="/files/a2d1707de674e17c2cc26c9ed9fb9c19fb2cb7fe" alt=""></div>

#### Import Analytics Profiles

In the final part of the configuration, you will select the user to be connected to the data import by using their verification details. You can also choose whether to import all existing profiles and automatically add new ones, which is usually recommended.

{% hint style="warning" %}
If you tick **Import all existing profiles and automatically add new ones**, any Analytics data accessible to this user will be imported.
{% endhint %}

<div data-with-frame="true"><img src="/files/a2a767d5f1d1674931ffc8d3faaca2dca5985a26" alt=""></div>

**Connecting Analytics Profile to a Website**

Once the data and profiles have been imported, you can add the website profiles to an existing website within your Publisher account. Simply go to Publisher accounts, select the Publisher and Website you wish to add the analytics data to, and choose the appropriate profile from the drop-down menu.

<div data-with-frame="true"><img src="/files/b0aabafa8396cf342614fd8ed10d7f013f204d4f" alt="Näyttökuva 2021-11-16 kello 9.54.37"></div>

If you cannot find the correct profile, it is most likely because it has not been imported. Please review the final step of the setup process to ensure all available profiles are imported. Once the data is mapped, it should appear correctly in the report or dashboard site reporting options.


# Setting Up a New SSP Connection with API

Connect a new SSP through API by creating API access, adding credentials, importing data, and mapping incoming placements in Relevant Yield.

Relevant Yield gathers data from API sources daily. Depending on your geographical location, there may be slight variations throughout the day, but our goal is to consistently provide fresh data for your work sessions.

{% hint style="info" %}
**This article is about API connections.** You should always use the API if possible. However, if for some reason the SSP doesn't provide an API connection, you may consider the CSV import option described in this article: [Set Up a New SSP Connection Through a Scheduled Daily CSV File.](/ad-revenue-insights/data-connections/setting-up-a-new-ssp-connection-through-a-scheduled-daily-csv-file)
{% endhint %}

{% stepper %}
{% step %}

## Create an API User in Your SSP

Your Relevant Digital Technical Account Manager will supply you with a dev\_\[customer name]@relevant-digital.com email address. You'll need this address to establish a new API user within the SSP.

{% hint style="info" %}
The API user may differ from a standard user, depending on the SSP.
{% endhint %}

The primary concern is ensuring that the user has access to the SSP's API features.

You may need to provide details regarding the **frequency of API calls**, which typically average around **five calls per day**. Fortunately, most SSPs/ad servers do not impose additional charges for API access, simplifying the process of obtaining it.

### Integrating Magnite API

We have established a Preferred Data partnership with Magnite, allowing us to add Magnite API support for all our API Insight customers. This partnership ensures better and more stable data collection for you.

{% hint style="info" %}
We remain 100% SSP and ad server independent. This partnership simply enables us to provide you with API access to Magnite.
{% endhint %}

If you are currently using CSV imports for Magnite, we can assist you in transitioning to API access as part of our partnership. This means you do not need to broker your own API agreement with Magnite; all arrangements can be managed through us.

#### How to Get Started

To initiate the integration of Magnite API access, please contact your Technical Account Manager or our support team. They will provide the necessary guidance and assistance throughout the setup process.
{% endstep %}

{% step %}

## Add a New SSP Connection in Relevant Yield

To add a new SSP connection, go to **Configuration > Integrations** and click " **+ New SSP**".

<div data-with-frame="true"><img src="/files/64c6f9006cfdf3c89af75d475775f73e17c76b8b" alt=""></div>
{% endstep %}

{% step %}

## Fill in the Required Fields

In the settings pop-up, you'll need to specify the type (which SSP) and a name for the connection. Additionally, you can define how you wish to manage the imported data (assign a percentage to specific buying/selling ad inventory for that SSP).

If you have any questions regarding the settings, please don't hesitate to reach out to our support team.

It's important to note that the settings may vary depending on the SSP.

![](/files/320d896a15985eb0c8e7125b421523ec758beb14)

{% hint style="info" %}
Understand how mapping works in your SSP before you populate data in Relevant Yield. The API works best when your placements have unique IDs, because this enables more granular reporting and better performance.
{% endhint %}
{% endstep %}

{% step %}

## Add SSP API Credentials

You will enter the credentials (the newly created API user from your SSP) at the bottom of the settings pop-up.

<div data-with-frame="true"><img src="/files/ad4924629b0caa946e3f0c808744115c791af044" alt=""></div>

The required credentials vary depending on the SSP. In some cases, only the API user email and password from the SSP UI are needed, while in others, the credentials may include a consumer secret and consumer key. If you're uncertain, please reach out to your Technical Account Manager for additional guidance and support.
{% endstep %}

{% step %}

## Populate Data

After adding your credentials, the system will populate with data, which becomes visible when generating a new API report. Data may populate automatically, typically by the following day. Alternatively, you can manually initiate an import, ensuring to import one day at a time to prevent overloading the system.

<div data-with-frame="true"><img src="/files/c59c7fd9a9ea2bf02d3e873e14bb5a226daed224" alt=""></div>
{% endstep %}

{% step %}

## Find the "Not Yet Mapped" API Structure

Once you can see data coming in, you can use the **Admin -> Missing SSP Traffic** section to view the names of the sites/placements that have been imported. From there, you can proceed to [map the new SSP IDs](/ad-revenue-insights/mapping/mapping-ad-server-and-ssp-placement-ids-to-relevant-yield-ad-revenue-insights-placements) to the corresponding websites.

<div data-with-frame="true"><img src="/files/79df9d8e2e71bab6ff1173bba3c3bc011937562a" alt=""></div>
{% endstep %}
{% endstepper %}


# Setting Up a New SSP Connection Through a Scheduled Daily CSV File

Set up an SSP mail import with scheduled daily CSV reports when API access is not available.

If the SSP does not provide an API, follow this documentation to set up a mail import SSP through CSV imports in Yield.

**It is always better to utilise the API first, but CSVs can be used as well. Read more about how to set up an API connection:** [Setting Up a New SSP Connection with API](/ad-revenue-insights/data-connections/setting-up-a-new-ssp-connection-with-api)

### Setting Up the CSV Report

You need to ask the partner company to generate automatic daily reports in .CSV format. The daily email must contain exactly **one .CSV file**. In some systems, you are allowed to do this yourself as well.

Before you start, make sure the report meets these requirements:

1. The report needs to be in CSV format. Excel files don't work.
2. Only Gmail is supported as the mailbox.
3. The subject line of the report should be unique. This is especially important if you work with multiple email import SSPs coming from the same sender address.

They should send the email reports to: **dev\_\[customer]@relevant-digital.com**. You should have already been given a similar email, but if you're unsure, feel free to reach out to your Technical Account Manager or our support team, and they can provide you with the correct email.

The report should include the following columns. Required fields are marked with `*`.

Required:

* **Date column\***
* **Placement ID column\***
* **Placement name column\***
* **Revenue column\***
* **Sold Impressions column\***

Optional but recommended:

* **Deal**
* **Deal ID**
* **Advertiser**
* **Ad Requests**

In Yield, you will need to set up both access to the mailbox and configure the column names in the report.
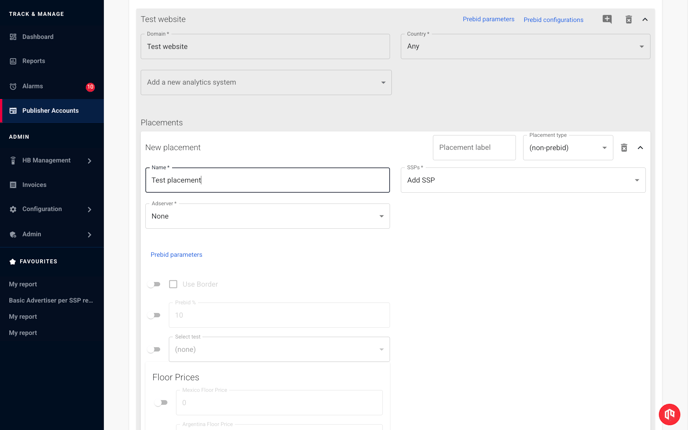
{% hint style="warning" %}
To see your Relevant email address (`dev_[customer]@relevant-digital.com`), you need help from Relevant Support because credentials are required. Contact your TAM or our support team to complete this step.
{% endhint %}

### Setting Up the Integration in Yield

{% stepper %}
{% step %}

#### Create the integration

Go to **Configuration** → **Integrations** and add a new SSP integration.

Set the SSP type to **Mail Import SSP** and give the integration a name. This name appears as the SSP name in reporting.

<div data-with-frame="true"><img src="/files/81a7da790e48ac954bf6be981c65b782c7ee4a8a" alt=""></div>
{% endstep %}

{% step %}

#### Map the CSV columns

Fill in the required fields `*` and as many additional fields as possible.

Make sure the column names in Relevant Yield match the column names in the CSV file.
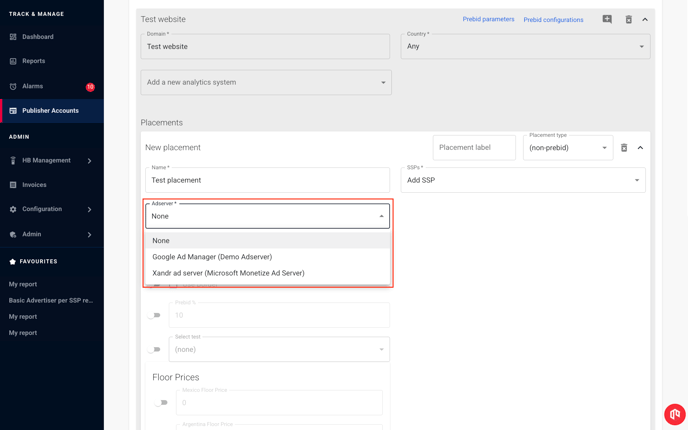
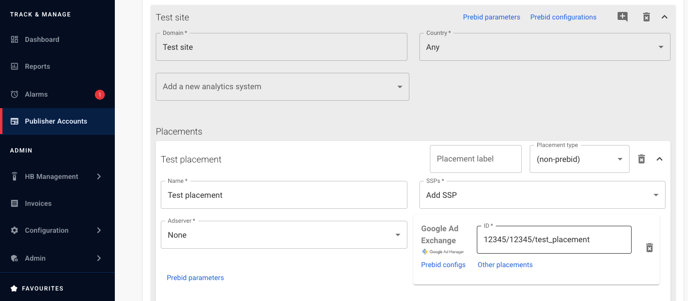
<div data-with-frame="true"><img src="/files/743b919ef363b2a11de28efdfbacc36959c365d6" alt=""></div>
{% endstep %}

{% step %}

#### Configure import settings

Complete any additional settings needed for your report:

* Add how the data should be handled and add [revenue shares](/ad-revenue-insights/finance-and-statements/revshare-handling-for-ssps-and-publisher-accounts) if needed.
* If the report currency is not EUR, enable **Use Default Report Currency** and select the value in **Default Report Currency**.
* Fill in the fields based on the column names used in the `.CSV` report file.
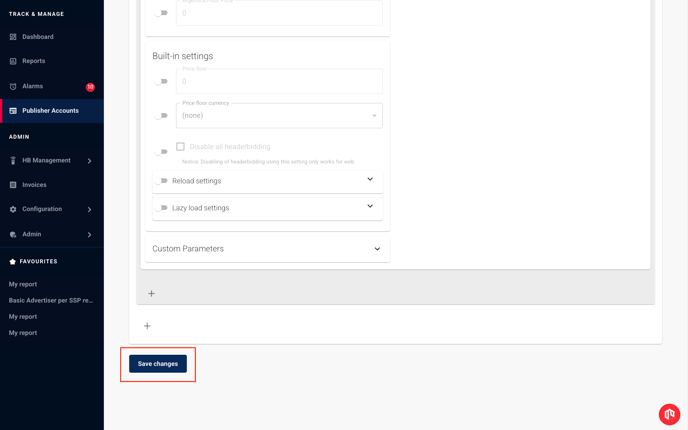
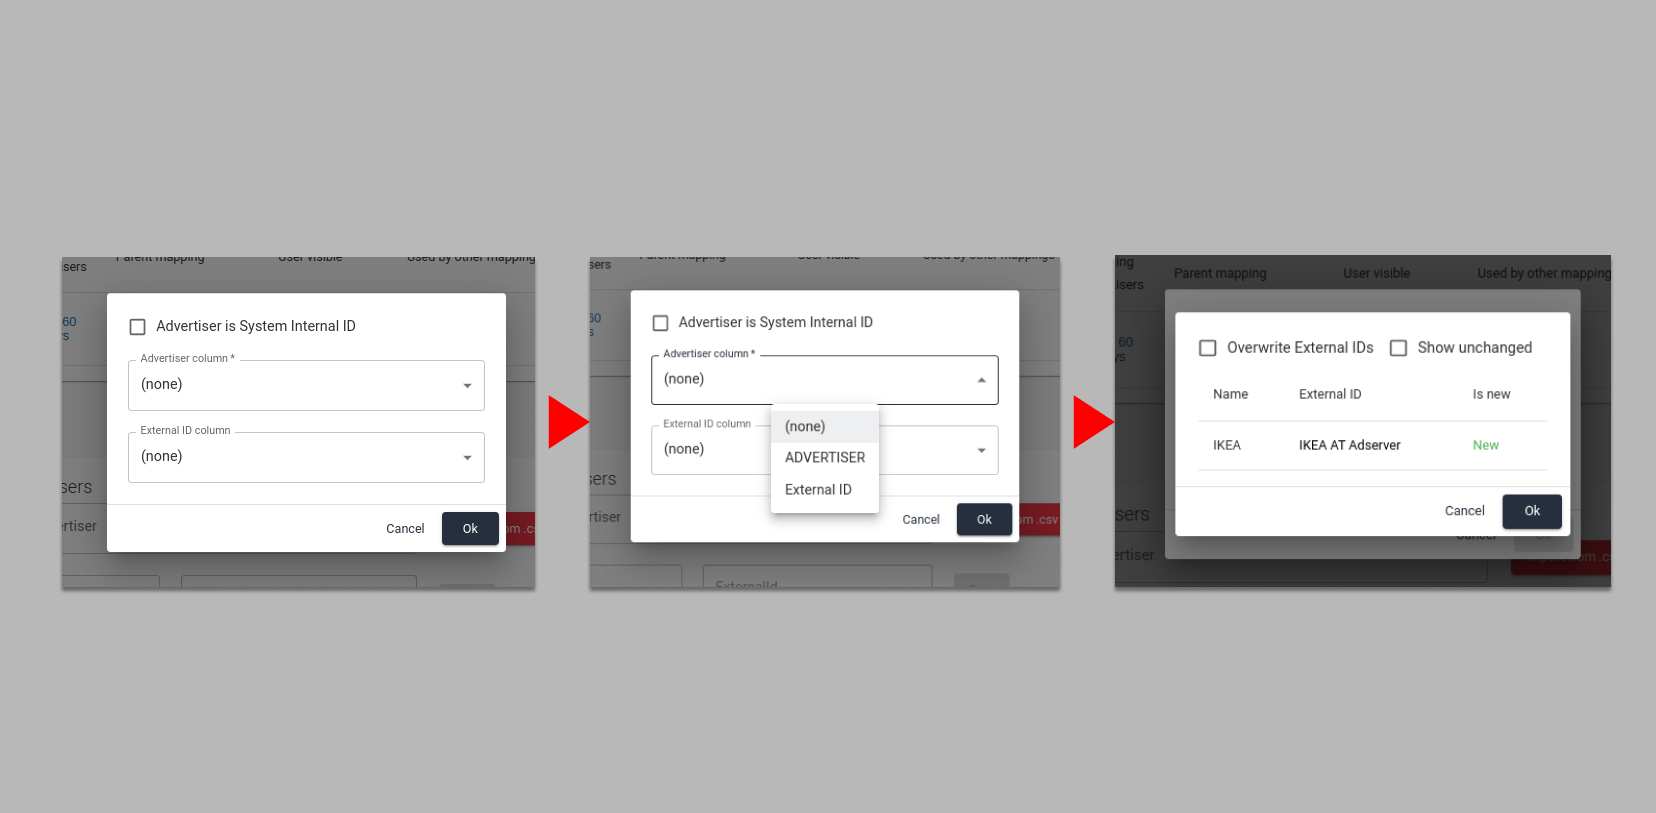
* Check the date format in the date column. If it is not a standard JavaScript date format, enter it in **Date Format**.
  {% endstep %}

{% step %}

#### Add Gmail credentials

To add the credentials for the Gmail account at the bottom of the page, follow the same procedure as [Google Ad Manager](/ad-revenue-insights/data-connections/setting-up-a-new-ad-server-connection).
{% endstep %}
{% endstepper %}

#### Using Scheduled Reports with Rubicon/Magnite

By default, we use [Magnite's preferred partner connection](/ad-revenue-insights/data-connections/setting-up-a-new-ssp-connection-with-api). If, for any reason, there's a need to set up a Magnite connection as a mail import SSP, here are the step-by-step instructions.

{% stepper %}
{% step %}

#### Create the saved report

Create a saved report with these settings:

* **Time Period:** Yesterday
* **Columns:**
  * Date
  * Advertiser
  * Zone
  * Zone ID
  * Ad Requests
  * Paid Impressions
  * Gross Revenue
  * Deal
  * Deal ID
  * Buyer
  * DSP
  * Creative Size
    {% endstep %}

{% step %}

#### Add the filter

Add this filter: **Paid Impressions >= 1**.

This removes unnecessary rows for advertisers with bid requests but no impressions.
{% endstep %}

{% step %}

#### Check the row count

Run the report manually and check the row count.

Rubicon has a 50,000-row report limit.
{% endstep %}

{% step %}

#### Reduce columns if needed

If the report is close to or above that limit, remove the **Advertiser** column.

This avoids losing data, but advertiser reporting in Yield for Rubicon will not be available.
{% endstep %}

{% step %}

#### Schedule the report

Schedule the report to send daily to **dev\_\[customer]@relevant-digital.com**.
{% endstep %}
{% endstepper %}


# Creating a Yield-to-Yield API Connection

Connect one Yield instance to another by setting up publisher-side access and configuring a Relevant Programmatic integration.

In case there is a need to connect from one Yield instance to another, it is easy to set it up by using a Relevant Programmatic integration type.

{% hint style="info" %}
In this article, Account A refers to the sender and Account B to the recipient of data.
{% endhint %}

### Account A: Setting Up the Publisher User for API

{% stepper %}
{% step %}

## Go to the user settings

Go to the user settings of the publisher account that requires the API connection. Create a user for the publisher using the email address they wish to use for setting up reporting on their side.
{% endstep %}

{% step %}

## Send the credentials

Send the credentials to the user, along with the URL for your API connection, which you can confirm with your support contact at Relevant.

If there is a need to limit the access to API data before a certain date, or hide the data after a certain amount of time has passed, you can set it under the Publisher Account's Invoicing and ARI report data settings.

<div data-with-frame="true"><img src="/files/7b1b1017af373a1ca5601eb6babcce3c1910b692" alt=""></div>

More information about publisher users can be found [here.](/general-platform/user-management/publisher-users)
{% endstep %}
{% endstepper %}

### **Account B: Setting Up the Yield API Integration**

{% stepper %}
{% step %}

## Add a new SSP

Go to Integrations and click the button to [add a new SSP](/ad-revenue-insights/data-connections/setting-up-a-new-ssp-connection-with-api). Select Relevant Programmatic as the integration type, and give the connection a descriptive name.
{% endstep %}

{% step %}

## Enter the Relevant Yield API URL

For the Relevant Yield API URL, enter the link for the API instance provided by your integration partner. For the credentials, use those associated with the API connection that were previously sent to you. Make sure to save the integration.
{% endstep %}

{% step %}

## Test the connection

Next, test the connection by manually importing data for a single day. If the import is successful, the data will appear under Missing SSP Traffic, and you will be able to map it to the correct websites as usual.

<div data-with-frame="true"><img src="/files/99f4a442f4cb724100c8363b8d8b378c958f8339" alt=""></div>

<div data-with-frame="true"><img src="/files/0a413e5e266a3965166e57c93d726189fbb9af06" alt=""></div>
{% endstep %}
{% endstepper %}


# CSV Support for Web-Analytics Imports

Import web analytics data through scheduled CSV emails by configuring a Mail Import Analytics integration in Yield.

Just as you can receive your web analytics data via API calls, we also support importing it through daily CSV files.

### How to Get Started

Setting up your mail import of web analytics for the Ad Revenue Insights module is straightforward.

Go to **Configuration → Integrations → New Analytics System**.

<div data-with-frame="true"><img src="/files/fa7e68f8dcc212148e305ba3457fb4acfe3ee2ac" alt=""></div>

Here, you can choose the type of data import you would like to use. Simply select Mail Import Analytics.

<div data-with-frame="true"><img src="/files/cee5b16f65cbaeaa48cd26197863015564d7609e" alt="" width="563"></div>

Once selected, you can name the columns based on how they appear in your import file. You can also configure a few additional options:

* **CSV is a link** – we will attempt to read the data from the provided link.
* **Ignore data in emails for the date the email was sent** – this can help avoid importing incomplete data for that specific date.

You should also enter the sender’s email address, along with a keyword or phrase from the subject line to help identify the correct email. This is especially useful if multiple emails are sent from the same sender.

<div data-with-frame="true"><img src="/files/ed22e994c7fade07e4138aaddb7944d8319d2d85" alt="" width="563"></div>


# Mapping

Map placements, advertisers, buyers, DSPs, and labels.

Use this section to connect your reporting data to the right entities in Relevant Yield. These guides cover placement mapping, demand mapping, label setup, and tools for keeping mappings up to date.

### In this section

* [Mapping Ad Server and SSP Placement IDs to Relevant Yield Ad Revenue Insights Placements](/ad-revenue-insights/mapping/mapping-ad-server-and-ssp-placement-ids-to-relevant-yield-ad-revenue-insights-placements) — Map ad server and SSP placement IDs to Relevant Yield placements so Ad Revenue Insights can report revenue accurately.
* [Advanced Mapping Tool](/ad-revenue-insights/mapping/advanced-mapping-tool) — Review missing SSP traffic, match new placements, and import updated mappings into Yield with the advanced mapping tool.
* [Mapping Advertisers, Buyers and DSPs for Reporting](/ad-revenue-insights/mapping/mapping-advertisers-buyers-and-dsps-for-reporting) — Map advertisers, buyers, and DSPs in Ad Revenue Insights to reduce fragmentation and keep reporting consistent across dashboards and reports.
* [Importing Advertisers for Mapping from Your CRM](/ad-revenue-insights/mapping/importing-advertisers-for-mapping-from-your-crm) — Import advertiser mappings from your CRM with a CSV file to speed up demand mapping setup in Yield.
* [Adding Your Own Placement Labels](/ad-revenue-insights/mapping/adding-your-own-placement-labels) — Add custom placement labels to group inventory in Ad Revenue Insights and use them as a reporting dimension.


# Mapping Ad Server and SSP Placement IDs to Relevant Yield Ad Revenue Insights Placements

Map ad server and SSP placement IDs to Relevant Yield placements so Ad Revenue Insights can report revenue accurately.

During onboarding Ad Revenue Insights, one of the tasks is to map adserver and SSP placement ids to corresponding Relevant Yield placements.

{% hint style="info" %}
Before you start, ensure that SSPs and ad servers are saved in the Configuration > Integrations view.
{% endhint %}

### How to Map SSP IDs to the Corresponding Relevant Yield Placements

{% stepper %}
{% step %}

## Navigate to a Placement

Go to Publisher Accounts → Websites → Placement

<div data-with-frame="true"><img src="/files/c331e49f1cf4fbfddff3a8012a068b2cfb44d699" alt=""></div>
{% endstep %}

{% step %}

## Add your Ad Server

In placement settings, select your ad server. If it has not been integrated yet, follow [this guide](/ad-revenue-insights/data-connections/setting-up-a-new-ad-server-connection).

<div data-with-frame="true"><img src="/files/1620bc65a79f4d66dcabfdc84180288d6e8ceaf2" alt=""></div>
{% endstep %}

{% step %}

## Add an SSP and the SSP ID

* In the Placement settings, select the SSPs you wish to use for the placement. If no SSP has been integrated yet, follow [this guide](/ad-revenue-insights/data-connections/setting-up-a-new-ssp-connection-with-api).
* Enter the SSP ID in the ID field

<div data-with-frame="true"><img src="/files/2c15cc56815335bd63c854b6fd639ca287a8dede" alt=""></div>
{% endstep %}

{% step %}

## Remember to add all of the SSP you have

Use The onboarding sheet provided by your Technical account manager and fill in all of the SSPs ids.
{% endstep %}

{% step %}

## Save

<div data-with-frame="true"><img src="/files/25a6d8bac9bf877e5cdc8496534d1a72685d2fb8" alt=""></div>
{% endstep %}
{% endstepper %}

### Related articles

* [Mapping Advertisers, Buyers and DSPs for Reporting](https://help.relevant-digital.com/e3t/Ctc/OO+50013/cyHXp04/JlF2-6qcW8wLKSR6lZ3pBW2-yDD066xcWzW7mSxqh7TK55zW7YDgbb31f2xxW5pskGW8FdhttN7g_zyrnBby4W90MS5T25Pmd0W80SsmW5WtJ2BW1J99zd4n-723MwJrJVyVc2hW4swpmP22D-CgW1yQFtT15VfMtN73fPnXr4_zWW7djJ1q4NvRhKN1HsKxn10K0ZW5PRpS_3sqshRW5bCTcC1Z-XHrW8fzVPb5lP25HW8ts7jH6h18VlW7xdmsy46_8d_W5xVv1K41yRQ1W2Fl5YV19PMHbW3nsCWS5lYlwcV9B7587zLlyRW4wTrVD48Vpp0W1gWqfT77bHG1W855h5y7jwXw7W5st3F54rhjM1V5MtC06sc3gfd8qHcg04)
* [Importing Advertisers for Mapping from Your CRM](https://help.relevant-digital.com/e3t/Ctc/OO+50013/cyHXp04/JlF2-6qcW8wLKSR6lZ3pCW7wb-xk2QhlTDW96WdYV7z1sc-W5wqtbp73XNvYW8RCH4P9d7PzkW4nXMvg2QqYL9N2-_qb3ZznH1VFq3Q37PM-lbW8L3CM4997j1SW35g0xz5Cg8MRW4k3ldm1v1M1_W6L61m01PQYXkN7GKXsV66TmpW4kYWYp81tJwQW3ZrYTd7XfkBHW1VnvRn5RHqBJW3YDbPB3QMC-MVb4kp156nB12M4XcJzdMYgkW3MnPyJ4qMGvVW39LMxV4B618vW18Nk9565vw2NW6ByTKk6b-znkW7dB4Xs2CW-V5W6ZXc071fxy4JVVc-w96Pw6NpW18kx_638PLSFW4SgNnw4JC9lNW8h5L934_McRNf13m2TR04)
* [Setting Up a New Ad Server Connection](https://help.relevant-digital.com/e3t/Ctc/OO+50013/cyHXp04/Jll2-6qcW7Y8-PT6lZ3pKW5dqrMn7NV6PcW3hK0-H5ddfJwW8yctGy90WgcSW5rjhZf1HlcWXW55dsw75GSWQgTBVNX1KJxl-W8Kx7Zf4hDrbtW5x3-R_9lG8lNW3jKXh45LPwMpW974PGP84nfHJW3P22Sj2Bk1n5W9hCXkS6fRY5jW5Hw-7h2ZYGvhW5gDNdL6TvXFkW2B4cmw8RVZ3cW8WY0cn2G-YxyW5QhLSQ4Hf4yKW24PG731v_hDxW6_KvGn34XxsGW1WK3-B2ZQYNwW5sYBKR5k9zVbW1wyXP54GgGSvW29h2Ps7SqNTWW1VfQB41L2JDdW8NN8dd4NKfmCW1-pvPv8TQ6NTf5yStW-04)
* [Adding Your Own Placement Labels](https://help.relevant-digital.com/e3t/Ctc/OO+50013/cyHXp04/Jll2-6qcW7Y8-PT6lZ3pGW4hdw6h7SS_Y0VwDp8k7RQHBFW6GR61v7P3cyKW4F9R-W4s5zlVW8-C3kT442hcjW38q-mG18q0YqW1T7vLx2Pz0Y4W99gMMG8Kb-fbW8q3XrV3lRvhRW6m1d_j1K43zHW2mMNKq80T2TGW7wmMDr4FvrBcW1zGtCN2dqSfvW82-nd75wdMW8W3VlRWy52wXJsW18RMW52cncZjW83SkWQ25ZxFHW5ncQr_2N8yYTVZBH5Z4r15P-W6TfjpF1DyKWNW2KT52T6rTsfTW8nbHwr2qn3-QW8Ldc9-1Mtp1PW6gRbHP43r4pZW4lBbvw2hDZKMW4FC1P66VrTPVf1xshkT04)
* [Advanced Mapping Tool](https://help.relevant-digital.com/e3t/Ctc/OO+50013/cyHXp04/Jll2-6qcW7Y8-PT6lZ3mnW5wVP-11G5dz3W4cS1mt3H_5gLW1tqVHC7qfGRCW98gbY96P1bDvW8Z-CQF1PRX5fW1LQyxw8fRmFYW1xzzRW8NV3l-VJsgLT6B6DPWW1R8DdN2G6s1rW2TqWnm2j-28FW7nvxM98nSKp8W8JZP7B8s5N8KW76tFdW3XHvYXN4yJC4P4PwntW6MbL238d-JqNW3Yk4GC8QPsBSW7-cqvF2JNkM6W8c0h7124W1_ZW4l51d758fZJ4W4V6pHd3LcMC7W5TP-d25Q0k8ZW5dxrPD7TLWMcW6bk9Jh2jLc0wW7QfvY34zzzHqW6kks8M4-mVBhW8TTGb4727Q7Vf2bQxkl04)


# Importing Advertisers for Mapping from Your CRM

Import advertiser mappings from your CRM with a CSV file to speed up demand mapping setup in Yield.

If you prefer not to start the demand mapping from scratch, you can import your existing Advertiser setup from your CRM system using a CSV file.

This article explains how to import your existing advertiser setup from your CRM into Yield’s demand mapping. A general overview of demand mapping can be found [here](/ad-revenue-insights/mapping).

To get started, you should either reformat the CSV file from your CRM system or use the example file below. The CSV file will be imported into Yield, and it will map your advertisers accordingly. In addition, you can add an external ID, which can be any identifier you use in your CRM or elsewhere.

[**Click Here**](https://help.relevant-digital.com/hubfs/Import%20Advertisers%20Example.csv?hsLang=en) **to download an example CSV file.**

When creating your CSV file from your CRM system, the formatting should follow this structure:

```
IKEA, Ikea
IKEA, IKEA Systems B.V
IKEA, IKEA AT Adverserver
```

We do not support adding multiple advertisers on the same line, as some advertisers use commas in their names. In the example above, all advertisers would be mapped to “IKEA”.

To import the CSV to Yield, go to: **Configuration** → **Demand Mappings** → **Individual Advertisers**, then locate the “Import from .csv” button.

![](/files/c47ccd22c5d524ea415bd968b1511b44b6ad4879)

In the image below, you can see the process of selecting the correct columns based on the file you are uploading to the advertiser mapping.

<div data-with-frame="true"><img src="/files/8c856122176b85cdc843b6294b981b3d7ac723fa" alt=""></div>


# Advanced Mapping Tool

Review missing SSP traffic, match new placements, and import updated mappings into Yield with the advanced mapping tool.

Advanced mapping allows you to review and adjust mappings for new placements to ensure data is accurately reflected in your reports.

It is recommended to use this functionality periodically (for example, once a week). It will pick up recently added placements in your ad server and SSP accounts, ensuring the data is included in your reports.

The import is not performed automatically because inconsistencies in placement naming could result in incorrect mapping. For this reason, the advanced import includes a step where you can review and adjust the mapping before the import is completed.

{% stepper %}
{% step %}

### Check missing SSP traffic

Open **Admin** > **Missing SSP Traffic** to see whether data is currently missing from standard Yield reports.

<div data-with-frame="true"><img src="/files/8f9fa716e09eb9f710882826ad3a972ddb112dd6" alt=""></div>

If the report shows substantial data, continue with the bulk import.
{% endstep %}

{% step %}

### Open Advanced Mapping

Go to **Publisher Accounts** and click the ![](/files/bb99dd7396f3192c2b28d8339ec03a2650890460) **Advanced Mapping** button.

<div data-with-frame="true"><img src="/files/20cab22adeb7c695f762a70329ea3ed804e16677" alt=""></div>

The dialog looks like this:

<div data-with-frame="true"><img src="/files/059338fb69e19cfa1a0a82570164e718d9dd4334" alt=""></div>

You usually do not need to change the settings. If you see a lot of traffic without revenue on the **Missing SSP Traffic** page, consider enabling **Only import placements with revenue (not only traffic)**. Click **Save as default** to keep that setting.
{% endstep %}

{% step %}

### Generate the structure

Click **Generate structure**. This does not update the system. It only shows which SSP placements will be added and where they will go when you later click **Perform import**.

<div data-with-frame="true"><img src="/files/c639f6797a6ebf1b69fdc1a78ab68f8b37a81d7a" alt=""></div>

Grey text shows existing publishers, sites, and placements. Black text shows new ones. Enable **Show all existing** if you want to view the full structure, including areas where nothing will be added.
{% endstep %}

{% step %}

### Review and adjust matches

Check the placements listed under **Failed Matches** on the right. These are placements where the import could not determine the correct Publisher, Site, or Placement. Add these manually later through the Publisher pages.

If an SSP placement appears in the wrong location, select it and click the first **Move** button. If you do not want to import a placement yet, click **Exclude from this import**.

The other **Move** and **Exclude** buttons work the same way for selected new placements or sites.

<div data-with-frame="true"><img src="/files/29f5b68e83d071c9729800ef73c6ba8ff7a4b0b5" alt=""></div>

After clicking **Ok**, review the updated tree.
{% endstep %}

{% step %}

### Perform the import

When everything looks correct, click **Perform import** to apply the update.

<div data-with-frame="true"><img src="/files/f64c425a193549700be0c7a65453d2b8601b614b" alt=""></div>

{% hint style="warning" %}
All placements shown in the tree view on the left will be imported, unless **Show all existing** has been selected, in which case everything will be displayed. The checkboxes are only used for the Move/Exclude functionality and do not indicate whether placements will be imported.
{% endhint %}
{% endstep %}
{% endstepper %}

In conclusion, it is recommended to perform an import every one to two weeks to avoid "losing" too much traffic in the reports. Most of the time, however, the procedure simply involves pressing the Generate and Perform import buttons.


# Mapping advertisers, buyers and DSPs for reporting

Map advertisers, buyers and DSPs in Ad Revenue Insights to reduce fragmentation and keep reporting consistent across dashboards and reports.

The Ad Revenue Insights module lets you map advertisers, buyers, deals and DSPs. Mapping reduces data fragmentation and keeps reporting consistent.

Values collected through API connections can use different naming conventions. The same advertiser, buyer or DSP can appear under multiple entries.

Mapping lets you:

* Align advertisers and buyers with your CRM structure.
* Show each advertiser, buyer or DSP as a single entry.
* Create custom mappings for advertisers, buyers and business verticals.

Go to **Configuration** → **Demand Mappings** to access the feature. Use the **Advertisers**, **Buyers**, **Deals** and **DSPs** tabs to manage each mapping type.

<div data-with-frame="true"><figure><img src="/files/qGftLf8U2EtRRI6tsqHN" alt=""><figcaption></figcaption></figure></div>

### Mapping advertisers

Your account includes a default advertiser mapping with common mappings from Relevant Digital. Create a custom mapping when it does not meet your needs. Group entries under one advertiser when ad servers and SSPs use different names.

Advertiser mapping gives you:

* A single advertiser view across ad servers and SSPs.
* Reports that match your CRM advertiser structure.
* Automatic grouping for new advertiser names that match your rules.

Go to **Configuration** → **Demand Mappings** → **Advertisers**. Create an advertiser list or select the default list for dashboards and reports. You can select a different list for an individual dashboard or report.

To add or edit a list, use **"Add new mapping from target advertiser"**. Map multiple advertisers to one target advertiser. The first advertiser becomes the target. The mapping appears in the list on the right.

Review matches from the last 60 days after mapping an advertiser. Edit the advertiser to add semantic rules. These rules include new matching advertisers automatically.

<div data-with-frame="true"><img src="/files/9c0b79cbd7dbb7eabe0e10ef6ec9faa384a28d32" alt=""></div>

Select **"Map words / phrases"** to add new matching advertisers as they enter Relevant Yield. Select **"Last 60 days"** to review a rule’s impact.

{% hint style="info" %}
The **Last 60 days** preview shows advertisers the rule could affect. It does not show the final mapping outcome. For example, a rule for `Volvo` can show `Volvo SUV` in the preview, even when `Volvo SUV` has its own mapping.
{% endhint %}

### Override deal mapping to a specific advertiser

Go to **Configuration** → **Demand Mappings** → **Deals**.

Deal mapping follows the advertiser mapping process. Override the incoming advertiser when a subcontractor creates a deal or the advertiser is mislabelled. Assign the deal to the correct advertiser instead.

Deal mapping gives you:

* Accurate advertiser attribution.
* Reports that better reflect your sales reality.

### Mapping buyers

Go to **Configuration** → **Demand Mappings** → **Buyers**. Buyer mapping follows the advertiser mapping process.

Buyer mapping gives you:

* A single buyer view across API connections.
* Consistent buyer dimensions in dashboards and reports.
* Buyer groups that align with your CRM structure.

### Mapping DSPs

SSPs can use different names for DSPs. DSP mapping unifies these names.

Go to **Configuration** → **Demand Mappings** → **DSPs**. DSP mapping follows the advertiser mapping process.

DSP mapping gives you:

* A single DSP view across SSP reporting.
* Consistent DSP names when SSPs use different conventions.
* Clearer comparison of DSP performance across demand sources.

### Use a mapping in a dashboard or report

In each dashboard or report, select the advertiser or buyer mapping through **"Other options"** in the settings view.

<div data-with-frame="true"><img src="/files/e4e9e99f6feb3c15a643fb4fec4fff7bb7582164" alt="" width="375"></div>

When you use the buyer or advertiser dimension, the list of entries reflects the selected mapping. Different dashboards and reports can use different advertiser mappings.

### Parent mapping

The **Parent mapping** option appears below each mapping group name. It attaches a personal mapping to an existing default or global mapping group. It does not change those groups or affect other users’ reports and mappings.

<div data-with-frame="true"><img src="/files/7896c0c4fe1907f6f2e97de1b327295aea2b41a6" alt=""></div>

Set your mapping’s parent to your company’s default mapping group to use both together. Reports using your mapping apply your personal settings alongside the company-wide defaults.


# Adding Your Own Placement Labels

Add custom placement labels to group inventory in Ad Revenue Insights and use them as a reporting dimension.

A placement label allows you to organise your different placements for Ad Revenue Insights reporting. The function is primarily used as an alternative grouping or reporting dimension compared with the standard “placement” dimension.

## How Does It Work?

If you go to your placements (in Publisher accounts → edit a publisher → choose and expand a website), you will see the placement label as an empty field next to the placement’s name:

<div data-with-frame="true"><img src="/files/b1a635cd39f52a6f9b8aa21249bfb96e54688b69" alt=""></div>

When you start typing a label, a list will automatically populate. This list can then be used from the drop-down menu on the next placement, so you do not need to re-enter the same value multiple times.

The label list will always consist of the labels actively used in the system. To remove a label entry, simply ensure it is not used by any of your placements.

## What Can You Use It For?

A label can be anything, as it is an open label that your organisation can use to group placements in a way that is important to you. Here are a few examples to get you started:

* **Media type:** Display, Native, Video, App
* **Above or below the fold**
* **Front page vs articles** (if you use different placements for this)
* **Content groupings across websites:** News, Cars, Sports, Fashion

Please note that only one placement label can be attached to each placement, so it is worth considering which approach brings your organisation the most value.

## How to Report on It

Once you have entered the first placement label, a list will be generated, and this will activate Placement labels in the API reporting dimensions. Simply select the dimension and run your report, or create your dashboard using it.

If you cannot find Placement labels as a dimension, please ensure that you have added at least one placement label to a placement.


# Forecasting

Work with forecast dimensions, reports, and dashboards.

Use this section to activate forecasting, build forecast reports, and understand what forecast data includes. These guides cover setup, limitations, and the dimensions and metrics available in forecast reporting.

### In this section

* [Forecast Reporting and Dashboards](/ad-revenue-insights/forecasting/forecast-reporting-and-dashboards) — Activate forecast imports, build forecast reports and dashboards, and understand how forecast data is collected and limited in Relevant Yield.
* [Forecast Dimensions and Metrics](/ad-revenue-insights/forecasting/forecast-dimensions-and-metrics) — Review the dimensions and metrics available in GAM forecast reports and dashboards in Ad Revenue Insights.


# Forecast Dimensions and Metrics

Review the dimensions and metrics available in GAM forecast reports and dashboards in Ad Revenue Insights.

## This article highlights the dimensions and metrics available in the ad server forecast reports and dashboards.

{% hint style="info" %}
Forecasts are currently only available for GAM.
{% endhint %}

**The following dimensions are available (they can also be used as filters):**

| Dimension      | Description                                                                                                |
| -------------- | ---------------------------------------------------------------------------------------------------------- |
| **Date**       | Displays the dates, based on your selected date granularity.                                               |
| **Ad Server**  | Shows the ad server from which the forecast data is collected.                                             |
| **Publisher**  | Shows the publisher to which the data is mapped in Relevant Yield.                                         |
| **Site**       | Shows the site to which the data is mapped in Relevant Yield.                                              |
| **Placement**  | Shows the placement to which the data is mapped in Relevant Yield.                                         |
| **Source**     | Shows the source to which the data is mapped in Relevant Yield.                                            |
| **Sales Rep.** | Shows the forecast based on the advertisers mapped to a particular sales representative in Relevant Yield. |
| **Advertiser** | Shows the forecast per advertiser in Relevant Yield.                                                       |
| **Line Item**  | Shows the forecast per line item.                                                                          |
| **Order**      | Shows the forecast per order.                                                                              |

#### The following metrics are available:

| Metric                   | Description                                                                                 |
| ------------------------ | ------------------------------------------------------------------------------------------- |
| **Revenue**              | The forecasted revenue from the ad server. Only direct and guaranteed deals are considered. |
| **Forecasted Inventory** | The expected inventory in the ad server.                                                    |
| **Reserved Impressions** | The currently reserved impressions, based on the latest import of forecasting data.         |
| **Sell-through %**       | The sell-out rate, expressed as a percentage of inventory versus reserved impressions.      |

<div data-with-frame="true"><img src="/files/622bc297af5159fb4f57721faac892eeb7020eed" alt="" width="375"></div>


# Forecast Reporting and Dashboards

Activate forecast imports, build forecast reports and dashboards, and understand how forecast data is collected and limited in Relevant Yield.

In this section, we describe forecast reports, including their functionality, underlying data sources, and important do’s and don’ts.

### What is the forecast report?

The forecast report can be used to get an overview of the sell-out rate on your websites. It is intended to give the user a broad perspective on how much inventory remains and whether target sell-out rates are being achieved.

The forecast report can be added as a regular report, as a dashboard, or even used as an alarm.

{% hint style="info" %}
The forecast report is not activated by default. You can ask our support team for help or enable it yourself by following the steps below.
{% endhint %}

### Activating the forecast report

You activate the forecast report by enabling the import of ad server forecasting data and then saving.

This function can be found at: Configuration -> Integration. Press **Edit** on the "GoogleAdX" type SSP in the column of your existing SSPs:

<div data-with-frame="true"><img src="/files/382b84b22a6d2da2bb54591bcf1d88e13ee1a673" alt=""></div>

Then locate the **Settings for ad server forecast data import** section. Check the box to enable the import and save the data.

<div data-with-frame="true"><img src="/files/e5f3fb52651f14f463af986074c9c3c68c1f481a" alt=""></div>

{% hint style="info" %}
The first import of forecast data runs with the normal data population on the following day. If you need the data earlier, open **Edit** again on your **GoogleAdX** SSP and click **Import data** manually for up to 90 days.
{% endhint %}

![](/files/ed126715b975d63fdae8896b0796538aacfe0272)

### Setting up the forecast report

If you would like to set up a forecast report, simply select the **API Adserver Forecast type report** (or dashboard):

<div data-with-frame="true"><img src="/files/381624e74c1964804fcaa9e4d01a5b4d6cb6e04c" alt=""></div>

### How we collect and use the data

The forecast report and dashboard are based on ad server data collected from the ad server APIs. We collect this data once a day during our normal import cycle, so it is important to understand that the data visible in Relevant Yield might differ slightly from the current data in your ad server during the day.

One thing to consider is that the forecast report reflects reserved impressions, so OpenRTB and non-guaranteed deals are not included. This means that the forecast report should be considered as the "minimum currently sold", as OpenRTB and non-guaranteed deals are likely to be added on top of this data.

### What can be reported on

Below is a screenshot of all available dimensions and metrics in the forecast reports. More about the different API forecast report dimensions and metrics can be found [here](/ad-revenue-insights/forecasting/forecast-dimensions-and-metrics).

<div data-with-frame="true"><img src="/files/a3f9bd7c0ecd42ac1a51a4cb8e85eecfd0b98aad" alt="" width="375"></div>

### Limitations

{% hint style="warning" %}
The forecast report currently works only for accounts that do not use custom targeting keys.
{% endhint %}


# Exports

Export Ad Revenue Insights data to CSV.

Export Ad Revenue Insights data to CSV. Download reports manually, schedule CSV deliveries, or export structure IDs.

### In this section

* [Extracting Reporting Data via Manual or Emailed CSV](/ad-revenue-insights/exports/extracting-reporting-data-via-manual-or-emailed-csv) — Download report data manually or schedule CSV deliveries from saved reports.
* [Exporting Publisher and Website Structure IDs to CSV](/ad-revenue-insights/exports/exporting-publisher-and-website-structure-ids-to-csv) — Export publisher and website structure IDs for auditing and data checks.


---

[Next Page](/llms-full.txt/1)